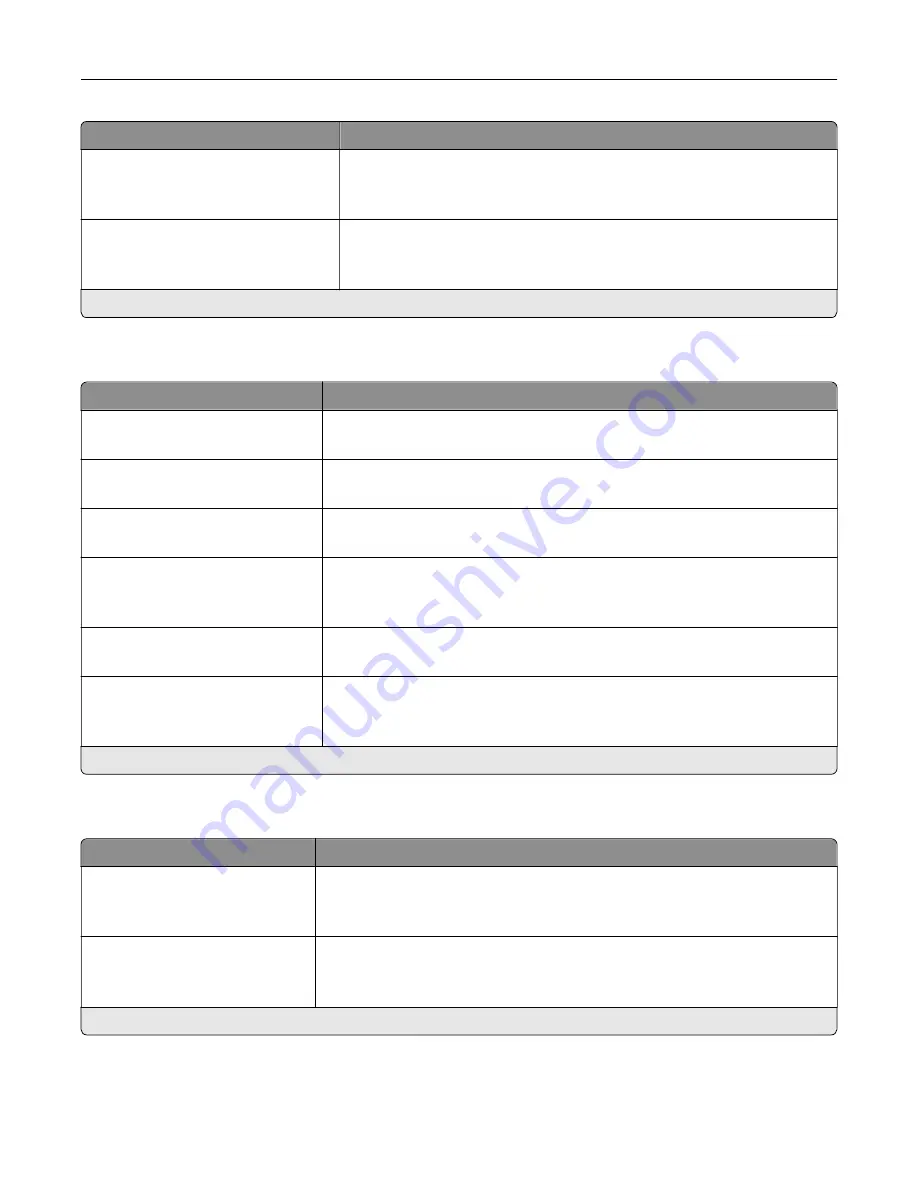
Menu item
Description
Tray Renumber
View Factory Defaults
Restore Defaults
Show or restore the factory default setting assigned to each tray or feeder.
Print Timeout
Off
On*
Set the printer to end a print job after it has been idle for the specified
amount of time.
Note:
When set to On, the factory default setting is 90 seconds.
Note:
An asterisk (*) next to a value indicates the factory default setting.
HTML
Menu item
Description
Font Name
[List of fonts] (Times*)
Set the font to use for HTML documents.
Font Size
1–255 (12*)
Set the font size to use for HTML documents.
Scale
1–400% (100*)
Scale HTML documents.
Orientation
Portrait*
Landscape
Set the page orientation for HTML documents.
Margin Size
8–255 mm (19*)
Set the page margin for HTML documents.
Backgrounds
Do Not Print
Print*
Print background information or graphics for HTML documents.
Note:
An asterisk (*) next to a value indicates the factory default setting.
Image
Menu item
Description
Auto Fit
On
Off*
Select the best available paper size and orientation setting for an image.
Note:
When set to On, this menu item overrides the scaling and orientation
settings for the image.
Invert
Off*
On
Invert bitonal monochrome images.
Note:
This menu item does not apply to GIF or JPEG image formats.
Note:
An asterisk (*) next to a value indicates the factory default setting.
Understanding the printer menus
57
Содержание M3250
Страница 1: ...M3250 MS622 User s Guide April 2018 www lexmark com Machine type s 4600 Model s 835 895 ...
Страница 5: ...Notices 171 Index 183 Contents 5 ...
Страница 97: ...4 Remove the used pick tires one after the other 5 Unpack the new pick tires Maintaining the printer 97 ...
Страница 99: ...4 Remove the tray insert and then flip the tray base Maintaining the printer 99 ...
Страница 100: ...5 Remove the used pick roller assembly 6 Unpack the new pick roller assembly Maintaining the printer 100 ...
Страница 101: ...7 Insert the new pick roller assembly 8 Flip the tray base and then insert the tray insert Maintaining the printer 101 ...
Страница 107: ...Jam location 1 Standard bin 2 Rear door 3 Tray x 4 Multipurpose feeder 5 Door A Clearing jams 107 ...
Страница 108: ...Paper jam in door A 1 Remove the tray 2 Open door A 3 Remove the toner cartridge Clearing jams 108 ...
Страница 115: ...3 Flex fan and align the paper edges before loading 4 Reload paper and then adjust the paper guide Clearing jams 115 ...
Страница 163: ...7 Attach the ISP kit to the printer Upgrading and migrating 163 ...
Страница 165: ...b Connect the ISP extended cable to the ISP connector Upgrading and migrating 165 ...
Страница 166: ...c Install the hard disk Upgrading and migrating 166 ...


