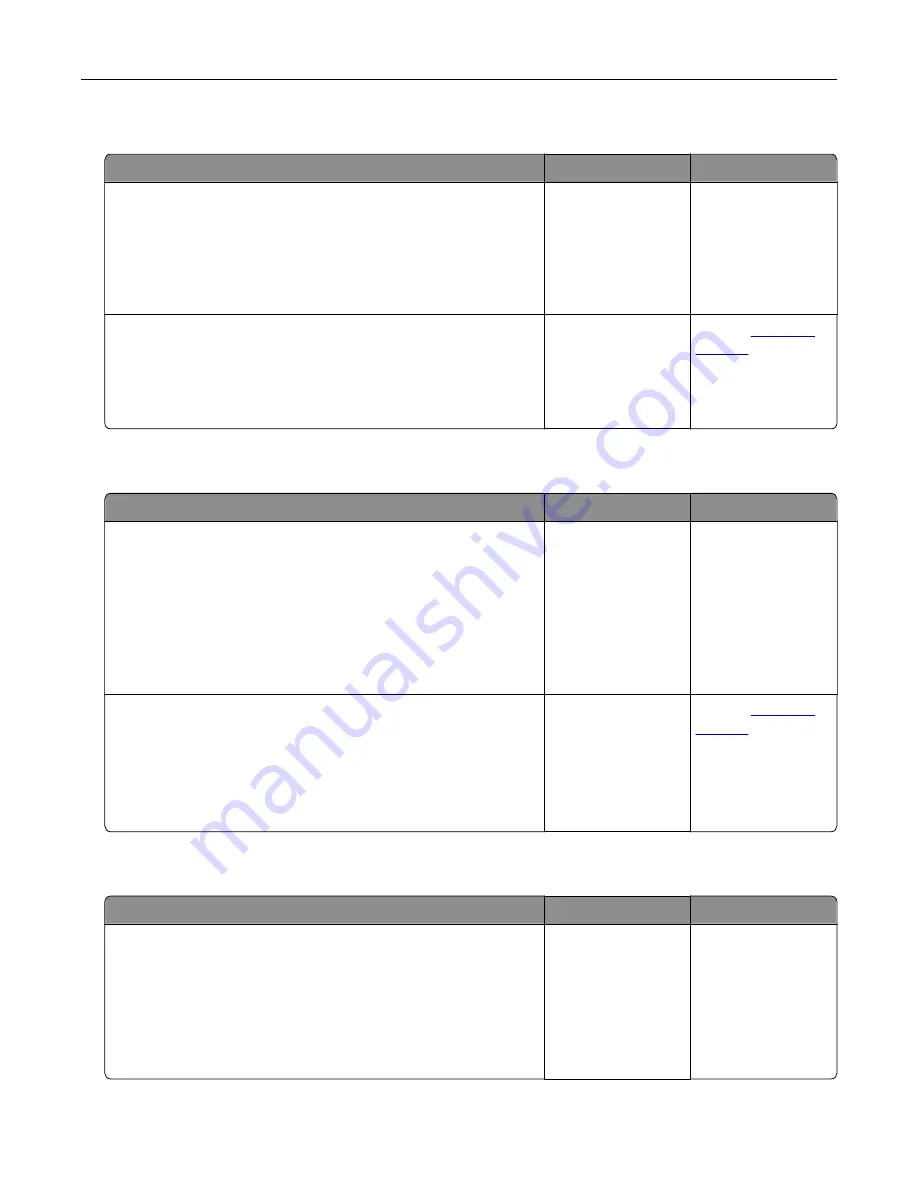
Partial copies of document or photo
Action
Yes
No
Step 1
a
Make sure that the document or photo is loaded facedown on
the upper left corner of the scanner glass.
b
Copy the document or photo.
Is the document or photo copied correctly?
The problem is
solved.
Go to step 2.
Step 2
a
Match the paper size setting and the paper loaded in the tray.
b
Copy the document or photo.
Is the document or photo copied correctly?
The problem is
solved.
Contact
Poor copy quality
Action
Yes
No
Step 1
a
Clean the scanner glass and the ADF glass with a damp, soft,
lint
‑
free cloth.
b
Make sure that the document or photo is loaded facedown on
the upper left corner of the scanner glass.
c
Copy the document or photo.
Is the copy quality satisfactory?
The problem is
solved.
Go to step 2.
Step 2
a
Check the quality of the original document or photo.
b
Adjust the scan quality settings.
c
Copy the document or photo.
Is the copy quality satisfactory?
The problem is
solved.
Contact
Scan job was not successful
Action
Yes
No
Step 1
Check the cable connections.
a
Make sure that the Ethernet or USB cable is securely connected
to the computer and the printer.
b
Resend the scan job.
Is the scan job successful?
The problem is
solved.
Go to step 2.
Troubleshooting
163
Содержание CX820 Series
Страница 1: ...XC8100 Series User s Guide March 2016 www lexmark com Machine type s 7564 Model s 596 598 ...
Страница 60: ...2 Remove and empty the hole punch box 3 Insert the hole punch box 4 Close door J Maintaining the printer 60 ...
Страница 64: ...2 Open door A 3 Remove the waste toner bottle Maintaining the printer 64 ...
Страница 69: ...2 Open door A 3 Remove the waste toner bottle Maintaining the printer 69 ...
Страница 72: ...2 Open door A 3 Remove the waste toner bottle Maintaining the printer 72 ...
Страница 76: ...3 Remove the pick roller 4 Unpack the new pick roller Maintaining the printer 76 ...
Страница 83: ...4 Remove the waste toner bottle 5 Open door A1 6 Remove the transfer belt Maintaining the printer 83 ...
Страница 93: ...2 Open door G 3 Remove the staple cartridge 4 Unpack the new staple cartridge Maintaining the printer 93 ...
Страница 95: ...2 Open door G 3 Pull out the staple cartridge holder Maintaining the printer 95 ...
Страница 113: ...2 Remove the jammed paper Note Make sure that all paper fragments are removed Clearing jams 113 ...
Страница 119: ...2 Open door G 3 Pull out the staple cartridge holder Clearing jams 119 ...
Страница 123: ... Area J1 Areas J3 and J4 Areas J5 and J6 3 Close door J Clearing jams 123 ...
Страница 127: ...Staple jam in door J 1 Open door J 2 Remove the staple cartridge holder Clearing jams 127 ...
Страница 129: ...5 Insert the staple cartridge holder 6 Close door J Clearing jams 129 ...
Страница 179: ...Installing the staple finisher 1 Turn off the printer 2 Open door C 3 Remove the paper bail Upgrading and migrating 179 ...
Страница 182: ...4 Open the covers at the right side of the caster base 5 Open door C Upgrading and migrating 182 ...


