2-2
Service Manual
5026
Operator panel and menus
Operator panel
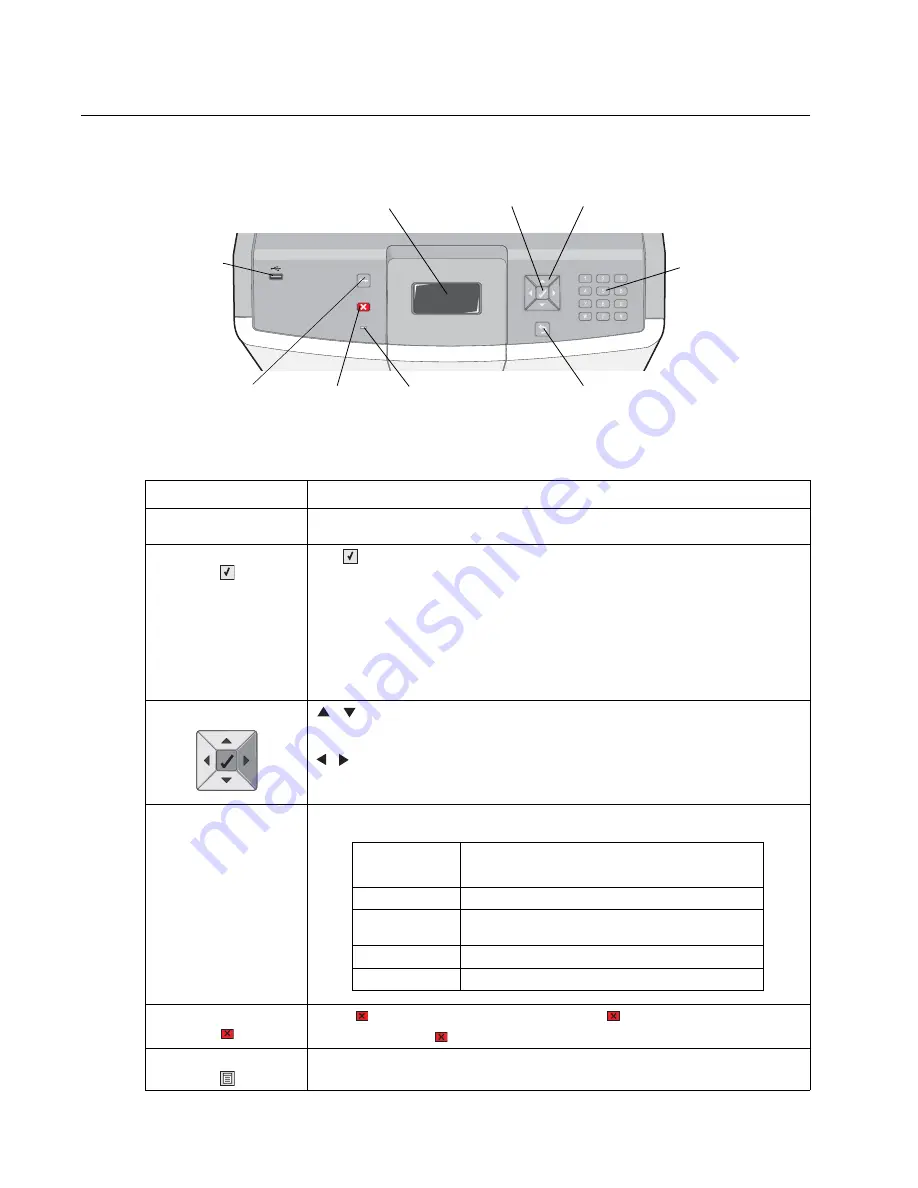
Buttons and light description
Button or light
Function
Display
The display shows messages and pictures that communicate the status of the
printer.
Select
The
button functions as a select button. Press this button to:
• Open a menu and display the first item in the menu (called a menu item).
• Open a menu item and display the default setting.
• Save the displayed menu item as the new user default setting. The printer
issues a
Saved
or
Submitted Selection
message and returns to the menu item.
Note:
When a new setting is saved as the user default setting, it remains in effect
until new settings are saved or until factory defaults are restored. Settings chosen
from the software application can also change or override the user default settings
selected from the operator panel.
Navigation arrow buttons
,
—Press these buttons to scroll up or down through menus, menu items, or
settings, called menu item values, or to scroll between screens and menu values.
Each press moves one item in the list or a different setting for a menu item.
,
—Press these buttons to scroll items that wrap off of the screen. For menu
items with numeric values, such as Copies, press and hold this button to scroll
through the values. Release the button when the needed number appears.
Indicator light
The two-toned light emitting diode called the indicator light on the operator panel
gives information about the status of the printer using the colors red and green.
Stop
Press
to stop or suspend all job activity. The
functions as a stop button.
If printing, pressing
causes the Stop screen to appear on the display.
Menu
Press to open the administration menus. These menus are only available when the
printer is in the
Ready
state.
Display
Select
Navigation arrow
Numeric
keypad
Back button
Indicator light
Cancel/
Stop
Menu button
USB direct
port
button
buttons
Indicator light
status
Indicates
Off
Printer power is off.
Blinking green
Printer is warming up, processing data, or
printing a job.
Solid green
Printer is on, but idle.
Solid red
Operator intervention is required.
Содержание C734 series
Страница 13: ...Notices and safety information xiii 5026 ...
Страница 14: ...xiv Service Manual 5026 ...
Страница 170: ...2 136 Service Manual 5026 ...
Страница 255: ...Repair information 4 39 5026 11 Press the two tabs F to separate the right cover from the rear right cover F ...
Страница 284: ...4 68 Service Manual 5026 7 Remove the two screws G 8 Remove the duplex reference edge guide assembly G ...
Страница 288: ...4 72 Service Manual 5026 12 Remove the seven screws M securing the EP drive ...
Страница 339: ...Repair information 4 123 5026 13 Remove the three printhead mounting screws D ...
Страница 346: ...4 130 Service Manual 5026 f Scroll down to Quick Test and press Select A page similar to this one prints ...
Страница 395: ...Connector locations 5 1 5026 5 Connector locations Locations ...
Страница 408: ...7 2 Service Manual 5026 Assembly 1 Covers ...
Страница 410: ...7 4 Service Manual 5026 Assembly 2 Front ...
Страница 412: ...7 6 Service Manual 5026 Assembly 3 Right 1 2 3 4 5 6 ...
Страница 414: ...7 8 Service Manual 5026 Assembly 4 Rear ...
Страница 422: ...7 16 Service Manual 5026 Assembly 10 Optional high capacity input option HCIT 4 2 1 6 5 7 8 11 12 10 13 14 3 9 ...
Страница 424: ...7 18 Service Manual 5026 Assembly 11 Options and features ...
Страница 426: ...7 20 Service Manual 5026 ...
Страница 436: ...I 10 Service Manual 5026 ...


