background image

Continue this process until all of your controllers 

have been updated. Each time you successfully 

update your controller it will be removed from the 

list. Once all of your controllers have been updated, 

press the right soft key      to continue to the 

NEXT 

STEP.

Create Areas

NOTE:

 The 

INSTALL 

CHECKLIST

 screen will appear 

with the selection box around 

STEP 4 - Create Areas

 when 

NEXT STEP

 is chosen from 

STEP 2

.

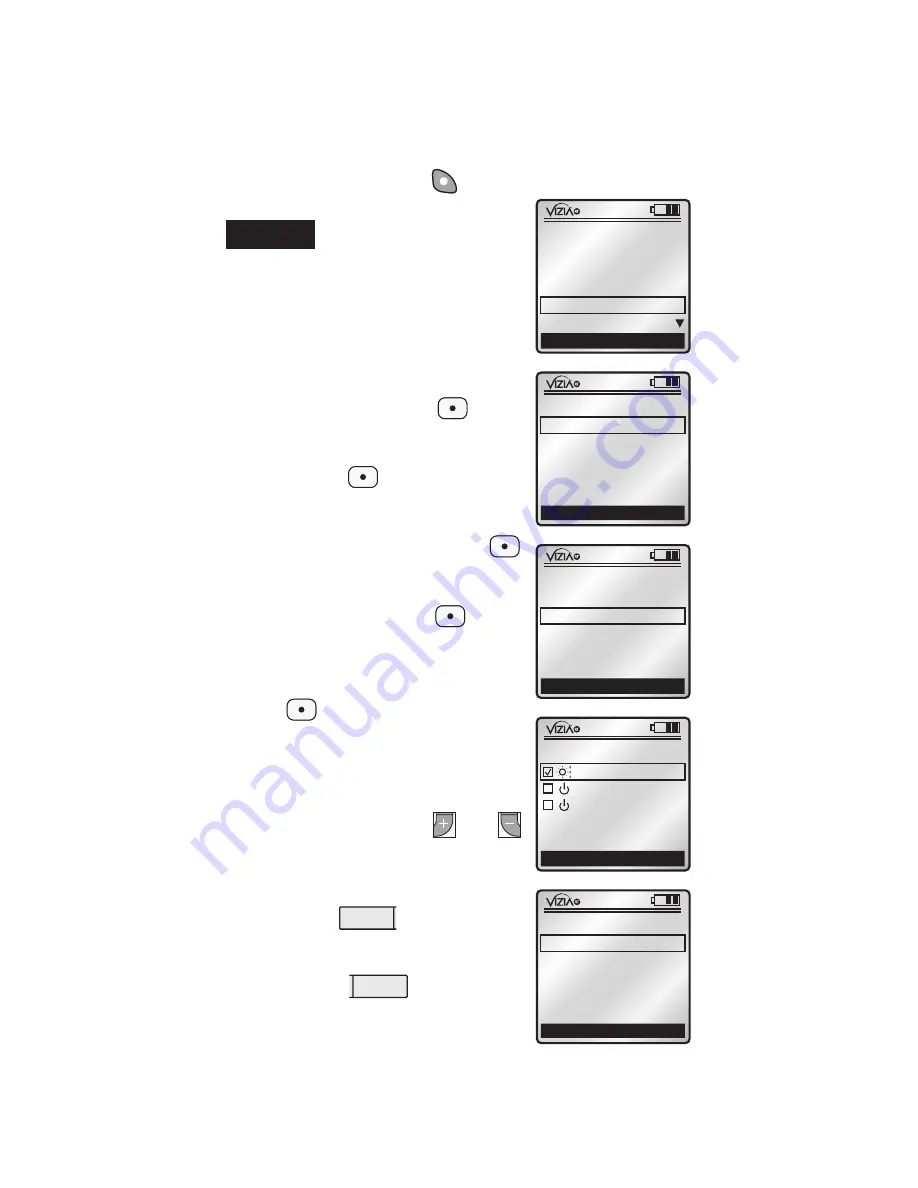
Press the center button       to  

bring up the 

AREA

 screen. With  

<< NEw >>

 selected press the 

center button       to bring up the 

CREATE AREA

 screen. You 

can now name your new area 

by pressing the center button   

(refer to TEXT EDITOR pg. 6). 

Once you name your new area, 

press the center button       to 

save the information and return 

to the 

CREATE AREA 

screen.

Scroll to and press the center 

button       to select 

Add Devices


which will bring up a list of the 

dimmers and switches you 

included in 

Step 1

 to add to your 

new area. Scroll to each device 

check box and use the 


and       

buttons to either add or subtract 

each device from your area. 

NOTE:

 You can use the  

4 ON

 button            on the 

bottom of the RZCPG to select 

ALL

 devices simultaneously. The 

4 Off

 button            deselects 

ALL

 devices. This feature will 

work whenever you encounter 

check box lists. 

9

STEP 4

x1

Cancel

CREATE AREA

 Name: Area #1
 Add Devices...

Save

x1

Back

(3)

AREA #1

Bedroom
Bathroom

Hall

 selected 1

Who Is

x1

Back

Next Step

AREA

<< NEW >>

Area #1

x1

Back

Next Step

AREA

<< NEW >>

x1

Back

INSTALL CHECKLIST

1. Include Dim/Swch
2. Include Controller
3. Update Controller
4. Create Areas
5. Set Associations

Next Step

1  

ON 

2  

ON 

3  

ON 

4  

ON 

OFF 

OFF 

OFF 

OFF 

x1 

12:00 PM 

Mon 05.01.200 6 

Default Pr ofil e 

Stand By

Menu

1  

ON 

2  

ON 

3  

ON 

4  

ON 

OFF 

OFF 

OFF 

OFF 

x1 

12:00 PM 

Mon 05.01.200 6 

Default Pr ofil e 

Stand By

Menu

ON

OFF

ON

OFF

Содержание Vizia RF RZCPG

Страница 1: ...Programmer Remote Cat RZCPG USER GUIDE Compatible with enabled products TM 1 ON 2 ON 3 ON 4 ON OFF OFF OFF OFF...

Страница 2: ...eas 9 10 Set Associations 10 11 Security 11 Install Complete 12 MAIN Menu screen 13 device list 13 who is 13 area 14 profile 14 15 events 15 16 settings 16 DATE TIME 16 CONTRAST 17 BUZZER 17 LOCATION...

Страница 3: ...ent has been tested and found to comply with the limits for a Class B Digital Device pursuant to Part 15 of the FCC Rules These limits are designed to provide reasonable protection against harmful int...

Страница 4: ...RZCPG unless prompted otherwise MENU NAVIGATION and ICONS Navigating screens and menus on your RZCPG is accomplished using the following buttons x1 Back MAIN MENU 1 Device List 2 Who Is 3 Area 4 Profi...

Страница 5: ...ht side arrow buttons to toggle between choices x1 Cancel Save All Devices 1 All Devices 2 ON 3 Default Fade x1 Cancel Save All Devices 1 All Devices 2 ON 3 Default Fade 1 ON 2 ON 3 ON OFF OFF OFF x1...

Страница 6: ...ll Events are Disabled Buzzer OFF indication Buzzer OFF Buzzer ON Error Indication Event Recurrence One Time Event Date Time of Day or Dawn Dusk Offset Filter data on screen is filtered Power Adapter...

Страница 7: ...ller 4 Create Areas 5 Set Associations Next Step x1 Back 3 Update Controller 4 Create Areas 5 Set Associations 6 Security 7 Install Complete Next Step INSTALL CHECKLIST 5 1 ON 2 ON 3 ON 4 ON OFF OFF O...

Страница 8: ...ur device NOTE The right soft key will toggle from Template to Abc to ABC to abc to 123 and back to Template again This feature allows you to access the template names or to select capital undercase l...

Страница 9: ...ust be placed into program mode before they can be included into the network refer to individual device instruction sheet Once your controller has been placed in program mode press the center button o...

Страница 10: ...ll prompt you to stand within 3 feet of that controller Press the right soft key YES to update your controller NOTE It is important that you remain within 3 ft of the controller you ve selected from t...

Страница 11: ...nter button to select Add Devices which will bring up a list of the dimmers and switches you included in Step 1 to add to your new area Scroll to each device check box and use the and buttons to eithe...

Страница 12: ...ER ASSOC screen will display with the selection box around 1 Button prompting you to select the button on your controller that you wish to associate an area to Use side arrow buttons to toggle if appl...

Страница 13: ...e between choices OPEN RZCPG Lock and System Lock Press right soft key Save to complete NOTE Selecting RZCPG Lock will lock the RZCPG When you return to the HOME screen you will not have access to the...

Отзывы: