201
Push Button method
Wireless Gateway
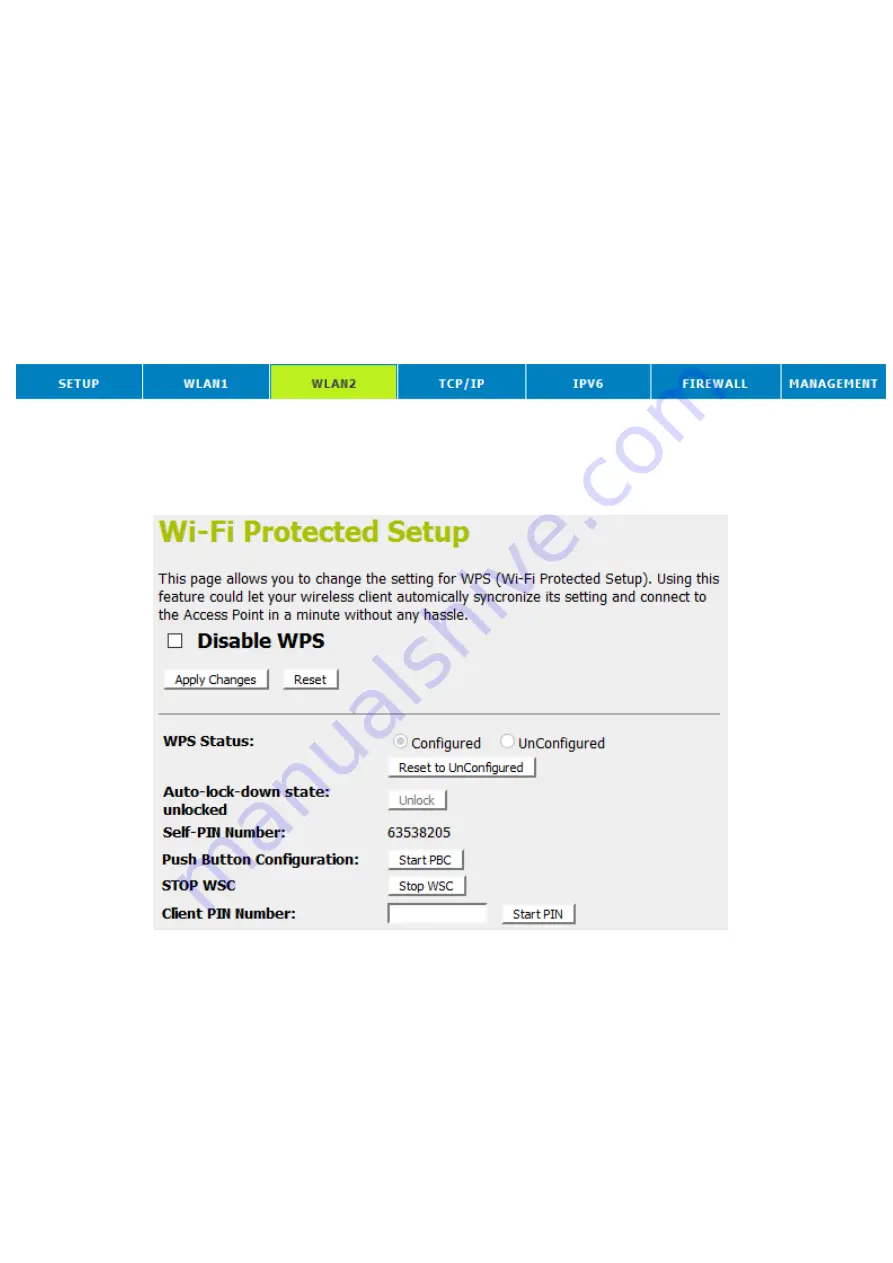
supports a virtual button “Start PBC” on the
Wi-Fi Protected Setup page
for Push Button method. If users
push a virtual button “Start PBC”, AP will initiate a WPS session
and wait for any station to join. At this moment, AP will detect
whether there is more than one station that starts the PBC
method. When multiple PBC sessions occur, users should try
PIN method.
After users push AP’s virtual button “Start PBC”, they must go to
station side to push its button within two minutes. If the WPS is
successfully done, AP will give its wireless profile to that station.
The station could use this profile to associate with AP.
1. From the head menu, click on
WAN2
.
2. From the left-hand menu, click on
WPS
. The following page
is displayed:
3. Make sure AP is in un-configured state.
4. Click
Start PBC
.
Содержание WGR-8031
Страница 1: ...1 LevelOne User Manual WGR 8031 Version v1 0_20160321...
Страница 15: ...15 2 Single RIGHT click on Local Area connection then click Properties...
Страница 16: ...16 3 Double click on Internet Protocol TCP IP...
Страница 18: ...18 For Windows Vista 32 64 1 Click on Start Control Panel View network status and tasks...
Страница 19: ...19 2 In the Manage network connections click on Manage network connections to continue...
Страница 20: ...20 3 Single RIGHT click on Local Area connection then click Properties...
Страница 23: ...23 For Windows 7 32 64 1 Click on Start Control Panel in Category View View network status and tasks...
Страница 24: ...24 2 In the Control Panel Home click on Change adapter settings to continue...
Страница 25: ...25 3 Single RIGHT click on Local Area Connection then click Properties...
Страница 26: ...26 4 Double click on Internet Protocol Version 4 TCP IPv4...
Страница 28: ...28 For Windows 8 8 1 32 64 1 Move the mouse or tap to the upper right corner and click on Settings...
Страница 29: ...29 2 Click on Control Panel...
Страница 31: ...31 5 Single RIGHT click on Ethernet then click Properties...
Страница 32: ...32 6 Double click on Internet Protocol Version 4 TCP IPv4...
Страница 35: ...35 3 Single RIGHT click on Ethernet then click Properties...
Страница 36: ...36 4 Double click on Internet Protocol Version 4 TCP IPv4...
Страница 45: ...45 Wireless Configuration 5GHz 6 Enter SSID 7 Click on Next...
Страница 50: ...50 2 Double click Network Connections...
Страница 56: ...56...
Страница 107: ...107 14 Change setting successfully Do not turn off or reboot the Device during this time Please wait 20 seconds...
Страница 119: ...119 23 Change setting successfully Please wait 20 seconds...
Страница 128: ...128 8 Click on Turn on network discovery and file sharing...
Страница 129: ...129 9 Click on No make the network that I am connected to a private network...
Страница 130: ...130 10 AP s icon will show up Double click on it...
Страница 131: ...131 11 Users could also Click Add a wireless device if the icon is not there Click next...
Страница 132: ...132 12 Enter AP s Self PIN Number and click next...
Страница 133: ...133 13 Choose a name that people who connect to your network will recognize...
Страница 134: ...134 14 Enter the Passphrase and then click Next...
Страница 135: ...135 15 A User Account Control screen pops up click Continue 16 AP is successfully configured by WCN...
Страница 137: ...137 18 The SSID field of Wireless Basic Settings page will also be modified with the value assigned by WCN...
Страница 148: ...148 Figure 9 Wireless Network page...
Страница 162: ...162 6 Change setting successfully Please wait 20 seconds...
Страница 177: ...177 22 Change setting successfully Please wait 20 seconds...
Страница 186: ...186 8 Click on Turn on network discovery and file sharing...
Страница 187: ...187 9 Click on No make the network that I am connected to a private network...
Страница 188: ...188 10 AP s icon will show up Double click on it...
Страница 189: ...189 11 Users could also Click Add a wireless device if the icon is not there Click next...
Страница 190: ...190 12 Enter AP s Self PIN Number and click next...
Страница 191: ...191 13 Choose a name that people who connect to your network will recognize...
Страница 192: ...192 14 Enter the Passphrase and then click Next...
Страница 193: ...193 15 A User Account Control screen pops up click Continue 16 AP is successfully configured by WCN...
Страница 195: ...195 18 The SSID field of Wireless Basic Settings page will also be modified with the value assigned by WCN...
Страница 213: ...213 1 From the head menu click on TCP IP 2 From the left hand menu click on WAN Setting The following page is displayed...
Страница 224: ...224...
Страница 225: ...225 8 Change setting successfully Please wait 20 seconds...
Страница 228: ...228...
Страница 230: ...230 2 From the left hand menu click on WAN Setting The following page is displayed...
Страница 234: ...234 RADVD 1 From the head menu click on IPV6 2 From the left hand menu click on RADVD The following page is displayed...
Страница 235: ...235...
Страница 247: ...247...
Страница 253: ...253 2 From the left hand menu click on Port Forwarding The following page is displayed...
Страница 263: ...263...
Страница 267: ...267...
Страница 277: ...277 2 From the left hand menu click on Deny Of Service The following page is displayed...
Страница 282: ...282 8 Change setting successfully Please wait 20 seconds...
Страница 284: ...284 6 Firmware update has been update complete The following page is displayed...
Страница 298: ......
Страница 305: ...305 For example from the Network Connections window you should see the Internet Gateway Device...


