background image


104 

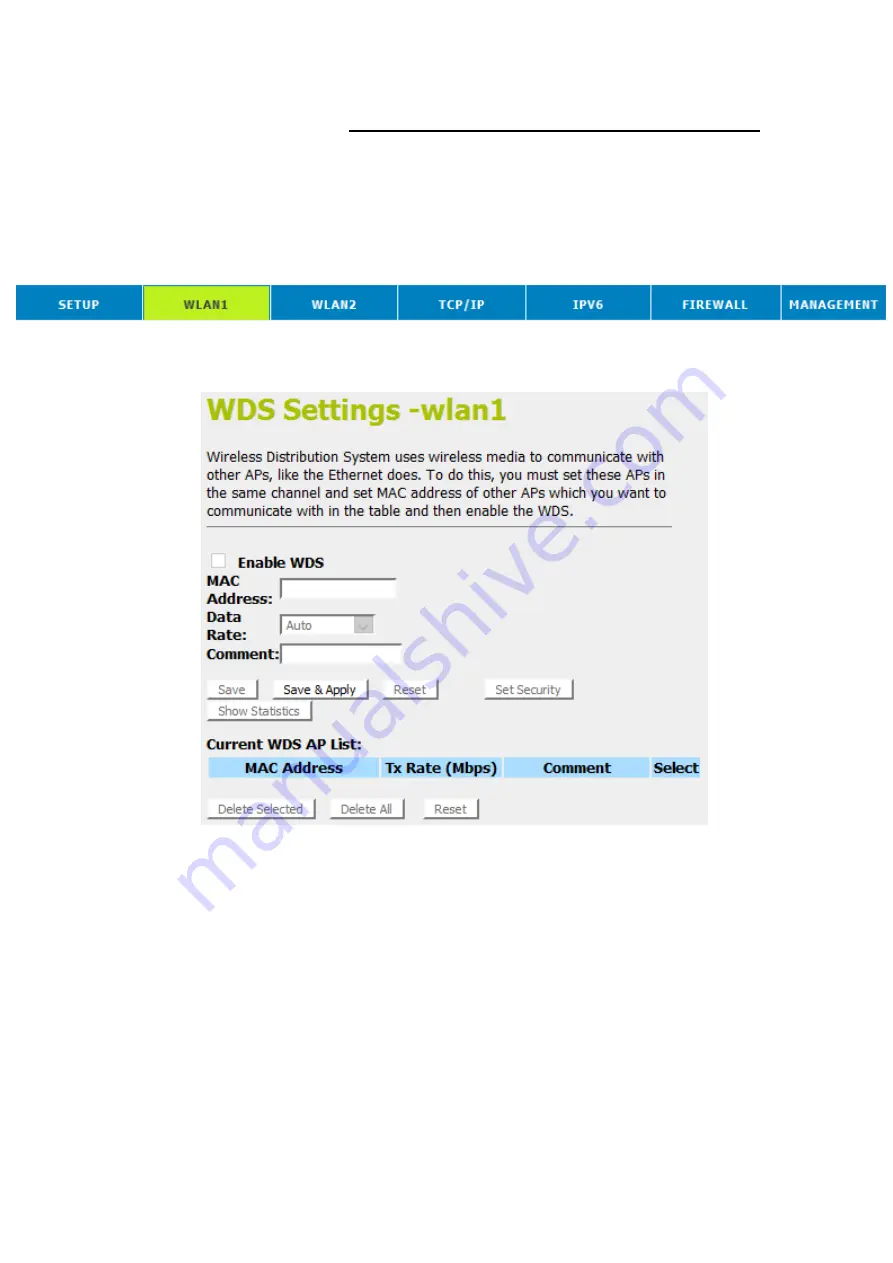
WDS settings 

Wireless Distribution System uses wireless media to 
communicate with other APs, like the Ethernet does. To do this, 
you must set these APs in the same channel and set MAC 
address of other APs which you want to communicate with in 
the table and then enable the WDS. To access the 

Wireless 

Network WDS settings 

page: 

1.  From the head menu, click on 

Wlan1


2.  From the left-hand menu, click on 

WDS settings

. The 

following page is displayed: 


Содержание WGR-8031

Страница 1: ...1 LevelOne User Manual WGR 8031 Version v1 0_20160321...

Страница 2: ...in IP address automatically 14 For Windows 98SE ME 2000 XP 14 For Windows Vista 32 64 18 For Windows 7 32 64 23 For Windows 8 8 1 32 64 28 For Windows 10 32 64 34 4 Connecting your device 38 Connectin...

Страница 3: ...Distribution System 72 Wireless 5GHz Security Setup 73 Configuring WEP 64bit ASCII 5 characters security 75 Configuring WEP 64bit Hex 10 characters security 75 Configuring WEP 128bit ASCII 13 charact...

Страница 4: ...red Key 98 WPA2 WPA Mixed Enterprise RADIUS 99 Access Control 101 Allow Listed 102 Deny Listed 103 WDS settings 104 Configure WDS Wireless Distribution System only 105 Configure AP Access Point WDS Wi...

Страница 5: ...ution System only 161 Configure AP Access Point WDS Wireless Distribution System 167 Site Survey 172 Configure Wireless ISP Wireless client Site Survey 173 WPS 178 Introduction of WPS 179 Supported WP...

Страница 6: ...port 80 238 Port filtering for UDP port 53 240 16 IP Filtering 242 IP filtering for TCP with specified IP 243 IP filtering for UDP with specified IP 245 IP filtering for both TCP and UDP with specifi...

Страница 7: ...Setting your username and password 291 A Configuring your Computers 293 Configuring Ethernet PCs 293 Before you begin 293 Windows XP PCs 293 Windows 2000 PCs 293 Windows Me PCs 295 Windows 95 98 PCs...

Страница 8: ...8 D Troubleshooting 306 Troubleshooting Suggestions 306 Diagnosing Problem using IP Utilities 308 ping 308 nslookup 308 E LICENSE STATEMENT GPL CODE STATEMENT 310...

Страница 9: ...on through DHCP Server and DHCP Client Services including IP route and DNS configuration RIP and IP Supports remote software upgrades User friendly configuration program accessed via a web browser Use...

Страница 10: ...ed to as the device The term LAN refers to a group of Ethernet connected computers at one site Typographical conventions Italic text is used for items you select from menus and drop down lists and the...

Страница 11: ...Computer System requirements Windows 98SE Windows Me Windows 2000 Windows XP Windows Vista Windows 7 Windows 8 Windows 8 1 and Windows 10 Package Contents 1 WGR 8031 2 Quick Installation Guide 4 Ether...

Страница 12: ...packet being transferred 2 4G 5G green 2 4G green 5G On WLAN link established and active Blink Valid Wireless packet being transferred WPS green Off WPS link isn t established and active Blink Valid W...

Страница 13: ...e via WAN Ethernet to xDSL Cable Modem WPS Press this button for at least 3 full seconds and the WPS LED will flash to start WPS Now go to the wireless adapter or device and press its WPS button Make...

Страница 14: ...lly Before starting the WGR 8031 configuration please kindly configure the PC computer as below to have automatic IP address DNS Server For Windows 98SE ME 2000 XP 1 Click on Start Control Panel in Cl...

Страница 15: ...15 2 Single RIGHT click on Local Area connection then click Properties...

Страница 16: ...16 3 Double click on Internet Protocol TCP IP...

Страница 17: ...ddress automatically and Obtain DNS server address automatically then click on OK to continue 5 Click Show icon in notification area when connected see screen image in 3 above then Click on OK to comp...

Страница 18: ...18 For Windows Vista 32 64 1 Click on Start Control Panel View network status and tasks...

Страница 19: ...19 2 In the Manage network connections click on Manage network connections to continue...

Страница 20: ...20 3 Single RIGHT click on Local Area connection then click Properties...

Страница 21: ...21 4 The screen will display the information User Account Control and click Continue to continue 5 Double click on Internet Protocol Version 4 TCP IPv4...

Страница 22: ...22 6 Check Obtain an IP address automatically and Obtain DNS server address automatically then click on OK to continue...

Страница 23: ...23 For Windows 7 32 64 1 Click on Start Control Panel in Category View View network status and tasks...

Страница 24: ...24 2 In the Control Panel Home click on Change adapter settings to continue...

Страница 25: ...25 3 Single RIGHT click on Local Area Connection then click Properties...

Страница 26: ...26 4 Double click on Internet Protocol Version 4 TCP IPv4...

Страница 27: ...27 5 Check Obtain an IP address automatically and Obtain DNS server address automatically then click on OK to continue...

Страница 28: ...28 For Windows 8 8 1 32 64 1 Move the mouse or tap to the upper right corner and click on Settings...

Страница 29: ...29 2 Click on Control Panel...

Страница 30: ...30 3 Click on View network status and tasks 4 In the Control Panel Home click on Change adapter settings to continue...

Страница 31: ...31 5 Single RIGHT click on Ethernet then click Properties...

Страница 32: ...32 6 Double click on Internet Protocol Version 4 TCP IPv4...

Страница 33: ...33 7 Check Obtain an IP address automatically and Obtain DNS server address automatically then click on OK to continue...

Страница 34: ...34 For Windows 10 32 64 1 Right click on Network icon then click Open Network and Sharing Center 2 In the Control Panel Home click on Change adapter settings to continue...

Страница 35: ...35 3 Single RIGHT click on Ethernet then click Properties...

Страница 36: ...36 4 Double click on Internet Protocol Version 4 TCP IPv4...

Страница 37: ...37 5 Check Obtain an IP address automatically and Obtain DNS server address automatically then click on OK to continue...

Страница 38: ...provide a basic configuration that should be compatible with your home or small office network setup Refer to the subsequent chapters for additional configuration instructions Connecting the Hardware...

Страница 39: ...Router s WAN Port Step 2 Connect the Ethernet cable to LAN Port Connect the supplied RJ45 Ethernet cable from your PC s Ethernet port to any of the 4 Router s LAN Ports Step 3 Attach the power connect...

Страница 40: ...our web browser type the following URL in the web address or location box and press Enter on your keyboard http 192 168 1 1 2 Please enter the User Name admin and Password admin and then click on OK b...

Страница 41: ...41 WAN Interface Setup Examples 8 1 DHCP client From the WAN Access Type drop down list select DHCP Client If you are happy with your settings click on Next 8 2 Static IP...

Страница 42: ...hich was given by Telecom or by your Internet Service Provider ISP If you are happy with your settings click on Next 8 3 PPPoE From the WAN Access Type drop down list select PPPoE setting Enter User N...

Страница 43: ...ovided by your Network Administrator or ISP for Static IP only Enter Default Gateway for example 172 1 1 254 provided by your Network Administrator or ISP for Static IP only Enter Server Domain Addres...

Страница 44: ...ded by your Network Administrator or ISP for Static IP only Enter Default Gateway for example 172 1 1 254 provided by your Network Administrator or ISP for Static IP only Enter Server Domain Address f...

Страница 45: ...45 Wireless Configuration 5GHz 6 Enter SSID 7 Click on Next...

Страница 46: ...None For example the Encryption you choose is None 9 Click on Next Wireless Configuration 2 4GHz 10 Enter SSID 11 Click on Next 12 From the Encryption list choose the Encryption type and enter relate...

Страница 47: ...ter change the wireless settings via the wireless configuration menu 16 Double click on the wireless icon on your computer and search for the wireless network that you enter SSID name 17 Click on the...

Страница 48: ...etwork key that belongs to your authentication type and key the default settings Security Mode WPA Mixed mode which could be found on the bottom side of the device You can later change this network ke...

Страница 49: ...of your own Network now is Now you could check what the Internet WAN access of your network is to know how to configure the WAN port of Wireless Gateway Please follow steps below to check what the In...

Страница 50: ...50 2 Double click Network Connections...

Страница 51: ...ient If you cannot see any Broadband Adapter in the Network Connections your Internet WAN access is DHCP Client or Static IP 3 Click Local Area Connection in LAN or High Speed Internet and you could s...

Страница 52: ...P If you cannot see any Broadband Adapter in the Network Connections your Internet WAN access is DHCP Client or Static IP 4 Click Local Area Connection in LAN or High Speed Internet and you could see...

Страница 53: ...hen you could get the IP settings in detail and write down the IP settings as follow IP Address 192 168 10 110 Subnet mask 255 255 255 0 Default gateway 192 168 10 100 Preferred DNS server 192 168 10...

Страница 54: ...PoE Client 6 Click Broadband Adapter in Broadband and you could see string Assigned by Service Provider in Details For PPPoE configuration on Wireless Gateway you ll need following information that yo...

Страница 55: ...the Web pages To access the Web pages you need the following A PC or laptop connected to the LAN port on the device A web browser installed on the PC The minimum browser version requirement is Interne...

Страница 56: ...56...

Страница 57: ...The first time you log into the program use these defaults User Name admin Password admin Note You can change the password at any time or you can configure your device so that you do not need to ente...

Страница 58: ...The LED labeled WAN should blink rapidly and then appear solid as the device connects to the site If the LEDs do not illuminate as expected you may need to configure your Internet access settings usi...

Страница 59: ...s is the IP address of the LAN port on the device The LAN port connects the device to your Ethernet network Typically you will not need to change this address See Network Settings LAN Interface DHCP D...

Страница 60: ...mation about the setup of your device including details of the device s Internet access settings details of the device s VoIP settings details of the device s Wireless settings To display this page 1...

Страница 61: ...DSL Cable Modem The NAT is enabled and PCs in four LAN ports share the same IP to ISP through WAN port The connection type can be setup in WAN page by using PPPoE DHCP client PPTP client L2TP client o...

Страница 62: ...re bridged together and NAT function is disabled All the WAN related function and firewall are not supported To change the Operation Mode 1 From the left hand menu click on Wizard The following page i...

Страница 63: ...You must set the wireless to client mode first and connect to the ISP AP in Site Survey page The connection type can be setup in WAN page by using PPPOE DHCP client or static IP To change the Operati...

Страница 64: ...ined by your Network Administrator or ISP 8 Click Next Static IP In this mode the device is supposed to connect to internet via ADSL Cable Modem The NAT is enabled and PCs in four LAN ports share the...

Страница 65: ...Client setting determined by your Network Administrator or ISP 2 Click Next PPPoE In this mode the device is supposed to connect to internet via ADSL Cable Modem The NAT is enabled and PCs in four LAN...

Страница 66: ...twork Administrator or ISP for Static IP only 4 Enter Subnet Mask for example 255 255 0 0 provided by your Network Administrator or ISP for Static IP only 5 Enter Default Gateway for example 172 1 1 2...

Страница 67: ...twork Administrator or ISP for Static IP only 4 Enter Subnet Mask for example 255 255 0 0 provided by your Network Administrator or ISP for Static IP only 5 Enter Default Gateway for example 172 1 1 2...

Страница 68: ...arameters for wireless LAN clients who may connect to your Access Point 1 From the Band drop down list select a Band 2 From the Mode drop down list select AP setting 3 Enter SSID for example LevelOne...

Страница 69: ...wireless LAN clients which may connect to your Access Point 1 From the Band drop down list select a Band 2 From the Mode drop down list select Client setting 3 From the Network Type drop down list sel...

Страница 70: ...to talk to each other as well as sending data to devices associated with them Note WDS is based on some standardized 802 11 protocols but there is no standardized way of implementing it that works acr...

Страница 71: ...f your main WDS station is also your network s router make sure it s set up to distribute IP addresses in the network Note Write down or otherwise take note of the MAC addresses of all of your WDS sta...

Страница 72: ...P functionality in the remote repeater stations All of this functionality should be performed in the main base station or the network s main router WDS Wireless Distribution System only 1 From the Ban...

Страница 73: ...y unauthorized access to your wireless network You can protect your wireless data from potential eavesdroppers by encrypting wireless data transmissions An eavesdropper might set up a compatible wirel...

Страница 74: ...use wireless network security on your device If you want to use WEP 64bit ASCII 5 characters data encryption follow the instructions in Configuring 64bit ASCII 5 characters encryption If you want to...

Страница 75: ...m the Key Format drop down list select ASCII 5 characters setting 4 Type the Key Setting 5 Click Next Configuring WEP 64bit Hex 10 characters security The example set in this section is for 64bit encr...

Страница 76: ...m the Key Format drop down list select ASCII 13 characters setting 4 Type the Key Setting 5 Click Next Configuring WEP 128bit Hex 26 characters security The example set in this section is for 128bit e...

Страница 77: ...y Format drop down list select Passphrase setting 3 Type the Pre Shared Key 4 Click Next Configuring WPA2 AES HEX 64 characters security The example set in this section is for WPA2 AES HEX 64 characte...

Страница 78: ...rs for wireless LAN clients who may connect to your Access Point 1 From the Band drop down list select a Band 2 From the Mode drop down list select AP setting 3 Enter SSID for example LevelOne 2 4G 4...

Страница 79: ...r wireless LAN clients which may connect to your Access Point 1 From the Band drop down list select a Band 2 From the Mode drop down list select Client setting 3 From the Network Type drop down list s...

Страница 80: ...access points to talk to each other as well as sending data to devices associated with them Note WDS is based on some standardized 802 11 protocols but there is no standardized way of implementing it...

Страница 81: ...f your main WDS station is also your network s router make sure it s set up to distribute IP addresses in the network Note Write down or otherwise take note of the MAC addresses of all of your WDS sta...

Страница 82: ...nce Make sure you turn off any routing or DHCP functionality in the remote repeater stations All of this functionality should be performed in the main base station or the network s main router WDS Wir...

Страница 83: ...z Security Setup This page allows you setup the wireless security Turn on WEP or WPA by using Encryption Keys could prevent any unauthorized access to your wireless network You can protect your wirele...

Страница 84: ...derived from the pass phrase and the network name SSID of the device To configure security choose one of the following options If you do not want to use Wireless Network security From the Encryption...

Страница 85: ...ct 64 bit setting 3 From the Key Format drop down list select ASCII 5 characters setting 4 Type the Key Setting 5 Click Finished 6 Change setting successfully Do not turn off or reboot the Device duri...

Страница 86: ...EP 128bit ASCII 13 characters security The example set in this section is for 128bit encryption 1 From the Encryption drop down list select WEP setting 2 From the Key Length drop down list select 128...

Страница 87: ...in this section is for 128bit encryption 1 From the Encryption drop down list select WEP setting 2 From the Key Length drop down list select 128 bit setting 3 From the Key Format drop down list selec...

Страница 88: ...ase encryption 1 From the Encryption drop down list select WPA2 AES setting 2 From the Pre Shared Key Format drop down list select Passphrase setting 3 Type the Pre Shared Key 4 Click Finished 5 Chang...

Страница 89: ...acters encryption 1 From the Encryption drop down list select WPA2 AES setting 2 From the Pre Shared Key Format drop down list select HEX 64 characters setting 3 Type the Pre Shared Key 4 Click Finish...

Страница 90: ...hree options of Operation Mode Gateway Bridge and Wireless ISP Setting Operation Mode To change the Operation Mode 1 From the head menu click on SETUP 2 From the left hand Operation Mode menu The foll...

Страница 91: ...less card on your device See Configuring Wireless PCs Basic Settings The Wireless Network page allows you to configure the Wireless features of your device To access the Wireless Network Basic Setting...

Страница 92: ...from the pull down menu Control Sideband Choose a Control Sideband from the pull down menu Channel Number Choose a Channel Number from the pull down menu Broadcast SSID Broadcast or Hide SSID to your...

Страница 93: ...reshold When transmitting a packet over a network medium sometimes the packet is broken into several segments if the size of packet exceeds that allowed by the network medium The Fragmentation Thresho...

Страница 94: ...ing Disable or Enable TX Beamforming RF Output Power TX Power measurement Security This page allows you setup the wireless security Turn on WEP or WPA by using Encryption Keys could prevent any unauth...

Страница 95: ...aracters Pre Shared Key Type the Pre Shared Key Enable Pre Authentication According to some of the preferred embodiments a method for proactively establishing a security association between a mobile n...

Страница 96: ...as secure as once believed 3 From the Encryption drop down list select WEP setting 4 From the Key Length drop down list select 64 bit or 128 bit setting 5 From the Key Format drop down list select AS...

Страница 97: ...ne end point to another However it has been found that WEP is not as secure as once believed 1 From the Encryption drop down list select WEP setting 2 Check the option of Use 802 1x Authentication 3 C...

Страница 98: ...ty choice in most installation instructions In the Personal mode the most likely choice for homes and small offices a pass phrase is required that for full security must be longer than the typical 6 t...

Страница 99: ...oth provide good security with two significant issues Either WPA or WPA2 must be enabled and chosen in preference to WEP WEP is usually presented as the first security choice in most installation inst...

Страница 100: ...100 5 Enter the Port IP Address and Password of RADIUS Server 6 Change setting successfully Do not turn off or reboot the Device during this time Please wait 20 seconds...

Страница 101: ...f complexity of the network security decreasing the chance of a breach MAC addresses can be add delete edit from the ACL list depending on the MAC Access Policy If you choose Allowed Listed only those...

Страница 102: ...nt 1 From the Wireless Access Control Mode drop down list select Allowed Listed setting 2 Enter the MAC Address 3 Enter the Comment 4 Click Save Apply button 5 Click OK button 6 Change setting success...

Страница 103: ...e Wireless Access Control Mode drop down list select Deny Listed setting 2 Enter the MAC Address 3 Enter the Comment 4 Click Save Apply button 5 Change setting successfully Do not turn off or reboot t...

Страница 104: ...do this you must set these APs in the same channel and set MAC address of other APs which you want to communicate with in the table and then enable the WDS To access the Wireless Network WDS settings...

Страница 105: ...hand menu click on Basic Settings 3 From the Mode drop down list select WDS 4 From the Channel Number drop down list select a Channel 5 Click Save Apply button 6 Change setting successfully Do not tu...

Страница 106: ...e WDS 10 Click the Set Security 11 This page allows you setup the wireless security for WDS When enabled you must make sure each WDS device has adopted the same encryption algorithm and Key 12 Configu...

Страница 107: ...107 14 Change setting successfully Do not turn off or reboot the Device during this time Please wait 20 seconds...

Страница 108: ...lick on WDS settings 17 Check on the option Enable WDS 18 Enter the MAC Address 19 Enter the Comment 20 Click the Save Apply 21 Change setting successfully Do not turn off or reboot the Device during...

Страница 109: ...Control List Configure AP Access Point WDS Wireless Distribution System 1 From the head menu click on Wlan1 2 From the left hand menu click on Basic Settings 3 From the Mode drop down list select AP...

Страница 110: ...ange setting successfully Click on Reboot Now button to confirm 8 From the head menu click on Wlan1 9 From the left hand menu click on WDS settings 10 Check on the option Enable WDS 11 Click the Set S...

Страница 111: ...u must make sure each WDS device has adopted the same encryption algorithm and Key 13 Configure each field with the Encryption that you selected 14 Click Save Apply button 15 Change setting successful...

Страница 112: ...e left hand menu click on WDS settings 18 Check on the option Enable WDS 19 Enter the MAC Address 20 Enter the Comment 21 Click the Save Apply 22 Change setting successfully Do not turn off or reboot...

Страница 113: ...113 23 From the head menu click on Wlan1 24 From the left hand menu click on WDS settings 25 The MAC Address that you created has been added in the Current Access Control List...

Страница 114: ...If any Access Point or IBSS is found you could choose to connect it manually when client mode is enabled To access the Wireless Network WDS settings page 1 From the head menu click on Wlan1 From the...

Страница 115: ...lick on SETUP 3 From the left hand Operation Mode menu click on Wireless ISP Settings 4 Config WAN Interface 5 Click Save Apply button 6 Change setting successfully Do not turn off or reboot the Devic...

Страница 116: ...ttings 9 From the Mode drop down list select Client 10 Enter SSID of the AP that you want to connect to for example AP_5G_A81261 If you don t know what the SSID of the AP that you want to connect to p...

Страница 117: ...117 12 Please wait 20 seconds 13 From the head menu click on WAN1 14 From the left hand menu click on Site Survey 15 Click Site Survey button...

Страница 118: ...ess Gateway were listed below 17 Click on the ratio of AP s SSID under the item Select that you want the Wireless Gateway to connect to 18 Click Next button 19 Click Connect button 20 Please wait 21 C...

Страница 119: ...119 23 Change setting successfully Please wait 20 seconds...

Страница 120: ...ult WPS Status When AP s settings are factory default out of box it is set to open security and un configured state It will be displayed by WPS Status If it already shows Configured some registrars su...

Страница 121: ...set up if users want to use the PIN configuration the only thing they need to do is entering the device PIN into registrar starting the PIN method on that device and simply wait until the device join...

Страница 122: ...g the WPS handshake a wireless profile is encrypted and transmitted to AP If the handshake is successfully done AP will be re initialized with the new wireless profile and wait for legacy stations or...

Страница 123: ...At this state AP is transparent to users If users want to configure a station or any device that is capable of being an enrollee they have to enter device s PIN into an external registrar and choose a...

Страница 124: ...124 Wireless Basic Settings wlan1 page Users need to make sure the Broadcast SSID file is set to Enabled Otherwise it might prevent WPS from working properly...

Страница 125: ...and EAP or UPnP Here users do not need to do any action on AP side They just need AP s device PIN and enter it into registrar An example from Vista WCN will be given 1 From the head menu click on WAN1...

Страница 126: ...ure WCN is enabled Users may need to enable it at the first time They could open the Control Panel click Classic View open Administrative Tools double click Services a User Account Control pop up and...

Страница 127: ...6 If the previous steps are done open Windows Explorer Go to the Network section 7 Click on Network discovery and file sharing are turned off Network computers and devices are not visible Click to Cha...

Страница 128: ...128 8 Click on Turn on network discovery and file sharing...

Страница 129: ...129 9 Click on No make the network that I am connected to a private network...

Страница 130: ...130 10 AP s icon will show up Double click on it...

Страница 131: ...131 11 Users could also Click Add a wireless device if the icon is not there Click next...

Страница 132: ...132 12 Enter AP s Self PIN Number and click next...

Страница 133: ...133 13 Choose a name that people who connect to your network will recognize...

Страница 134: ...134 14 Enter the Passphrase and then click Next...

Страница 135: ...135 15 A User Account Control screen pops up click Continue 16 AP is successfully configured by WCN...

Страница 136: ...136 17 Finally AP will become configured see WPS Status The authentication algorithm encryption algorithm and key assigned by WCN will be displayed below Current Key Info...

Страница 137: ...137 18 The SSID field of Wireless Basic Settings page will also be modified with the value assigned by WCN...

Страница 138: ...perations of AP AP being a registrar AP mode Whenever users enter station s PIN into AP s Wi Fi Protected Setup page and click Start PIN AP will become a registrar Users must start the PIN method on t...

Страница 139: ...139 6 Users must start the PIN method on the station side within two minutes 7 Users must start the PIN method on the station side within two minutes...

Страница 140: ...140 8 If the device PIN is correct and the WPS handshake is successfully done on the station side User s Wi Fi Protected status will be shown as below...

Страница 141: ...in previous sections In this case AP is in un configured state before the station initiates the WPS handshake According to the WPS spec AP will create a wireless profile with WPA2 mixed mode and a ra...

Страница 142: ...that starts the PBC method When multiple PBC sessions occur users should try PIN method After users push AP s virtual button Start PBC they must go to station side to push its button within two minut...

Страница 143: ...143 5 Users must start the PBC method on the station side within two minutes 6 Users must start the PBC method on the station side within two minutes...

Страница 144: ...144 7 If the device PCB and the WPS handshake is successfully done on the station side User s Wi Fi Protected status will be shown as below...

Страница 145: ...in previous sections In this case AP is in un configured state before the station initiates the WPS handshake According to the WPS spec AP will create a wireless profile with WPA2 mixed mode and a ra...

Страница 146: ...wireless schedule rule Please do not forget to configure system time before enable this feature To access the Wireless Schedule page 1 From the head menu click on WAN1 2 From the left hand menu click...

Страница 147: ...e Wireless card on your device See Configuring Wireless PCs Basic Settings The Wireless Network page allows you to configure the Wireless features of your device To access the Wireless Network Basic S...

Страница 148: ...148 Figure 9 Wireless Network page...

Страница 149: ...own menu Control Sideband Choose a Control Sideband from the pull down menu Channel Number Choose a Channel Number from the pull down menu Broadcast SSID Broadcast or Hide SSID to your Network Default...

Страница 150: ...will have on your Access Point To access the Wireless Network Advanced Settings page 1 From the head menu click on Wlan2 2 From the left hand menu click on Advanced Settings The following page is disp...

Страница 151: ...IAPP Protection A protection mechanism prevents collisions among 802 11g nodes Aggregation Disable or Enable Aggregation Short GI Disable or Enable Short GI WLAN Partition Disable or Enable WLAN Part...

Страница 152: ...ength Select the Key Length 64 bit or 128 bit Key Format Select the Key Format ASCII 5 characters Hex 10 characters ASCII 13 characters or Hex 26 characters Encryption Key Enter the Encryption Key WPA...

Страница 153: ...ts message header only if it supports the pre authentication Enable disable pre authentication support Default disable Authentication RADIUS Server Port Type the port number of RADIUS Server IP addres...

Страница 154: ...as it is transmitted from one end point to another However it has been found that WEP is not as secure as once believed 1 From the Encryption drop down list select WEP setting 2 Check the option of Us...

Страница 155: ...ues Either WPA or WPA2 must be enabled and chosen in preference to WEP WEP is usually presented as the first security choice in most installation instructions In the Personal mode the most likely choi...

Страница 156: ...on wireless access points WPA2 implements the full standard but will not work with some older network cards Both provide good security with two significant issues Either WPA or WPA2 must be enabled an...

Страница 157: ...ddress spoofing is a proven means to hacking a network this can be used in conjunction with additional security measures to increase the level of complexity of the network security decreasing the chan...

Страница 158: ...Allowed Listed only those clients whose wireless MAC addresses are in the access control list will be able to connect to your Access Point 1 From the Wireless Access Control Mode drop down list selec...

Страница 159: ...ol List Deny Listed When Deny Listed is selected these wireless clients on the list will not be able to connect the Access Point 1 From the Wireless Access Control Mode drop down list select Deny List...

Страница 160: ...e with other APs like the Ethernet does To do this you must set these APs in the same channel and set MAC address of other APs which you want to communicate with in the table and then enable the WDS T...

Страница 161: ...ibution System only 1 From the head menu click on Wlan2 2 From the left hand menu click on Basic Settings 3 From the Mode drop down list select WDS 4 From the Channel Number drop down list select a Ch...

Страница 162: ...162 6 Change setting successfully Please wait 20 seconds...

Страница 163: ...163 7 From the head menu click on Wlan2 8 From the left hand menu click on WDS settings 9 Check on the option Enable WDS 10 Click the Set Security...

Страница 164: ...ity for WDS When enabled you must make sure each WDS device has adopted the same encryption algorithm and Key 12 Configure each field with the Encryption that you selected 13 Click Save Apply button 1...

Страница 165: ...u click on Wlan2 16 From the left hand menu click on WDS settings 17 Check on the option Enable WDS 18 Enter the MAC Address 19 Enter the Comment 20 Click the Save Apply 21 Change setting successfully...

Страница 166: ...166 22 From the head menu click on Wlan2 23 From the left hand menu click on WDS settings 24 The MAC Address that you created has been added in the Current Access Control List...

Страница 167: ...System 1 From the head menu click on Wlan2 2 From the left hand menu click on Basic Settings 3 From the Mode drop down list select AP WDS 4 Enter SSID for example AP_2 4G 5 From the Channel Number dr...

Страница 168: ...168 7 Change setting successfully Please wait 20 seconds 8 From the head menu click on Wlan2 9 From the left hand menu click on WDS settings 10 Check on the option Enable WDS 11 Click the Set Security...

Страница 169: ...ity for WDS When enabled you must make sure each WDS device has adopted the same encryption algorithm and Key 13 Configure each field with the Encryption that you selected 14 Click Save Apply button 1...

Страница 170: ...u click on Wlan2 17 From the left hand menu click on WDS settings 18 Check on the option Enable WDS 19 Enter the MAC Address 20 Enter the Comment 21 Click the Save Apply 22 Change setting successfully...

Страница 171: ...171 23 From the head menu click on Wlan2 24 From the left hand menu click on WDS settings 25 The MAC Address that you created has been added in the Current Access Control List...

Страница 172: ...If any Access Point or IBSS is found you could choose to connect it manually when client mode is enabled To access the Wireless Network WDS settings page 1 From the head menu click on Wlan2 2 From the...

Страница 173: ...click on SETUP 2 From the left hand Operation Mode menu click on Wireless ISP Settings 3 Config WAN Interface 4 Click Save Apply button 5 Change setting successfully Please wait 20 seconds 6 From the...

Страница 174: ...drop down list select Client 9 Enter SSID of the AP that you want to connect to for example AP_2 4G If you don t know what the SSID of the AP that you want to connect to please skip this step 10 Clic...

Страница 175: ...175 11 Please wait 20 seconds 12 From the head menu click on WAN2 13 From the left hand menu click on Site Survey 14 Click Site Survey button...

Страница 176: ...ess Gateway were listed below 16 Click on the ratio of AP s SSID under the item Select that you want the Wireless Gateway to connect to 17 Click Next button 18 Click Connect button 19 Please wait 20 C...

Страница 177: ...177 22 Change setting successfully Please wait 20 seconds...

Страница 178: ...ult WPS Status When AP s settings are factory default out of box it is set to open security and un configured state It will be displayed by WPS Status If it already shows Configured some registrars su...

Страница 179: ...set up if users want to use the PIN configuration the only thing they need to do is entering the device PIN into registrar starting the PIN method on that device and simply wait until the device join...

Страница 180: ...g the WPS handshake a wireless profile is encrypted and transmitted to AP If the handshake is successfully done AP will be re initialized with the new wireless profile and wait for legacy stations or...

Страница 181: ...At this state AP is transparent to users If users want to configure a station or any device that is capable of being an enrollee they have to enter device s PIN into an external registrar and choose a...

Страница 182: ...182 Wireless Basic Settings wlan1 page Users need to make sure the Broadcast SSID file is set to Enabled Otherwise it might prevent WPS from working properly...

Страница 183: ...and EAP or UPnP Here users do not need to do any action on AP side They just need AP s device PIN and enter it into registrar An example from Vista WCN will be given 1 From the head menu click on WAN2...

Страница 184: ...ure WCN is enabled Users may need to enable it at the first time They could open the Control Panel click Classic View open Administrative Tools double click Services a User Account Control pop up and...

Страница 185: ...6 If the previous steps are done open Windows Explorer Go to the Network section 7 Click on Network discovery and file sharing are turned off Network computers and devices are not visible Click to Cha...

Страница 186: ...186 8 Click on Turn on network discovery and file sharing...

Страница 187: ...187 9 Click on No make the network that I am connected to a private network...

Страница 188: ...188 10 AP s icon will show up Double click on it...

Страница 189: ...189 11 Users could also Click Add a wireless device if the icon is not there Click next...

Страница 190: ...190 12 Enter AP s Self PIN Number and click next...

Страница 191: ...191 13 Choose a name that people who connect to your network will recognize...

Страница 192: ...192 14 Enter the Passphrase and then click Next...

Страница 193: ...193 15 A User Account Control screen pops up click Continue 16 AP is successfully configured by WCN...

Страница 194: ...194 17 Finally AP will become configured see WPS Status The authentication algorithm encryption algorithm and key assigned by WCN will be displayed below Current Key Info...

Страница 195: ...195 18 The SSID field of Wireless Basic Settings page will also be modified with the value assigned by WCN...

Страница 196: ...to modify the security settings The reason is the same as we explained in the previous section Operations of AP AP being a registrar AP mode Whenever users enter station s PIN into AP s Wi Fi Protect...

Страница 197: ...197 1 From the head menu click on WAN2 2 From the left hand menu click on WPS The following page is displayed 3 Make sure AP is in un configured state 4 Enter the Client PIN Number 5 Click Start PIN...

Страница 198: ...198 6 Users must start the PIN method on the station side within two minutes 7 Users must start the PIN method on the station side within two minutes...

Страница 199: ...199 8 If the device PIN is correct and the WPS handshake is successfully done on the station side User s Wi Fi Protected status will be shown as below...

Страница 200: ...in previous sections In this case AP is in un configured state before the station initiates the WPS handshake According to the WPS spec AP will create a wireless profile with WPA2 mixed mode and a ra...

Страница 201: ...that starts the PBC method When multiple PBC sessions occur users should try PIN method After users push AP s virtual button Start PBC they must go to station side to push its button within two minut...

Страница 202: ...202 5 Users must start the PBC method on the station side within two minutes 6 Users must start the PBC method on the station side within two minutes...

Страница 203: ...203 7 If the device PCB and the WPS handshake is successfully done on the station side User s Wi Fi Protected status will be shown as below...

Страница 204: ...in previous sections In this case AP is in un configured state before the station initiates the WPS handshake According to the WPS spec AP will create a wireless profile with WPA2 mixed mode and a ra...

Страница 205: ...wireless schedule rule Please do not forget to configure system time before enable this feature To access the Wireless Schedule page 1 From the head menu click on WAN2 2 From the left hand menu click...

Страница 206: ...mask DHCP etc Note You should only change the addressing details if your ISP asks you to or if you are familiar with network configuration In most cases you will not need to make any changes to this...

Страница 207: ...ent DHCP client computers devices connected to the device will have their information displayed in the DHCP Client List table The table will show the IP Address MAC Address and Expired Time of the DHC...

Страница 208: ...Changing the LAN IP address and subnet mask To check the configuration of LAN Interface 1 From the head menu click on TCP IP 2 From the left hand menu click on LAN Setting The following page is displa...

Страница 209: ...ge default LAN port IP address 4 Click in the IP Address and Subnet Mask box and type a new IP Address and Subnet Mask 5 Change the default DHCP Client Range 6 Click Save Apply 7 Change setting succes...

Страница 210: ...s NT Windows 2000 Windows XP a Bring up a command window b Type ipconfig release in the command window c Type ipconfig renew d Type exit to close the command window Linux a Bring up a shell b Type pum...

Страница 211: ...and Expired Time of the DHCP lease for each client computer device 1 From the head menu click on TCP IP 2 From the left hand menu click on LAN Setting The following page is displayed 3 Click on Show...

Страница 212: ...ice Wireless Gateway supports four methods of obtaining the WAN IP address Option Description Static IP Choose this option if you are a leased line user with a fixed IP address DHCP Client Choose this...

Страница 213: ...213 1 From the head menu click on TCP IP 2 From the left hand menu click on WAN Setting The following page is displayed...

Страница 214: ...tion recognized by the Internet service provider Password Password for PPPoE registration recognized by the Internet service provider Service Name Service Name for PPPoE registration recognized by the...

Страница 215: ...nable or Disable Ping Access on WAN Enable Web Server Access on WAN Enable or Disable Web Server Access on WAN Enable IPsec pass through on VPN connection Enable or Disable IPsec pass through on VPN c...

Страница 216: ...ress subnet mask gateway address and DNS domain name server address es provided to you by your ISP If your ISP wants you to connect to the Internet using Static IP follow the instructions below 1 From...

Страница 217: ...own list select Static IP setting 4 Enter WAN IP Address WAN Subnet Mask Default Gateway and DNS which was given by Telecom or by your Internet Service Provider ISP 5 Click Save Apply 6 Change setting...

Страница 218: ...cally If you are connected to the Internet through a Cable modem line then a dynamic IP will be assigned If your ISP wants you to connect to the Internet using DHCP Client follow the instructions belo...

Страница 219: ...219 3 From the WAN Access Type drop down list select DHCP Client setting 4 Click Save Apply 5 Change setting successfully Please wait 20 seconds...

Страница 220: ...ord so they can check that you are a legitimate registered Internet service user Your device stores these authentication details so you will not have to enter this username and password every time you...

Страница 221: ...m the WAN Access Type drop down list select PPPoE setting 4 Enter User Name Password provided by your ISP Type them in the relevant boxes 5 Click Save Apply 6 Change setting successfully Please wait 2...

Страница 222: ...n If your ISP Network Administrator wants you to connect to the Internet using PPTP follow the instructions below 1 From the head menu click on TCP IP 2 From the left hand menu click on WAN Setting Th...

Страница 223: ...4 Enter IP Address Subnet Mask Default Gateway provided by your ISP Type them in the relevant boxes for Static IP only 5 Select PPTP Server Mode 6 Enter Server Domain Address User Name Password provid...

Страница 224: ...224...

Страница 225: ...225 8 Change setting successfully Please wait 20 seconds...

Страница 226: ...n If your ISP Network Administrator wants you to connect to the Internet using L2TP follow the instructions below 1 From the head menu click on TCP IP 2 From the left hand menu click on WAN Setting Th...

Страница 227: ...4 Enter IP Address Subnet Mask Default Gateway provided by your ISP Type them in the relevant boxes for Static IP only 5 Select L2TP Server Mode 6 Enter Server Domain Address User Name Password provid...

Страница 228: ...228...

Страница 229: ...have a DSL Cable modem that allows only 1 MAC to talk on the internet If you change network cards you have to call them up to change the MAC The Wireless Gateway can it s MAC to computer s one that w...

Страница 230: ...230 2 From the left hand menu click on WAN Setting The following page is displayed...

Страница 231: ...89ab that you want to be instead of in the Clone MAC Address field 4 If you enter 12 digits of 0 in the Clone MAC Address field it ll disable Clone MAC Address function 5 Click Save Apply 6 Change set...

Страница 232: ...etwork which connects to the WAN port of your Access Point Here you may change the access method to static IP DHCP PPPoE Bridge by click the item value of WAN Access type 1 From the head menu click on...

Страница 233: ...233 IPV6 LAN SETTING 1 From the head menu click on IPV6 2 From the left hand menu click on IPV6 LAN SETTING The following page is displayed...

Страница 234: ...234 RADVD 1 From the head menu click on IPV6 2 From the left hand menu click on RADVD The following page is displayed...

Страница 235: ...235...

Страница 236: ...236 TUNNEL 6 OVER 4 1 From the head menu click on IPV6 2 From the left hand menu click on TUNNEL 6 OVER 4 The following page is displayed...

Страница 237: ...wing page is displayed Option Description Enable Port Filtering Enable Disable the WAN packet filter Default setting is Disable Port Range Enter the port range to be filtered for both Outbound and Inb...

Страница 238: ...ting common or custom application Check the common port ranges listed in Port filtering for TCP port 80 Please follow example below to deny the TCP port 80 for both Outbound and Inbound packet 1 From...

Страница 239: ...select TCP setting 6 Enter HTTP in Comment field 7 Click Save Apply 8 Now the port filter that you created has been added and listed in the Current Filter Table 9 Now the TCP port for both Outbound an...

Страница 240: ...UDP port 53 Please follow example below to deny the UDP port 53 for both Outbound and Inbound packet 1 From the head menu click on Firewall 2 From the left hand menu click on Port Filtering The follo...

Страница 241: ...e in Comment field 7 Click Save Apply 8 Now the port filter that you created has been added and listed in the Current Filter Table 9 Now the UDP port 80 for both Outbound and Inbound packet has been d...

Страница 242: ...r LAN computers from the WAN side When you define an IP filter rule and enable the feature you instruct the ADSL Ethernet router to examine data packets to determine whether they meet criteria set for...

Страница 243: ...irewall 2 From the left hand menu click on IP Filtering The following page is displayed IP filtering for TCP with specified IP Please follow example below to deny the TCP protocol for specified IP 1 F...

Страница 244: ...Enter the IP Address that you want to be denied in Loal IP Address field 5 From the Protocol drop down list select TCP setting 6 Enter any comment in Comment field 7 Click Save Apply 8 Now the IP Fil...

Страница 245: ...rotocol for example web site due to the Protocol TCP has been blocked by the IP Filtering rule that created IP filtering for UDP with specified IP Please follow example below to deny the UDP protocol...

Страница 246: ...protocol for both Outbound and Inbound packet has been denied Now The Local IP Address for example 10 0 0 102 that listed in the Current Filter Table cannot visit any application that use UDP protoco...

Страница 247: ...247...

Страница 248: ...ied in Local IP Address field 5 From the Protocol drop down list select Both setting 6 Enter any comment in Comment field 7 Click Save Apply 8 Now the IP Filter that you created has been added and lis...

Страница 249: ...data packets from your local network to Internet through the Wireless Gateway Use of such filters can be helpful in securing or restricting your local network 1 From the head menu click on Firewall 2...

Страница 250: ...cified MAC Address Please follow example below to deny the specified MAC Address has the Internet Access 1 From the head menu click on Firewall 2 From the left hand menu click on MAC Filtering The fol...

Страница 251: ...Address that you want to be denied in MAC Address field 5 Enter any comment in Comment field 6 Click Save Apply 7 Now the MAC Filter that you created has been added and listed in the Current Filter T...

Страница 252: ...d to make any changes to the default Security configuration You only need to edit the configuration if you wish to do one or both of the following allow Internet users to browse the user pages on your...

Страница 253: ...253 2 From the left hand menu click on Port Forwarding The following page is displayed...

Страница 254: ...with specified IP Please follow example below to configure the Port Forwarding to Specified IP with TCP 1 From the head menu click on Firewall 2 From the left hand menu click on Port Forwarding The f...

Страница 255: ...comment in Comment field 7 Click Save Apply 8 Now the IP Address and port range that you created has been added and listed in the Current Filter Table 9 Now the port range of the IP Address in the Cu...

Страница 256: ...that the port you want to be forwarded in IP Address field 5 From the Protocol drop down list select UDP setting 6 Enter any comment in Comment field 7 Click Save Apply 8 Now the IP Address and port...

Страница 257: ...r is used to deny LAN users from accessing the internet Block those URLs which contain keywords listed below 1 From the head menu click on Firewall 2 From the left hand menu click on URL Forwarding Th...

Страница 258: ...menu click on Firewall 2 From the left hand menu click on URL Forwarding The following page is displayed 3 Check the option Enable URL Filtering to enable the URL Filtering 4 Check the option deny url...

Страница 259: ...259 7 Now the URL Filter that you created has been added and listed in the Current Filter Table 8 Now the URL Address in the Current Filter Table cannot be visited...

Страница 260: ...ernet traffic such as Web HTTP servers FTP servers SMTP e mail servers and DNS servers 1 From the head menu click on Firewall 2 From the left hand menu click on DMZ The following page is displayed DMZ...

Страница 261: ...261 3 Check the option Enable DMZ to enable the Enable DMZ 4 Enter the IP Address that to be the DMZ Host in DMZ Host IP Address field 5 Click Save Apply...

Страница 262: ...ANs are created to provide the segmentation services traditionally provided by routers VLANs address issues such as scalability security and network management 1 From the head menu click on Firewall 2...

Страница 263: ...263...

Страница 264: ...OUTE SETUP This page is used to setup dynamic routing protocol or edit static route entry 1 From the head menu click on Firewall 2 From the left hand menu click on ROUTE SETUP The following page is di...

Страница 265: ...ve your online gaming experience by ensuring that your game traffic is prioritized over other network traffic such as FTP or Web 1 From the head menu click on Firewall 2 From the left hand menu click...

Страница 266: ...e It will display the LAN WAN and system firmware information This page will display different information according to WAN setting Static IP DHCP or PPPoE 1 From the head menu click on Management 2 F...

Страница 267: ...267...

Страница 268: ...age shows the packet counters for transmission and reception regarding to wireless and Ethernet networks 1 From the head menu click on Management 2 From the left hand menu click on Statistics The foll...

Страница 269: ...get a domain name When the IP address of the host changes it just needs to send a message to the website that s providing dynamic DNS service to this host For this to work an automated update client...

Страница 270: ...registering you need to provide your username password and hostname as mandatory parameters A service provider may also prompt you to fill some optional parameters Configuring IP Interfaces You need...

Страница 271: ...271 1 From the head menu click on Management 2 From the left hand menu click on DDNS The following page is displayed Configure DynDNS 1 From the head menu click on Management...

Страница 272: ...NS from the Service Provider drop down list 5 Type your own unique User Name Password and Domain Name which you applied from www dyndns com in the relevant boxes They can be any combination of letters...

Страница 273: ...273 Configure TZO 1 From the head menu click on Management 2 From the left hand menu click on DDNS The following page is displayed...

Страница 274: ...our own unique Email Key and Domain Name which you applied from http www tzo com MainPageWebClient clientsignup html in the relevant boxes They can be any combination of letters or numbers with a maxi...

Страница 275: ...erver and SNTP Client Configuration settings 1 From the head menu click on Management 2 From the left hand menu click on Time Zone Setting The following page is displayed 3 om the Time Zone Select dro...

Страница 276: ...ait 20 seconds 28 Denial of Service A denial of service DoS attack is characterized by an explicit attempt by hackers to prevent legitimate users of a service from using that service Denial of Service...

Страница 277: ...277 2 From the left hand menu click on Deny Of Service The following page is displayed...

Страница 278: ...278 3 Check the option Enable DoS Prevention 4 Check the option of each Service 5 Check the option Enable Source IP Blocking 6 Click Save Apply 7 Change setting successfully Please wait 20 seconds...

Страница 279: ...is page is used to configure the TR 069 CPE Here you may change the setting for the ACS s parameters 1 From the head menu click on Management 2 From the left hand menu click on TR 069 CONFIG The follo...

Страница 280: ...0 30 Log This page can be used to set remote log server and show the system log System Log 1 From the head menu click on Management 2 From the left hand menu click on Log The following page is display...

Страница 281: ...recorded in the system log Enable Remote Log Enable Send the system log to remote log server To do this make sure a secure syslog server is available Default Disable Log Server IP Address Enter the IP...

Страница 282: ...282 8 Change setting successfully Please wait 20 seconds...

Страница 283: ...site to your PC s file directory 1 Once you have downloaded the latest firmware version to your From the head menu click on Management 2 From the left hand menu click on Upgrade Firmware The following...

Страница 284: ...284 6 Firmware update has been update complete The following page is displayed...

Страница 285: ...vert back to the original factory configuration you can do so by resetting the device to factory defaults Save Settings to File It allows you save current settings to a file 1 From the left hand Manag...

Страница 286: ...286 2 Click on Save 3 If you are happy with this click Save and then browse to where the file to be saved Or click Cancel to cancel it...

Страница 287: ...load the settings from the file which was saved previously 1 From the left hand Management menu click on Reset factory default The following page is displayed Figure 12 Reset to Defaults page 2 Click...

Страница 288: ...288 3 If you are happy with this click Upload to start to load settings from file 4 Once it finished loading settings form file it ll show the message below...

Страница 289: ...o so by resetting the device to factory defaults Note If you reset your device to factory defaults all previous configuration changes that you have made are overwritten by the factory default configur...

Страница 290: ...you that resetting to factory defaults cannot be undone any changes that you have made to the basic settings will be replaced If you are happy with this click OK Or click Cancel to cancel it 4 Reload...

Страница 291: ...sername and password set are as follows Username admin Password admin Setting your username and password Note Non authorized users may try to access your system by guessing your username and password...

Страница 292: ...t setting uses admin for the username and admin for password 3 If you are happy with these settings click Save Apply You will see following page that the new user has been displayed on the Currently D...

Страница 293: ...ons Windows XP PCs 1 In the Windows task bar click the Start button and then click Control Panel 2 Double click the Network Connections icon 3 In the LAN or High Speed Internet window right click on t...

Страница 294: ...m your Windows 2000 installation CD or other media Follow the instructions to install the files 7 If prompted click OK to restart your computer with the new settings Next configure the PCs to accept I...

Страница 295: ...Next configure the PCs to accept IP information assigned by the Wireless Gateway 9 In the Control Panel double click the Network and Dial up Connections icon 10 In Network and Dial up Connections wind...

Страница 296: ...k OK twice to confirm and save your changes You will be prompted to restart Windows 14 Click Yes Windows NT 4 0 workstations First check for the IP protocol and if necessary install it 1 In the Window...

Страница 297: ...bnets on your LAN subnets are described in Appendix B Before you begin you must have the following information available The IP address and subnet mask of each PC The IP address of the default gateway...

Страница 298: ......

Страница 299: ...xample a 7 digit telephone number starts with a 3 digit prefix that identifies a group of thousands of telephone lines and ends with four digits that identify one specific line in that group Similarly...

Страница 300: ...s set to 0 or all fields set to 255 as those values are reserved for special uses Subnet masks Definition mask A mask looks like a regular IP address but contains a pattern of bits that tells what par...

Страница 301: ...s in field4 for its host IDs ranging from 1 to 62 Note Sometimes a subnet mask does not specify any additional network ID bits and thus no subnets Such a mask is called a default subnet mask These mas...

Страница 302: ...d automatic discovery for a breadth of device categories from a wide range of vendors This means a device can dynamically join a network obtain an IP address convey its capabilities and learn about th...

Страница 303: ...og box select Network Connections 3 In the Network Connections dialog box right click on the local area connection entry for your network this will display a menu Select the Properties menu entry 4 In...

Страница 304: ...ries from the Networking Services window and then click OK If you are using Windows XP select Universal Plug and Play If you are using Windows XP SP1 select Internet Gateway Device discovery and Contr...

Страница 305: ...305 For example from the Network Connections window you should see the Internet Gateway Device...

Страница 306: ...Access My PC cannot access the Internet Use the ping utility discussed in the following section to check whether your PC can communicate with the device s LAN IP address by default 192 168 1 1 If it...

Страница 307: ...ettings and returns all settings to their default values I cannot access the web pages from my browser Use the ping utility discussed in the following section to check whether your PC can communicate...

Страница 308: ...t computer receives the message a Command Prompt window is displayed Figure 17 Using the ping Utility If the target computer cannot be located you will receive the message Request timed out Using the...

Страница 309: ...and then click Run In the Open text box type the following Nslookup Click OK A Command Prompt window displays with a bracket prompt At the prompt type the name of the Internet address that you are in...

Страница 310: ...License Version 2 GPLv2 and GNU Lesser General Public License 2 1 LGPLv2 1 WRITTEN OFFER FOR GPL LGPL SOURCE CODE We will provide everyone upon request the applicable GPLv2 and LGPLv2 1 source code fi...

Страница 311: ...t level1 com Web www level1 com NO WARRANTY This program is distributed in the hope that it will be useful but WITHOUT ANY WARRANTY without even the implied warranty of MERCHANTABILITY or FITNESS FOR...

Страница 312: ...ISING OUT OF THE USE OR INABILITY TO USE THE PROGRAM INCLUDING BUT NOT LIMITED TO LOSS OF DATA OR DATA BEING RENDERED INACCURATE OR LOSSES SUSTAINED BY YOU OR THIRD PARTIES OR A FAILURE OF THE PROGRAM...

Страница 313: ...nd change free software to make sure the software is free for all its users This General Public License applies to most of the Free Software Foundation s software and to any other program whose author...

Страница 314: ...s translate to certain responsibilities for you if you distribute copies of the software or if you modify it For example if you distribute copies of such a program whether gratis or for a fee you must...

Страница 315: ...reflect on the original authors reputations Finally any free program is threatened constantly by software patents We wish to avoid the danger that redistributors of a free program will individually o...

Страница 316: ...a portion of it either verbatim or with modifications and or translated into another language Hereinafter translation is included without limitation in the term modification Each licensee is addressed...

Страница 317: ...absence of any warranty and give any other recipients of the Program a copy of this License along with the Program You may charge a fee for the physical act of transferring a copy and you may at your...

Страница 318: ...s under the terms of this License c If the modified program normally reads commands interactively when run you must cause it when started running for such interactive use in the most ordinary way to p...

Страница 319: ...sections when you distribute them as separate works But when you distribute the same sections as part of a whole which is a work based on the Program the distribution of the whole must be on the term...

Страница 320: ...or executable form under the terms of Sections 1 and 2 above provided that you also do one of the following we use this doubled UL to get the sub sections indented while making the bullets as unobviou...

Страница 321: ...s allowed only for noncommercial distribution and only if you received the program in object code or executable form with such an offer in accord with Subsection b above The source code for a work mea...

Страница 322: ...rce code from the same place counts as distribution of the source code even though third parties are not compelled to copy the source along with the object code 4 You may not copy modify sublicense or...

Страница 323: ...nd conditions for copying distributing or modifying the Program or works based on it 6 Each time you redistribute the Program or any work based on the Program the recipient automatically receives a li...

Страница 324: ...d not permit royalty free redistribution of the Program by all those who receive copies directly or indirectly through you then the only way you could satisfy both it and this License would be to refr...

Страница 325: ...licensee cannot impose that choice This section is intended to make thoroughly clear what is believed to be a consequence of the rest of this License 8 If the distribution and or use of the Program i...

Страница 326: ...have the option of following the terms and conditions either of that version or of any later version published by the Free Software Foundation If the Program does not specify a version number of this...

Страница 327: ...TTED BY APPLICABLE LAW EXCEPT WHEN OTHERWISE STATED IN WRITING THE COPYRIGHT HOLDERS AND OR OTHER PARTIES PROVIDE THE PROGRAM AS IS WITHOUT WARRANTY OF ANY KIND EITHER EXPRESSED OR IMPLIED INCLUDING B...

Страница 328: ...ECIAL INCIDENTAL OR CONSEQUENTIAL DAMAGES ARISING OUT OF THE USE OR INABILITY TO USE THE PROGRAM INCLUDING BUT NOT LIMITED TO LOSS OF DATA OR DATA BEING RENDERED INACCURATE OR LOSSES SUSTAINED BY YOU...

Страница 329: ...copyright line and a pointer to where the full notice is found one line to give the program s name and an idea of what it does Copyright C yyyy name of author This program is free software you can red...

Страница 330: ...ersion 69 Copyright C year name of author Gnomovision comes with ABSOLUTELY NO WARRANTY for details type show w This is free software and you are welcome to redistribute it under certain conditions ty...

Страница 331: ...library you may consider it more useful to permit linking proprietary applications with the library If this is what you want to do use the GNU Lesser General Public License instead of this License No...

Отзывы: