background image


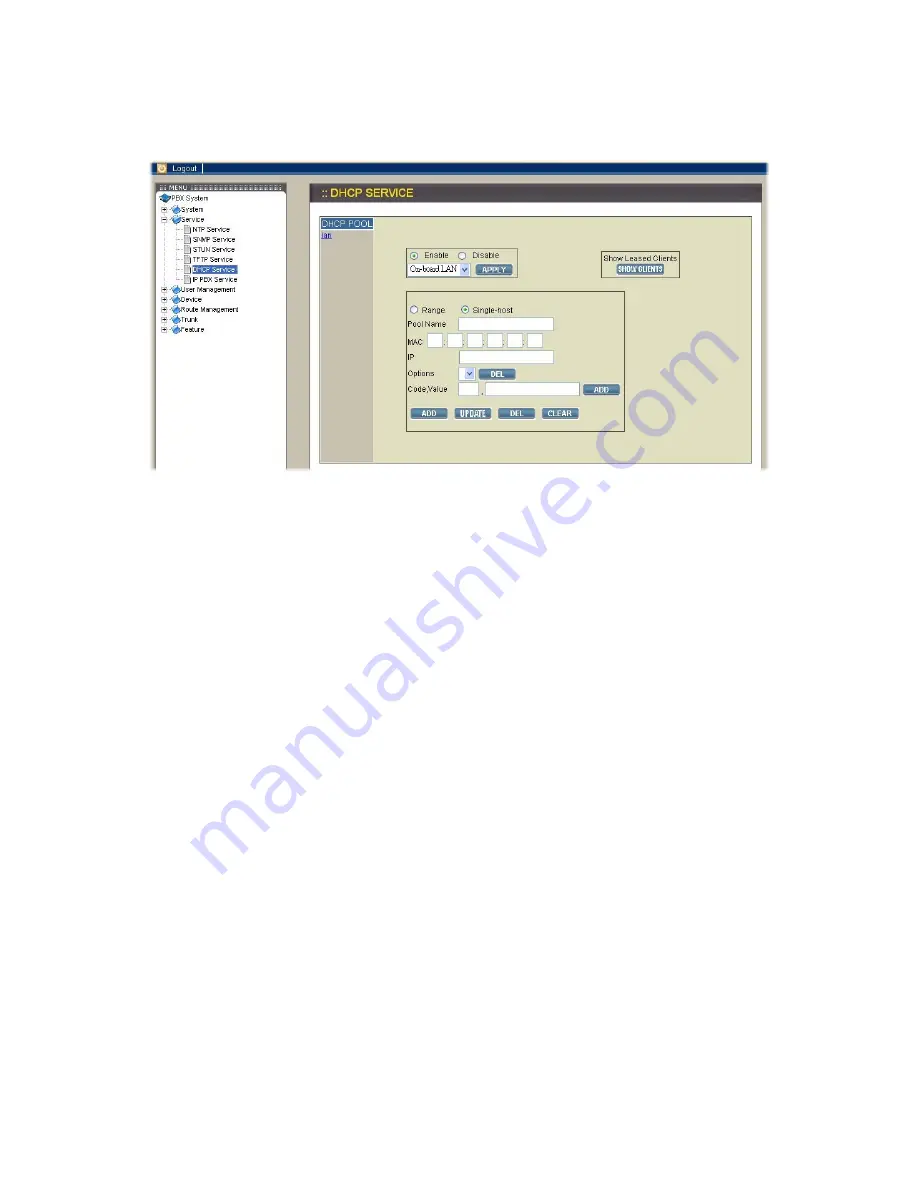
2.2.5. DHCP Service 

Select Service

DHCP Service to display current status of DHCP service in this page. 

You can enable or disable DHCP service at any time. 


Enable DHCP service 

Select Enable button, and then click APPLY icon. Afterward, you can configure more 
DHCP settings in this page. 
 

Add DHCP pool 

Click <Add new> icon from the left panel. At first, specify a pool ID which must have an 
alphabet initial in the ID text field. Secondly, check Single host checkbox if the binding is 
intended for a specific host only then give the MAC address of the host right below. 
Thirdly, enter the DHCP range of addresses available for lease in the two Range text 
fields; Start and End. If Single host checkbox is checked, the End text field will be grayed 
out. Optionally, DHCP options could be configured by entering an option code in Code 
text field and the option value in Value text field then click Add icon. The just added 
DHCP option shall be displayed in the Options list. Follow the same steps to add more 
DHCP options. To delete an option, choose it from the Options list and click Delete icon. 
Last, click Save icon to commit changes. You should be able to see the newly added 
DHCP pool displayed in the DHCP Pool panel on the left side. 

Edit DHCP Pool 

Click the link of the pool ID listed in the DHCP Pool panel, and enter desired settings 
shown on the right side. Click APPLY icon to save the changes. 

Delete DHCP Pool 

Click the link of the pool ID which you want to delete from the DHCP Pool panel. Click 
Delete icon to delete it. The just deleted pool ID shall disappear from the DHCP Pool 
panel. 

Show Clients 

Click the Show client icon to list all leased LAN IP addresses and client details in a new 
pop-up window. 


Disable DHCP service 

Select Disable button then click APPLY icon. 
 

Содержание VOI-9200

Страница 1: ...VOI 9200 SIP IP PBX User Manual Ver 1 02 0809...

Страница 2: ...NGS 7 1 6 CONNECTION DIAGRAM 7 2 WEB BASED MANAGEMENT 8 2 1 SYSTEM 9 2 2 SERVICE 22 2 3 USER MANAGEMENT 29 2 4 DEVICE 34 2 5 ROUTE MANAGEMENT 42 2 6 TRUNK 46 2 7 FEATURE 56 3 APPLICATION EXAMPLES 67 3...

Страница 3: ...to all phone devices In addition it also provides Internet access to all LAN devices through NAT router VOI 9200 IP PBX provides call control and media relay services to SIP clients and it performs th...

Страница 4: ...ion Music on ringing extensions Forward to voice mail on no answer Voice Mail User PIN Multilingual Multi folder archive Fast forward Rewind Undelete MWI notification E mail notification and attachmen...

Страница 5: ...ine 2 Port FXO 2 Phone 2 Port FXS 3 LAN ON indicates LAN connection BLINK indicates LAN activity 4 WAN ON indicates WAN connection BLINK indicates WAN activity 5 WLAN Reserved 6 Active On Indicates th...

Страница 6: ...for connection to the analog phone and numbered 3 and 4 from left to right 5 USB port Connect to an external USB drive for backup internal system storage Click the Backup icon in Web configurations an...

Страница 7: ...1 5 Default Settings WAN IP 192 168 0 1 LAN IP 192 168 1 1 Username admin Password admin 1 6 Connection Diagram...

Страница 8: ...PC or laptop to access the web GUI through LAN port at https 192 168 1 1 or through WAN port at https 192 168 0 1 Once connected the browser may warn about accepting a certificate please accept it The...

Страница 9: ...f time zone and real time clock The Time Setup page allows to configure time zone and date for IP PBX System time zone setup Choose the time zone for the IP PBX0 then click APPLY button to save the se...

Страница 10: ...e interface types among static IP DHCP and PPPoE The default type of WAN interface is static IP and the default WAN IP is 192 168 0 1 If LAN only checkbox is checked the WAN interface will be disabled...

Страница 11: ...tton to save your input The PPPoE dialing will start right away When the connection is active the page will show the acquired IP address network mask and default gateway information There will also be...

Страница 12: ...ess is 192 168 1 1 You can enter your desired IP and mask then click APPLY button to save Note that VOI 9200 IP PBX at default assigns IP addresses for LAN devices via DHCP server and translates those...

Страница 13: ...ts share the same gateway unless masking does the same The examples are adding IP Route IDs net1 and net2 with parameters 192 168 128 0 255 255 255 0 192 168 129 0 255 255 255 0 shared gateway 192 168...

Страница 14: ...a DynDNS client The client then uses Username and Password to access its account and update the Hostname with the latest WAN IP address at the DynDNS server in Interval seconds periodically Enable Dyn...

Страница 15: ...al WAN transmission speed By default QoS is disabled Enable QoS Select Enable button and enter the values of WAN Uplink Speed WAN Downlink Speed and Uplink VoIP Reserved bandwidth respectively and the...

Страница 16: ...and Port specify the TCP or UDP port number s on WAN IP which will be forwarded to the Forward to port of Forward to IP in LAN For example 192 168 1 5 is a mail server to be seen from outside one shou...

Страница 17: ...B connector of an external USB drive There are two checkboxes for removing either CDR or Voicemails after backup After a confirmation of the insertion backup starts a few seconds later if the external...

Страница 18: ...sted IP address of the corresponding extension trunk ID is dynamic or specified Registered indicate whether the extension trunk ID registers successfully or not Reg Progress display the response code...

Страница 19: ...the complete number that the caller dialed practically Caller ID the configured caller ID of the caller Dest Interface the interface of VOI 9200 that this call passed through Start Time the time when...

Страница 20: ...vent log includes reported events from system services including NTP DNS DHCP and PPPoE You can click System Events icon to see complete records Active Calls Click Active Calls icon to display the act...

Страница 21: ...k UPGRADE icon Note that the filename of firmware should not be changed otherwise system will refuse to upgrade it 2 1 10 Shutdown By selecting System Shutdown you can shutdown the machine after click...

Страница 22: ...ange Disable NTP service Select Disable button and then click APPLY icon 2 2 2 SNMP Service Select Service SNMP Service to specify Simple Network Management Protocol SNMP parameters for networking sta...

Страница 23: ...sable STUN service After selecting Disable button you can enter the fully qualified domain name FQDN or the static IP address of the external WAN interface if needed and then click APPLY icon Usually...

Страница 24: ...lder Delete Folder Choose a directory you would like to delete from Download list then click Delete Folder icon The folder you just deleted shall disappear from the list Download File Choose a directo...

Страница 25: ...by entering an option code in Code text field and the option value in Value text field then click Add icon The just added DHCP option shall be displayed in the Options list Follow the same steps to a...

Страница 26: ...configured in the first half of Advance page PBX SIP Port The UDP port where the SIP service listens on RTP Port Range The range of RTP ports used by the IPPBX for media transporting Max Expiration Ti...

Страница 27: ...eckbox for enabling DNS SRV resolution for phones or remote SIP trunks not yet registered Max Active Users Maximum number of actively registered clients Max Active Calls Maximum number of concurrent c...

Страница 28: ...tely This function should be rarely required unless the LAN setting has been changed or the operating service is found abnormally without problematic configuration Revert IPPBX configuration Click REV...

Страница 29: ...n an IP telephony network such as Sales Marketing Administration Accounting and Engineering etc Each usergroup associates with a set of PBX features and call routing scopes In other words users in the...

Страница 30: ...e usergroup link in Groups panel Edit settings shown on the right side Click APPLY icon 3 Delete Usergroup Click the usergroup link in Groups panel Click Delete icon The deleted usergroup shall disapp...

Страница 31: ...ks have been created Reachable usergroups Select other usergroups reachable from this usergroup By default only users in the same usergroup can be reached one another There is no usergroup initially C...

Страница 32: ...e IP telephony network Select User Management User one can add edit and delete users Note that you have to reload to activate changes 1 Add User Click ADD icon from the panel Enter settings shown in T...

Страница 33: ...her a real or a virtual one e g Alice Lee or Conference Room Description Arbitrary description info E mail address An e mail address of the user for voicemail notification Attach voicemail in e mail n...

Страница 34: ...ts the administrator to create accounts for device extensions Note the same account information has to be programmed into the device through the configuration interface Select Device IP Phone one can...

Страница 35: ...e phone Each field is explained as followings Note that for phones using HTTP for auto config DHCP setting needs a new option 151 with a value of http IP PBX LAN IP tftpboot No extra setting if the ph...

Страница 36: ...n Table 2 4 Click APPLY button The newly added extension of this device should be displayed in Extensions panel on the left side More extensions could be added by repeating the last 3 steps above Edit...

Страница 37: ...vices panel Click Extensions button Click extension link in Extensions panel Click Delete button The deleted extension shall disappear from the Extensions panel Once a device has no extension it can b...

Страница 38: ...ation and calls from WAN in a SIP ID same as the extension number I e this extension must be on LAN Disable NAT Traversal Respond with the device based on IP addresses given in the SIP messages instea...

Страница 39: ...by entering one or more calling numbers and click Add button Use Remove button and Remove all button to cancel blockings Selective call forward Optional Unconditional call forwarding according to the...

Страница 40: ...2 4 3 Analog Phone PC 1 PC 2 only Connect an analog phone to an FXS port and configure the properties of each port Detailed settings are described as in Table 2 5...

Страница 41: ...ionally The number could be an extension or a PSTN number with appropriate outbound prefix Unavailable call forward Optional Enter a number to which incoming calls are forwarded when not answered The...

Страница 42: ...tion digits Match any single digit listed explicitly For example digit set 13579 match odd digits dot Match any digit in any length Usually given in the end of a pattern to include all numbers matched...

Страница 43: ...number pattern consisting of digits digit set and wildcard characters e g 9NXXXXXX matches any 7 digit called number starting from a digit larger or equal to 2 and with an extra prefix digit 9 Number...

Страница 44: ...n the Route Group Management page IP PBX service must be reloaded to activate changes Add Routegroup Click ADD button from the left panel Enter settings shown in Table 2 5 3 Click APPLY button The new...

Страница 45: ...iated routes Select routes belonged to this routegroup Click arrow icons to add or remove a route to from the routegroup The right box lists currently selected routes Note the order of selected routes...

Страница 46: ...to a remote IP PBX to reach its extensions and PSTN ports 2 6 1 SIP Trunk The SIP Trunk Management page allows the administrator to configure SIP trunks used by VOI 9200 IP PBX Select Trunk SIP Trunk...

Страница 47: ...ber consisting of digits only Usually give the phone number issued by the ITSP for consistency Description Arbitrary description info Block all calls Check this to create a dummy blocking trunk Outbou...

Страница 48: ...IP or FQDN SIP registrar port Specify IP address or fully qualified domain name and UDP port of the remote SIP registrar which usually refer to an ITSP SIP server same as proxy Registration required C...

Страница 49: ...not be appropriate usergroups to select initially One can come back later once the expected usergroup has been added Disable NAT Traversal Respond with the proxy based on IP addresses given in the SI...

Страница 50: ...selecting Trunk FXO PSTN Trunk one can add edit and delete PSTN trunks IP PBX service must be reloaded to activate changes Add PSTN Trunk Click Add new button from the left panel Enter settings shown...

Страница 51: ...ber of this PSTN trunk group A valid number ranges from 1 to 31 Description Arbitrary description info Trunk ports FXO port indices grouped by this PSTN trunk such as 1 or 1 2 or 1 3 etc Maximum port...

Страница 52: ...e Preferred language for system instructions heard from the trunk Usergroup of privilege When disabled DID select a usergroup whose reachability to other usergroups and trunks will be used as the priv...

Страница 53: ...ap roles and form another pair Since a terminal trunk is the account for a SIP trunk to authenticate with exact the same identifier and password must be used for both The Terminal Trunk Management pag...

Страница 54: ...hoose an extension to be an unconditional destination for incoming calls to this terminal The number of the terminal is therefore regarded as the direct line number of the extension Language Preferred...

Страница 55: ...2 6 4 POTS setup PC 1 PC 2 only This page allows selection of country based progress tones and or impedance of POTS ports IP PBX service needs to be restarted before new setting takes effect...

Страница 56: ...p current phone moves to another phone and dials the park line number told by IP PBX to resume conversation with the caller If the callee does not call the given park line number to resume conversatio...

Страница 57: ...D button from the left panel to add a new pattern Enter settings shown in Table 2 7 2 Click APPLY button The newly added pattern should be displayed in Life Line panel on the left side Delete Life Lin...

Страница 58: ...PIN of the room number Select Feature Meet me Conference to configure meet me conference feature Add Meet me Conference Click ADD button from the left panel to add a new conference room Enter settings...

Страница 59: ...ce 1 to mute unmute 9 to log in as the administrator if there is no administrator in yet Administrator PIN PIN for the administrator of the conference During a conference the administrator has followi...

Страница 60: ...e right side Click APPLY button Delete MOH file Click link to the file to delete from the MOH files panel Click Delete button The deleted MOH file shall disappear from the MOH files panel Table 2 7 4...

Страница 61: ...from the menu enter settings shown in Table 2 7 5 and then click APPLY button Table 2 7 5 Voice Mail Configuration Settings Field Description Voicemail pilot number Number to access voice mail system...

Страница 62: ...t To reset a prompt back to default leave browsed file blank and directly click the PUT FILE button Note that the replacement is done for the selected language only Currently only following prompts co...

Страница 63: ...ote that the replacement is done for the selected language only Currently only following prompts could be replaced Table 2 7 7 Replaceable Voicemail System Prompts Prompt Description Login Welcome to...

Страница 64: ...me feature select Feature Worktime from the menu enter settings shown in the window and then click APPLY button Add Worktime Click Add New button from the left panel to add a new worktime Enter settin...

Страница 65: ...ne phone and the auto attendant to make the transfer In some case the caller may not know the extension of the party so that there should be a key say 0 to call the operator for help Sometimes the inc...

Страница 66: ...rompts Management This page allows replacing built in IVR prompts with user recordings Choose a language and browse a corresponding recording from local storage Then click PUT FILE to complete the rep...

Страница 67: ...ocedure below is recommended as the first step of a configuration sequence The configuration only enables internal extension calls but it serves as a good practice for IP PBX administration Configurat...

Страница 68: ...ty and ext all 2 Include staff and utility in the Reachable usergroup of ext all 3 Create a user account for each staff and assign it to usergroup staff 4 Create an additional user account public and...

Страница 69: ...he site it is in only while the staff phones can call any extension in both sites without limitation B HQ has extensions 1XX and B BR has extensions 2XX Calls between B HQ and B BR use private SIP tru...

Страница 70: ...ADSL modem PSTN IP Phones POTS FXS Ethernet LAN FXO WAN Internet ADSL modem PSTN IP Phones POTS FXS FXO Ethernet LAN IP PBX Headquarter IP PBX Branch Figure 5 2 Two Site IP PBX Network Connections...

Страница 71: ...y while for usergroup utility include Reachable usergroup staff only 16 Reload IP PBX Service Configuration steps in IP PBX Branch 1 Create usergroups staff utility and ext all 2 Include staff and uti...

Страница 72: ...answer Voice Mail User PIN Multi folder archive Fast forward Rewind Undelete MWI notification E mail notification and attachment Unified messaging Personal reception on unavailability and busy Voicema...

Страница 73: ...ring to the GPL requirements the open source code and open source license for the source code are available for free download at http global level1 com If you would like a copy of the GPL or other ope...

Отзывы: