16
INSTALLATION AND MAINTENANCE
CPLS drip-proof 3-phase induction motors
4240 en - 2014.09 / b
LEROY-SOMER
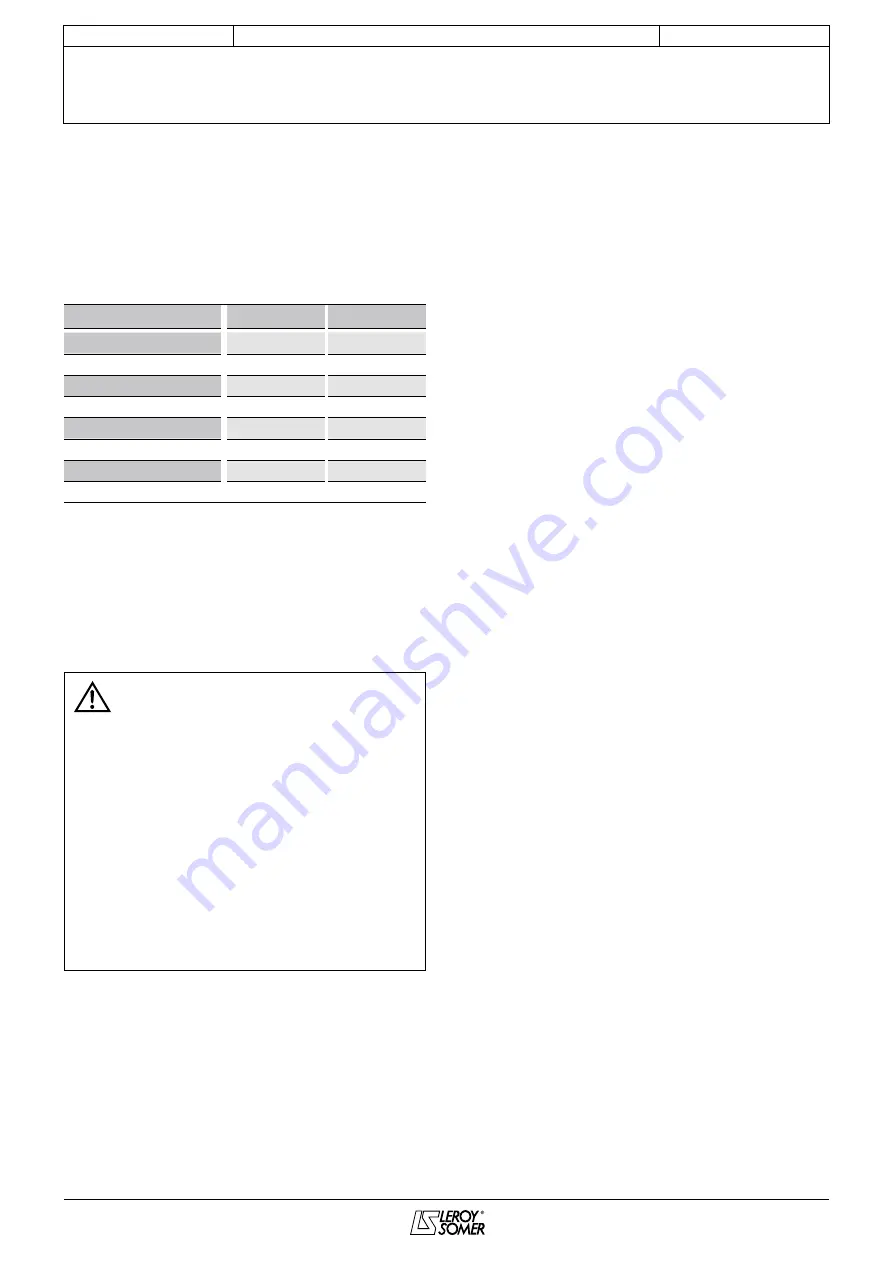
Quantity of grease
As the bearings are pre-lubricated in the factory, no greasing
is needed during commissioning, unless the motor has been
stored for a long time (see section 1.2 - Storage).
During the
first greasing undertaken by the customer or if
the grease inlet pipes have been cleaned
, a slighter larger
quantity of grease should be added in order to ensure that the
new grease reaches the bearing.
Motor
1
st
greasing
2
nd
greasing
CPLS 112
14 g
11 g
CPLS 132
18 g
15 g
CPLS 160 Std, HV1, HV2
25 g
20 g
CPLS 160 HV3
16 g
11 g
CPLS 200 Std, HV1, HV2
45 g
40 g
CPLS 200 HV3
19 g
11 g
CPLS 250 Std, HV1
65 g
50 g
CPLS 250 HV2
55 g
40 g
Specific greasing information for CPLS 160 HV3 and
200 HV3 (high-speed) motors
After 5 greasings, the DE and NDE grease traps must be
dismantled, emptied and cleaned.
(See the “Cleaning the grease traps” section).
After regreasing, do not start the motor
immediately at very high speed.
Proceed in stages:
- Run the motor up to 3000 min
-1
and wait for the bearing
temperature to stabilise (10-15 min approximately).
- Increase the motor speed by another 3000 min
-1
and
wait for the bearing temperature to re-stabilise (another
10-15 minutes approximately).
The motor can then be used normally
As a rule, abrupt, frequent changes of motor speed
should be avoided, so as to “smooth out” temperature
variations in the end shields as much as possible. The
grease will then work optimally, and the bearing and
grease life will be maximised.
Cleaning the grease traps
On the DE shield:
- Take off the coupling and the shaft extension key.
- Undo the CHC screws holding the trap, and release it.
- Empty out the waste grease, clean the trap, and the grease
valve.
- Refit the trap, the CHC screws, the shaft extension key and
the coupling.
On the NDE shield:
- Remove the 3 CHC screws from the encoder protective
cover, the encoder support is also released.
- Loosen the encoder driving ring screw (at the encoder
drive end).
- Remove the encoder from the motor shaft with its support.
- Undo the CHC screws holding the trap, and release it.
- Empty out the waste grease, clean the trap, and the grease
valve.
- Refit the trap and CHC screws.
- Refit the encoder on the shaft, with its support.
- Tighten the encoder driving ring screw.
- Refit the encoder protective cover and the 3 CHC screws.
When tightening its screws, be sure not to force the encoder
feet: it must remain centred on the shaft. Forcing it could cause
high-speed vibrations, with damaging effects on the encoder .
Содержание CPLS 112
Страница 27: ......


