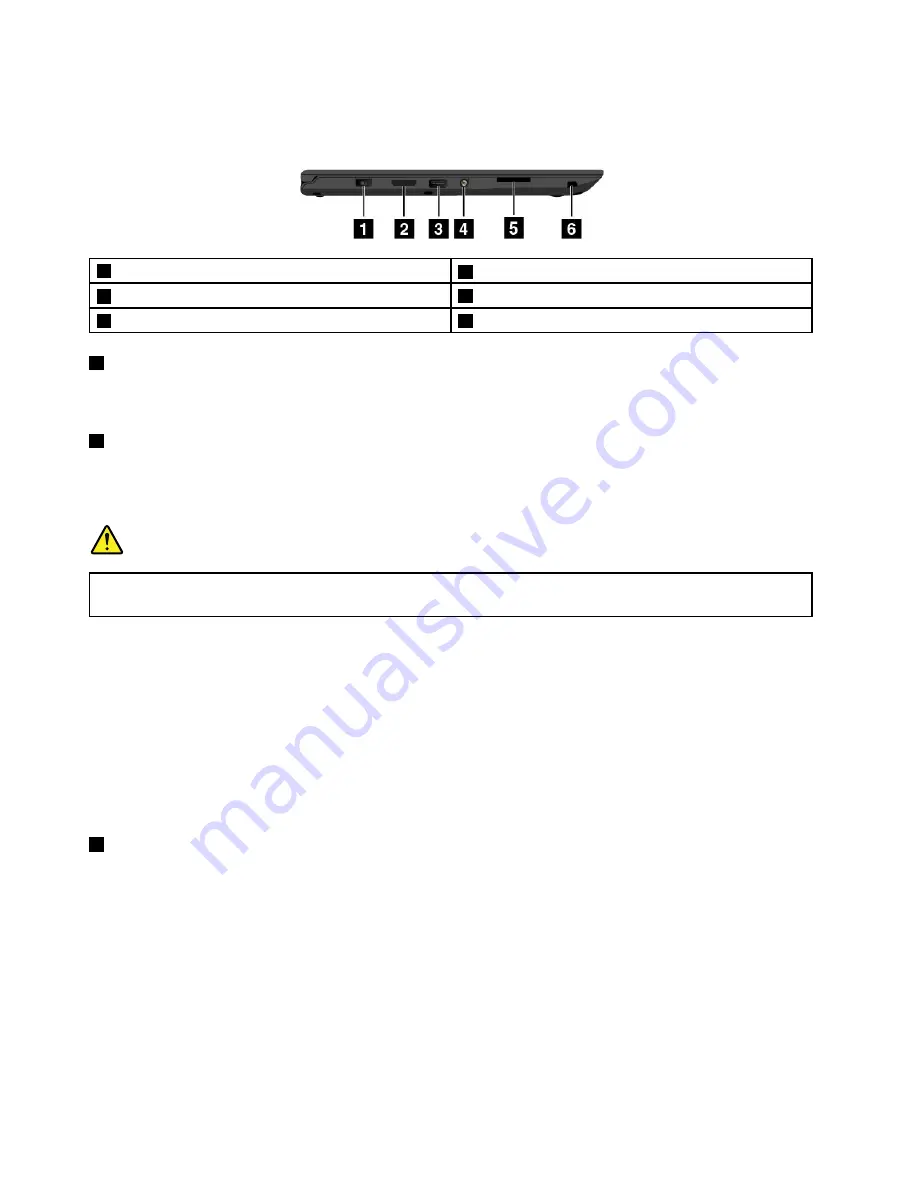
Left-side view
Note:
Depending on the model, your computer might look different from the following illustration.
1
ac power connector
2
connector
3
Always On USB connector (USB 3.0 connector)
4
Audio connector
5
Media-card slot
6
ThinkPad Pen Pro (available on some models)
1
ac power connector
Connect the ac power adapter to the power connector to provide ac power to the computer and charge
the battery.
2
connector
Use the connector to connect to the ThinkPad Dock or to connect to the
Ethernet Adapter. With the Ethernet Adapter, you can connect the computer to a local area
network (LAN).
DANGER
To avoid the risk of electrical shock, do not connect the telephone cable to the Ethernet connector
on the Ethernet Adapter. You can only connect an Ethernet cable to this connector.
Depending on the country or region of delivery, a Ethernet Adapter might be a part of the shipping
contents that come with your computer. If your computer does not come with the Ethernet
Adapter, you can purchase one from Lenovo at:
http://www.lenovo.com/accessories/services/index.html
The Ethernet connector on the Ethernet Adapter has two network status indicators. When the
green indicator is on, the computer is connected to a LAN. When the yellow indicator blinks, data is being
transmitted.
For instructions on how to use the ThinkPad Dock, see “ThinkPad Dock” on page 47.
3
Always On USB connector (USB 3.0 connector)
By default, the Always On USB connector enables you to charge some mobile digital devices and
smartphones when your computer is in the following situations:
• When your computer is on or in sleep mode
• When your computer is in hibernation mode or is turned off, but connected to ac power
To charge these devices when the computer is in hibernation mode or turned off, and the computer is not
connected to ac power, do the following:
•
For Windows 7
: Start the Power Manager program, click the
Global Power Settings
tab, and then
follow the instructions on the screen.
•
For Windows 10
: Start the Lenovo Settings program, click
POWER
, and then follow the instructions on
the screen.
4
ThinkPad P40 Yoga, ThinkPad S3, ThinkPad Yoga 14, and ThinkPad Yoga 460 User Guide
Содержание ThinkPad Yoga 460
Страница 1: ...ThinkPad P40 Yoga ThinkPad S3 ThinkPad Yoga 14 and ThinkPad Yoga 460 User Guide ...
Страница 6: ...iv ThinkPad P40 Yoga ThinkPad S3 ThinkPad Yoga 14 and ThinkPad Yoga 460 User Guide ...
Страница 16: ...xiv ThinkPad P40 Yoga ThinkPad S3 ThinkPad Yoga 14 and ThinkPad Yoga 460 User Guide ...
Страница 70: ...54 ThinkPad P40 Yoga ThinkPad S3 ThinkPad Yoga 14 and ThinkPad Yoga 460 User Guide ...
Страница 82: ...66 ThinkPad P40 Yoga ThinkPad S3 ThinkPad Yoga 14 and ThinkPad Yoga 460 User Guide ...
Страница 108: ...92 ThinkPad P40 Yoga ThinkPad S3 ThinkPad Yoga 14 and ThinkPad Yoga 460 User Guide ...
Страница 124: ...108 ThinkPad P40 Yoga ThinkPad S3 ThinkPad Yoga 14 and ThinkPad Yoga 460 User Guide ...
Страница 132: ...116 ThinkPad P40 Yoga ThinkPad S3 ThinkPad Yoga 14 and ThinkPad Yoga 460 User Guide ...
Страница 151: ...6 Remove the dc in bracket 7 Remove the ac power card Chapter 10 Replacing devices 135 ...
Страница 158: ...142 ThinkPad P40 Yoga ThinkPad S3 ThinkPad Yoga 14 and ThinkPad Yoga 460 User Guide ...
Страница 162: ...146 ThinkPad P40 Yoga ThinkPad S3 ThinkPad Yoga 14 and ThinkPad Yoga 460 User Guide ...
Страница 172: ...156 ThinkPad P40 Yoga ThinkPad S3 ThinkPad Yoga 14 and ThinkPad Yoga 460 User Guide ...
Страница 176: ...160 ThinkPad P40 Yoga ThinkPad S3 ThinkPad Yoga 14 and ThinkPad Yoga 460 User Guide ...
Страница 181: ......
Страница 182: ......