2
USB 3.0 connector
: Used to connect devices that are compatible with USB 3.0 and USB 2.0.
3
Always On USB connector
: By default, the Always On USB connector enables you to charge some
mobile digital devices and smartphones no matter when your computer is in sleep mode, hibernation mode,
or is off. For more information, refer to the documentation that comes with the dock.
4
Combo audio connector
: Used to connect headphones or a headset that has a 3.5-mm (0.14-inch),
4-pole plug.
5
System-status indicator
: The indicator on the illuminated ThinkPad logo functions the same as the ones
on the computer. For details, see “Status indicators” on page 7.
6
Power button
: The power button on the dock functions the same as the one on the computer.
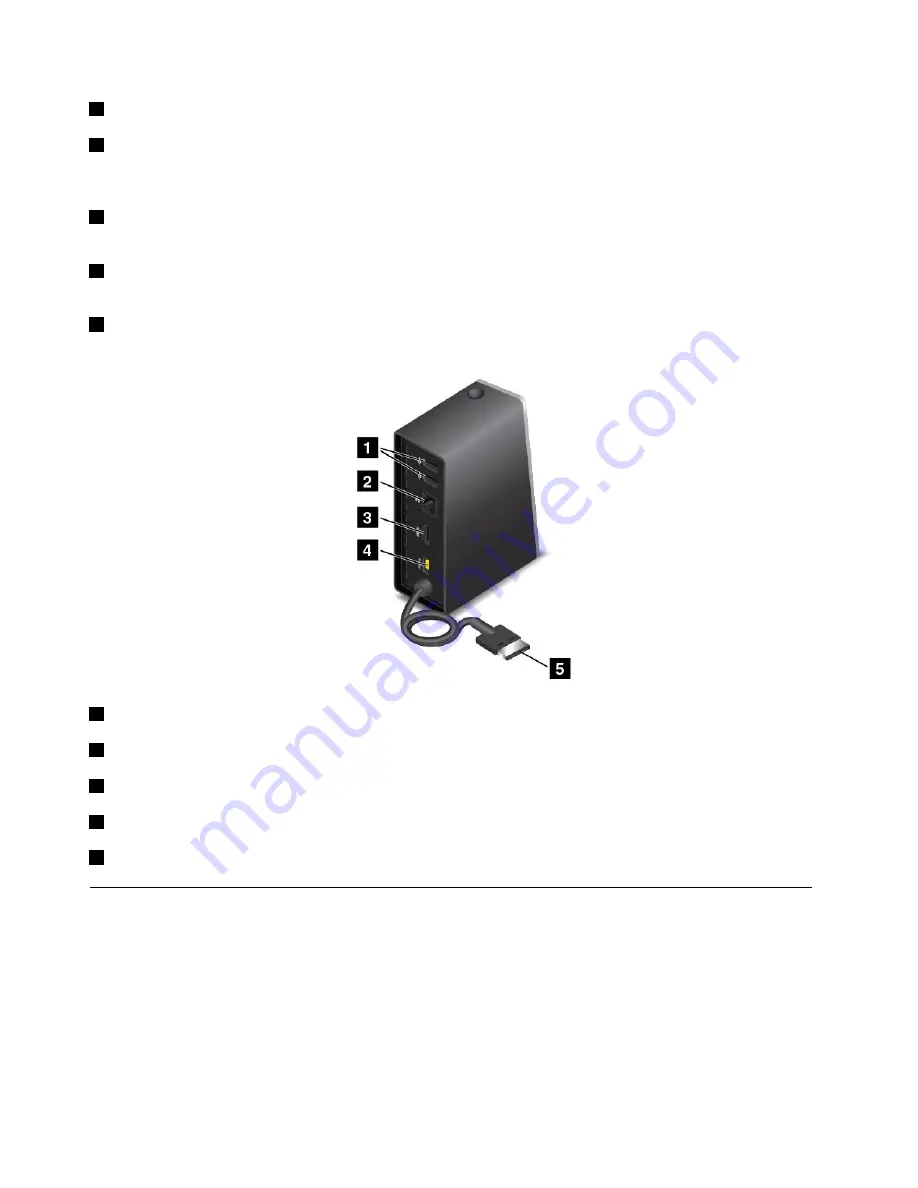
Rear view
1
USB 2.0 connector
: Used to connect devices that are compatible with USB 2.0.
2
Ethernet connector
: Used to connect the dock to an Ethernet LAN.
3
HDMI connector
: Used to connect a digital audio device or video monitor that is compatible with HDMI.
4
Power connector
: Used to connect the ac power adapter.
5
Lenovo OneLink connector
: Connect the Lenovo OneLink connector to the computer.
ThinkPad OneLink Pro Dock
Depending on the model, your computer might support the ThinkPad OneLink Pro Dock (hereafter referred to
as the dock). Attach your computer to the dock to expand the working capability.
This topic provides basic information about the dock. For detailed information about using the dock, refer
to the documentation that comes with the dock.
Note:
Depending on the model, your dock might look slightly different from the illustrations in this topic.
56
User Guide
Содержание ThinkPad Yoga 14
Страница 1: ...User Guide ThinkPad Yoga 14 ...
Страница 6: ...iv User Guide ...
Страница 16: ...xiv User Guide ...
Страница 70: ...54 User Guide ...
Страница 82: ...66 User Guide ...
Страница 114: ...98 User Guide ...
Страница 153: ...6 Remove the dc in bracket 7 Remove the audio OneLink ac power USB card Chapter 10 Replacing devices 137 ...
Страница 154: ...8 Install the new card in place 9 Install the dc in bracket in place 138 User Guide ...
Страница 156: ...4 Detach the connector 5 Remove the screws Then remove the speaker assembly 140 User Guide ...
Страница 160: ...144 User Guide ...
Страница 164: ...148 User Guide ...
Страница 170: ...154 User Guide ...
Страница 174: ...158 User Guide ...
Страница 178: ...162 User Guide ...
Страница 183: ......
Страница 184: ......