background image

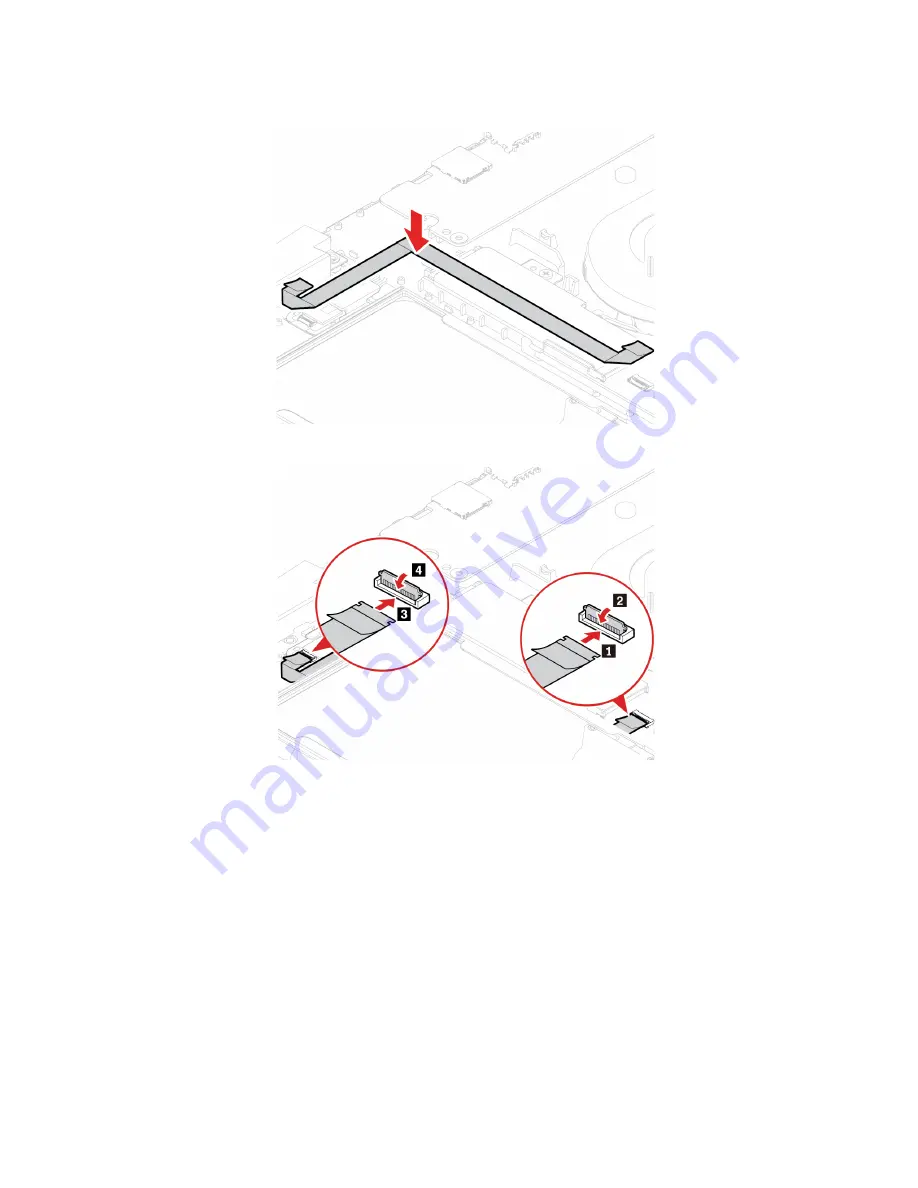
11.  Install the cable. 

12.  Attach the connectors. 

13.  Reinstall the base cover assembly.

14.  Turn the computer over. Connect the ac power adapter and all disconnected cables to the computer.

Keyboard

Prerequisite

Before you start, read Appendix A “Important safety information” on page 65 and print the following 
instructions.

Replacement procedure

Note:

You might be instructed to slide the keyboard frame forward or backward in some of the following 

steps. In this case, ensure that you do not press or hold the keys while sliding the keyboard frame. 
Otherwise, the keyboard frame cannot be moved.

1.  Disable the built-in battery. See “Disable Fast Startup and the built-in battery” on page 35.

2.  Turn off the computer and disconnect the computer from ac power and all connected cables.

52

E590 and R590 User Guide

Содержание ThinkPad E590

Страница 1: ...E590 and R590 User Guide ...

Страница 2: ...ant safety information on page 65 Safety and Warranty Guide Setup Guide First Edition October 2018 Copyright Lenovo 2018 LIMITED AND RESTRICTED RIGHTS NOTICE If data or software is delivered pursuant to a General Services Administration GSA contract use reproduction or disclosure is subject to restrictions set forth in Contract No GS 35F 05925 ...

Страница 3: ... the computer 25 Use passwords 25 Password types 25 Set change and remove a password 26 Use fingerprint authentication for selected models 27 Use firewalls and antivirus programs 28 Chapter 5 Configure advanced settings 29 UEFI BIOS 29 What is UEFI BIOS 29 Enter the BIOS menu 29 Navigate in the BIOS interface 29 Change the startup sequence 29 Set the system date and time 30 Update UEFI BIOS 30 Rec...

Страница 4: ...ons 85 Recycling and environmental information 85 Important WEEE information 85 Japan recycling statements 86 Recycling information for Brazil 87 Battery recycling information for the European Union 87 Recycling information for China 88 Battery recycling information for Taiwan 88 Battery recycling information for the United States and Canada 88 Restriction of Hazardous Substances RoHS Directive of...

Страница 5: ... not be applicable to your computer Documentation content is subject to change without notice Lenovo makes constant improvements on the documentation of your computer including this User Guide To get the latest documentation go to https support lenovo com Microsoft makes periodic feature changes to the Windows operating system through Windows Update As a result some information in this documentati...

Страница 6: ...iv E590 and R590 User Guide ...

Страница 7: ... indicator nearby is on when in use If you use other apps that support photographing video chatting and video conference the camera starts automatically when you enable the camera required feature from the app 3 Screen User the full high definition FHD or high definition HD display to enhance your visual experience when you watch movies browse the Web and so on Copyright Lenovo 2018 1 ...

Страница 8: ...g rapidly The computer is entering sleep or hibernation mode Blinking slowly The computer is in sleep mode 2 Numeric keypad Quickly input numbers 3 Fingerprint reader Log in to your computer with enrolled fingerprints See Use fingerprint authentication for selected models on page 27 4 Speakers Play sound 5 Trackpad Perform finger touch and all the functions of a traditional mouse See Use the track...

Страница 9: ...ssories connected to the USB C connector might not work correctly 2 HDMI connector The HDMI connector is a digital audio and video interface It enables you to connect your computer to a compatible digital audio device or video monitor such as a DVD player or an HDTV 3 Always On USB 3 1 connector Gen 1 With the Always On USB feature enabled the Always On USB 3 1 connector Gen 1 can charge a USB com...

Страница 10: ...oard USB mouse USB storage device or USB printer 5 Audio connector Connect headphones or a headset with a 3 5 mm 0 14 inch and 4 pole plug to listen to the sound from the computer Note The conventional microphone is not supported for selected models 4 E590 and R590 User Guide ...

Страница 11: ... USB storage device or USB printer 3 Ethernet connector Connect to a local area network LAN When the green indicator is on the computer is connected to a LAN When the yellow indicator blinks data is being transmitted 4 Security lock slot Lock your computer to a desk table or other fixtures through a compatible security cable lock See Lock the computer on page 25 Chapter 1 Meet your computer 5 ...

Страница 12: ...ogy Display size 396 2 mm 15 6 inches Display resolution 1366 x 768 or 1920 x 1080 pixels Intel UHD graphics or AMD discrete graphics Keyboard Function keys Numeric keypad Six row keyboard traditional or backlight Trackpad TrackPoint pointing device Connectors and slots Always On USB 3 1 connector Gen 1 Audio connector Ethernet connector HDMI connector microSD card slot USB C connector USB 2 0 con...

Страница 13: ...s Thickness 20 7 mm 0 81 inches Maximum heat output depending on the model 45 W 154 Btu hr 65 W 222 Btu hr Power source ac power adapter Sine wave input at 50 Hz to 60 Hz Input rating of the ac power adapter 100 V to 240 V ac 50 Hz to 60 Hz Chapter 1 Meet your computer 7 ...

Страница 14: ...8 E590 and R590 User Guide ...

Страница 15: ... of the Administrator type With an Administrator account you can create additional user accounts or change account types by doing the following 1 Open the Start menu and select Settings Accounts Family other people 2 Follow the on screen instructions Microsoft account You can also log in to the Windows operating system with a Microsoft account To create a Microsoft account go to the Microsoft sign...

Страница 16: ...ch among them 7 Windows notification area Display notifications and status of some features 8 Battery status icon Display power status and change battery or power settings When your computer is not connected to ac power the icon changes to 9 Network icon Connect to an available wireless network and display the network status When connected to a wired network the icon changes to 10 Action center Di...

Страница 17: ...formation provided by Microsoft at https www microsoft com en us howtotell default aspx There are no external visual indicators of the Product ID or Windows version for which the computer is licensed Instead the Product ID is recorded in the computer firmware Whenever a Windows 10 product is installed the installation program checks the computer firmware for a valid matching Product ID to complete...

Страница 18: ...ending on the computer model System Update Download and install firmware and driver updates to keep your computer up to date You can configure the options to install updates automatically when available Hardware Settings Configure intelligent settings of the following hardware to make your computer smarter to use Always On USB Battery Camera Computer display Keyboard Microphone Speakers Trackpad T...

Страница 19: ...tters 4 F1 F12 function keys Invoke the special function printed as an icon on each key or standard function To choose whether to invoke the special function or standard function 1 Go to Control Panel and view by Large icons or Small icons 2 Click Keyboard or Lenovo Keyboard Manager and select the option of your preference Switch the function of the F1 F12 keys between the standard function and sp...

Страница 20: ... Click Hardware Settings and then click Input 3 Locate the Keyboard User defined Key section and follow the on screen instructions to complete the setting On this setting page you can also define different functions for the key combinations with F12 such as Shift F12 Alt F12 or Ctrl F12 Open the calculator Put your computer to sleep mode Open the Snipping Tool program Fn Spacebar Switch between di...

Страница 21: ...ting stick itself does not move The higher the pressure applied the faster the pointer moves 2 Left click button Press to select or open an item 3 Right click button Press to display a shortcut menu 4 Scroll bar Press and hold the dotted scroll bar while applying pressure to the pointing stick in the vertical or horizontal direction Then you can scroll through the document Web site or apps Disable...

Страница 22: ...ing clicking and scrolling functions of a traditional mouse Use the trackpad 1 Left click zone Press to select or open an item You also can tap anywhere on the surface of the trackpad with one finger to perform the left click action 2 Right click zone Press to display a shortcut menu You also can tap anywhere on the surface of the trackpad with two fingers to perform the right click action 16 E590...

Страница 23: ...top Notes When using two or more fingers ensure that you position your fingers slightly apart Some gestures are not available if the last action was done from the TrackPoint pointing device Some gestures are only available when you are using certain apps If the trackpad surface is stained with oil turn off the computer first Then gently wipe the trackpad surface with a soft and lint free cloth moi...

Страница 24: ...ke photos or record a video 1 Open the Start menu and click Camera 2 To take a photo click the camera icon If you want to record video click the video icon to switch to video mode If you use other programs that provide features such as photographing video capturing and video conference the camera starts automatically when you enable the camera required feature To configure the camera settings 1 Op...

Страница 25: ... screen only Computer only or Disconnect projector Duplicate Displays the same video output on both your computer screen and an external display Extend Extends the video output from your computer display to an external display You can drag and move items between the two displays Second screen only Displays the video output only on an external display Note Depending on the situation you might see P...

Страница 26: ...20 E590 and R590 User Guide ...

Страница 27: ...attery charging is also affected by the battery temperature The recommended battery temperature range for charging the battery is between 10 C 50 F and 35 C 95 F Note To maximize the life of the battery the computer does not recharge the battery if the remaining power is greater than 95 Check the battery temperature 1 Open the Start menu and click Lenovo Vantage 2 Click Hardware Settings Power 3 L...

Страница 28: ...eakers The devices must be within a short distance usually 10 meters 33 feet from the computer 1 Turn on Bluetooth on the computer Press or Open the Start menu and then click Settings Devices Bluetooth other devices Turn on the Bluetooth switch 2 Click Add Bluetooth or other device Bluetooth 3 Select a Bluetooth device and then follow the on screen instructions Your Bluetooth device and computer w...

Страница 29: ... from the Windows operating system 3 Press the card and remove it from your computer Store the card safely for future use Airplane mode When the Airplane mode is enabled all wireless features are disabled To enable or disable the Airplane mode 1 Open the Start menu 2 Click Settings Network Internet Airplane mode 3 Turn on or turn off the Airplane mode switch Purchase options Lenovo has a number of...

Страница 30: ...24 E590 and R590 User Guide ...

Страница 31: ...ick com Your computer might look different from the illustration Use passwords This section introduces types of passwords in UEFI Unified Extensible Firmware Interface BIOS Basic Input Output System and how to set change and remove a password Password types You can set a power on password supervisor password or hard disk password in UEFI BIOS to prevent unauthorized access to your computer However...

Страница 32: ...The user of the computer can change the user hard disk password as desired but only the administrator can remove the user hard disk password When prompted to enter a hard disk password press F1 to switch between the master hard disk password and user hard disk password Attention Record your hard disk password and store it in a safe place If you forget the hard disk password Lenovo cannot reset you...

Страница 33: ...rd hard disk password or both as required The connection is created When you start the computer again you can use your fingerprints to log in to the computer without entering your Windows password power on password or hard disk password To change the settings go to the BIOS menu Attention If you always use your fingerprint to log in to the computer you might forget your passwords Write down your p...

Страница 34: ...rity threats unauthorized access intrusions and Internet attacks It also protects your privacy A full version of antivirus program is provided with a free 30 day subscription After 30 days you must renew the license to continue receiving the antivirus program updates For more information see the help system of the program 28 E590 and R590 User Guide ...

Страница 35: ...press Enter to skip the password prompt and enter the BIOS menu However you cannot change the system configurations that are protected by the supervisor password Navigate in the BIOS interface Attention The default configurations are already optimized for you in boldface Improper change of the configurations might cause unexpected results You can navigate in the BIOS interface by pressing the foll...

Страница 36: ...date package will be downloaded and installed automatically From the Lenovo Support Web site Go to https support lenovo com and select the entry for your computer Then follow the on screen instructions to download and install the latest UEFI BIOS update package Recovery information This section introduces the recovery information of the Windows 10 operating system Ensure that you read and follow t...

Страница 37: ...Windows 10 operating system It enables you to recover or repair the operating system even if the Windows 10 operating system fails to start After two consecutive failed boot attempts the Windows recovery environment starts automatically Then you can choose repair and recovery options by following the on screen instructions Create and use a recovery USB device It is recommended that you create a re...

Страница 38: ...ata on your internal storage drive including the data stored in a hidden folder 1 If you are using the Windows BitLocker Drive Encryption feature and your computer has a Trusted Platform Module ensure that you have disabled the feature 2 Ensure that the security chip is set to Active a Restart the computer When the logo screen is displayed press F1 to enter the BIOS menu b Select Security Security...

Страница 39: ...emory and then follow the instructions on the screen to enable it Install device drivers You should download the latest driver for a component when you notice poor performance from that component or when you added a component This action might eliminate the driver as the potential cause of a problem Download and install the latest driver by one of the following methods From Lenovo Vantage 1 Open t...

Страница 40: ...34 E590 and R590 User Guide ...

Страница 41: ...eturn the defective part that is replaced by the CRU When return is required 1 return instructions a prepaid shipping label and a container will be included with the replacement CRU and 2 you might be charged for the replacement CRU if Lenovo does not receive the defective CRU within thirty 30 days of your receipt of the replacement CRU For full details see the Lenovo Limited Warranty documentatio...

Страница 42: ...Select Yes in the Setup Confirmation window The built in battery is disabled and the computer turns off automatically Wait three to five minutes to let the computer cool Replace a CRU Follow the replacement procedure to replace a CRU Base cover assembly Prerequisite Before you start read Appendix A Important safety information on page 65 and print the following instructions Note Do not remove the ...

Страница 43: ...that the latches of the base cover assembly are secured in place 2 Then tighten the screws 3 6 Turn the computer over Connect the ac power adapter and all disconnected cables to the computer Troubleshooting If the computer does not start up after you reinstall the base cover assembly disconnect the ac power adapter and then reconnect it to the computer Chapter 6 CRU replacement 37 ...

Страница 44: ... built in battery See Disable Fast Startup and the built in battery on page 35 2 Turn off the computer and disconnect the computer from ac power and all connected cables 3 Close the computer display and turn the computer over 4 Remove the base cover assembly See Base cover assembly on page 36 5 Open the latches on both sides of the memory slot at the same time 1 and then remove the memory module 2...

Страница 45: ...installed in the memory slot next to the thermal fan assembly 7 Reinstall the base cover assembly 8 Turn the computer over Connect the ac power adapter and all disconnected cables to the computer Speaker assembly Prerequisite Before you start read Appendix A Important safety information on page 65 and print the following instructions Replacement procedure 1 Disable the built in battery See Disable...

Страница 46: ...5 Detach the connector of the speaker assembly 6 Remove the speaker assembly 7 Install the new speaker assembly in place 40 E590 and R590 User Guide ...

Страница 47: ...d for frequent changes or replacement Before replacing the hard disk drive make a backup copy of all the data that you want to keep Do not touch the contact edge of the hard disk drive Otherwise the hard disk drive might get damaged Do not apply pressure to the hard disk drive Do not make the hard disk drive subject to physical shocks or vibration Put the hard disk drive on a soft material such as...

Страница 48: ...isk drive cable from the system board Lift the tab and remove the hard disk drive together with its bracket 6 Detach the cable from the hard disk drive 7 Detach the bracket from the hard disk drive 42 E590 and R590 User Guide ...

Страница 49: ... new hard disk drive is seated in place Connect the hard disk drive cable to the system board 11 Reinstall the base cover assembly 12 Turn the computer over Connect the ac power adapter and all disconnected cables to the computer M 2 solid state drive Prerequisite Before you start read Appendix A Important safety information on page 65 and print the following instructions Chapter 6 CRU replacement...

Страница 50: ...he M 2 solid state drive subject to physical shocks or vibration Put the M 2 solid state drive on a soft material such as cloth to absorb physical shocks Replacement procedure for the long M 2 solid state drive 1 Disable the built in battery See Disable Fast Startup and the built in battery on page 35 2 Turn off the computer and disconnect the computer from ac power and all connected cables 3 Clos...

Страница 51: ...puter over Connect the ac power adapter and all disconnected cables to the computer Replacement procedure for the short M 2 solid state drive 1 Disable the built in battery See Disable Fast Startup and the built in battery on page 35 2 Turn off the computer and disconnect the computer from ac power and all connected cables 3 Close the computer display and turn the computer over 4 Remove the base c...

Страница 52: ...loosen the screw 2 to remove the long bracket 3 Note Two thermal pads are attached underneath the long bracket to prevent possible overheating Ensure that the thermal pads are not removed or damaged 46 E590 and R590 User Guide ...

Страница 53: ...es the M 2 solid state drive Then remove the M 2 solid state drive out of the slot 2 Note Remove the short bracket if you want to replace the short M 2 solid state drive with a long M 2 solid state drive Chapter 6 CRU replacement 47 ...

Страница 54: ...einstall the long bracket into place 1 2 Then install the screw 3 and tighten the screw 4 9 Reinstall the base cover assembly 10 Turn the computer over Connect the ac power adapter and all disconnected cables to the computer Fingerprint reader Prerequisite Before you start read Appendix A Important safety information on page 65 and print the following instructions 48 E590 and R590 User Guide ...

Страница 55: ...n page 35 2 Turn off the computer and disconnect the computer from ac power and all connected cables 3 Close the computer display and turn the computer over 4 Remove the base cover assembly See Base cover assembly on page 36 5 Detach the connectors 6 Remove the cable as shown Chapter 6 CRU replacement 49 ...

Страница 56: ...7 Remove the screw that secures the bracket 8 Remove the bracket 1 and the fingerprint reader 2 50 E590 and R590 User Guide ...

Страница 57: ...9 Install the new fingerprint reader 1 and the bracket 2 in place 10 Install the screw to secure the fingerprint reader Chapter 6 CRU replacement 51 ...

Страница 58: ...owing instructions Replacement procedure Note You might be instructed to slide the keyboard frame forward or backward in some of the following steps In this case ensure that you do not press or hold the keys while sliding the keyboard frame Otherwise the keyboard frame cannot be moved 1 Disable the built in battery See Disable Fast Startup and the built in battery on page 35 2 Turn off the compute...

Страница 59: ...cures the keyboard 6 Turn the computer over and open the display Take the tool out of the new keyboard package Insert the tabs a and b into the slot between the TrackPoint buttons and the trackpad 1 Slightly pivot the tool downward 2 to release the left and right Trackpoint buttons Then remove the two Trackpoint buttons 3 Chapter 6 CRU replacement 53 ...

Страница 60: ...s c and d into the two dents near the two screw heads as shown 9 Pivot the tool in the direction as shown to release the keyboard 1 Push the keyboard in the direction as shown by arrows 2 to release the latches from the keyboard bezel 54 E590 and R590 User Guide ...

Страница 61: ...yboard slightly upward as shown by arrow 1 Then turn the keyboard over as shown by arrow 2 11 Put the keyboard on the palm rest as shown and detach the connectors Then remove the keyboard Chapter 6 CRU replacement 55 ...

Страница 62: ...nd turn the keyboard over as shown 13 Insert the keyboard into the keyboard bezel as shown Ensure that the front edge of the keyboard the edge that is close to the display is under the keyboard bezel 56 E590 and R590 User Guide ...

Страница 63: ...14 Slide the keyboard in the direction as shown by the arrows Ensure that the latches are secured under the keyboard frame 15 Tighten the screws to secure the keyboard Chapter 6 CRU replacement 57 ...

Страница 64: ...rd package Install the TrackPoint buttons as shown 17 Install the screw to secure the keyboard 18 Reinstall the base cover assembly 19 Turn the computer over Connect the ac power adapter and all disconnected cables to the computer 58 E590 and R590 User Guide ...

Страница 65: ...computer immediately The more quickly you stop the current from passing through the computer the more likely you will reduce damage from short circuits Attention Although you might lose some data or work by turning off the computer immediately leaving the computer on might make your computer unusable 2 Do not try to drain out the liquid by turning over the computer If your computer has keyboard dr...

Страница 66: ...ad error on HDDx SSDx The storage drive is not working Reinstall the storage drive If the problem still exists replace the storage drive Error The non volatile system UEFI variable storage is nearly full Note This error indicates that the operating system or programs cannot create modify or delete data in the non volatile system UEFI variable storage due to insufficient storage space after POST Th...

Страница 67: ...e proper diagnostic app and install it on your smartphone 3 Run the diagnostic app and place the smartphone near the computer 4 Press Fn on your computer to emit the beep again The diagnostic app decodes the beep error and shows possible solutions on the smartphone Note Do not attempt to service a product yourself unless instructed to do so by the Customer Support Center or product documentation O...

Страница 68: ...rranty Guide Setup Guide This User Guide Regulatory Notice 1 Go to https support lenovo com 2 Detect your computer or select computer model manually 3 Select Documentation and filter out the documentation you want Lenovo Support Web site with the latest support information of the following Drivers and software Diagnostic solutions Product and service warranty Product and parts details Knowledge ba...

Страница 69: ...ormation Product name Machine type and serial number The following illustration shows where to find the machine type and serial number of your computer Lenovo Customer Support Center During the warranty period you can call Lenovo Customer Support Center for help Telephone numbers For a list of the Lenovo Support phone numbers for your country or region Go to https pcsupport lenovo com supportphone...

Страница 70: ...r hardware available Services not covered Replacement or use of parts not manufactured for or by Lenovo or nonwarranted parts Identification of software problem sources Configuration of UEFI BIOS as part of an installation or upgrade Changes modifications or upgrades to device drivers Installation and maintenance of network operating systems NOS Installation and maintenance of programs For the ter...

Страница 71: ...n includes references to power adapters and batteries In addition some products such as speakers and monitors ship with external power adapters If you have such a product this information applies to your product In addition computer products contain a coin sized internal battery that provides power to the system clock even when the computer is unplugged so the battery safety information applies to...

Страница 72: ...ep liquids away from your computer Protect the cables from being damaged Applying strong force to cables may damage or break them Route communication lines or the cables of an ac power adapter a mouse a keyboard a printer or any other electronic device so that they cannot be walked on tripped over pinched by your computer or other objects or in any way subject to treatment that could interfere wit...

Страница 73: ... from your product Or you might hear sounds like popping cracking or hissing These might merely mean that an internal electronic component has failed in a safe and controlled manner Or they might indicate a potential safety issue Do not take risks or attempt to diagnose the situation yourself Contact the Customer Support Center for further guidance For a list of Service and Support phone numbers s...

Страница 74: ... approved for customer installation are referred to as Customer Replaceable Units or CRUs Lenovo provides documentation with instructions when it is appropriate for customers to install options or replace CRUs You must closely follow all instructions when installing or replacing parts The Off state of a power indicator does not necessarily mean that voltage levels inside a product are zero Before ...

Страница 75: ...gradual corrosion of power cord terminals and or the connector terminals on a power adapter which can eventually result in overheating Ensure that all power cord connectors are securely and completely plugged into receptacles Do not use any power adapter that shows corrosion at the ac input pins or shows signs of overheating such as deformed plastic at the ac input pins or anywhere on the power ad...

Страница 76: ...rating Consult an electrician for more information if you have questions about power loads and branch circuit ratings Be sure that the power outlet you are using is properly wired easily accessible and located close to the equipment Do not fully extend power cords in a way that will stress the cords Be sure that the power outlet provides the correct voltage and current for the product you are inst...

Страница 77: ... at room temperature charged to approximately 30 to 50 of capacity We recommend that the batteries be charged about once per year to prevent overdischarge Do not put the battery in trash that is disposed of in landfills When disposing of the battery comply with local ordinances or regulations Notice for built in rechargeable battery DANGER Do not attempt to remove or replace the built in rechargea...

Страница 78: ...m coin cell battery is swallowed or placed inside any part of the body seek medical care immediately Do not Throw or immerse into water Heat to more than 100 C 212 F Repair or disassemble Leave in an extremely low air pressure environment Leave in an extremely high temperature environment Crush puncture cut or incinerate Dispose of the battery as required by local ordinances or regulations The fol...

Страница 79: ... computer or charge the battery near flammable materials or in explosive environments Ventilation slots fans and or heat sinks are provided with the product for safety comfort and reliable operation These features might inadvertently become blocked by placing the product on a bed sofa carpet or other flexible surface Never block cover or disable these features When the ac power adapter is connecte...

Страница 80: ...til all internal parts enclosures are fastened into place Never use the computer when internal parts and circuits are exposed DANGER Connect and disconnect cables as described in the following procedures when installing moving or opening covers on this product or attached devices To connect 1 Turn everything OFF 2 First attach all cables to devices 3 Attach signal cables to connectors 4 Attach pow...

Страница 81: ...ctors do not comply with specifications of EN 50332 2 The headphone output connector of your computer complies with EN 50332 2 Sub clause 7 This specification limits the computer s maximum wide band true RMS output voltage to 150 mV To help protect against hearing loss ensure that the headphones or earphones you use also comply with EN 50332 2 Clause 7 limits for a wide band characteristic voltage...

Страница 82: ...exposed circuitry Prevent others from touching components When you install a static sensitive option or CRU touch the static protective package containing the part to a metal expansion slot cover or other unpainted metal surface on the computer for at least two seconds This reduces static electricity in the package and your body When possible remove the static sensitive part from the static protec...

Страница 83: ...uthorized Lenovo repair technician should disassemble and repair your computer Do not modify or tape the latches to keep the display open or closed Avoid directly exposing your computer and peripherals to the air from an appliance that can produce negative ions Wherever possible ground your computer to facilitate safe electrostatic discharge Clean your computer It is a good practice to clean your ...

Страница 84: ...78 E590 and R590 User Guide ...

Страница 85: ...k Turn on or turn off Mouse Keys Left Alt Left Shift PrtScn or PrtSc Turn on or turn off High Contrast For more information go to https windows microsoft com and then search using any of the following keywords keyboard shortcuts key combinations shortcut keys Ease of Access Center Ease of Access Center on the Windows operating system enables you to configure your computers to suit their physical a...

Страница 86: ...d send e mails To use Speech Recognition 1 Go to Control Panel and view by Category 2 Click Ease of Access Speech Recognition 3 Follow the on screen instructions Screen reader technologies Screen reader technologies are primarily focused on software program interfaces help systems and various online documents For additional information about screen readers see the following Use PDFs with screen re...

Страница 87: ...ough a screen reader Each image in the documentation also includes adequate alternative text so that visually impaired users can understand the image when they use a screen reader Ergonomic information Good ergonomic practice is important to get the most from your personal computer and to avoid discomfort Arrange your workplace and the equipment you use to suit your individual needs and the kind o...

Страница 88: ...It might not be possible to observe the best ergonomic practices when you are using your computer while on the move or in a casual setting Regardless of the setting try to observe as many of the tips as possible Sitting properly and using adequate lighting for example helps you maintain desirable levels of comfort and performance If your work area is not in an office setting ensure to take special...

Страница 89: ...ated wireless cards that operate within the guidelines identified by radio frequency RF safety standards and recommendations therefore Lenovo believes that this product is safe for use by consumers These standards and recommendations reflect the consensus of the worldwide scientific community and result from deliberations of panels and committees of scientists who continually review and interpret ...

Страница 90: ...https www lenovo com us en social_responsibility EU_DoC_notebooks For wireless peripheral devices https www lenovo com us en social_responsibility EU_DoC_wireless_ options Lenovo cannot accept responsibility for any failure to satisfy the protection requirements resulting from a non recommended modification of the product including the installation of option cards from other manufacturers This pro...

Страница 91: ...AR 값은 국가 보고 및 테스트 요구 사항과 네트워크 대역에 따라 다를 수 있습니다 본 장치 는 사람의 신체에서 20mm 이상의 거리에서 사용할 수 있습니다 Environmental information of countries and regions This section provides environmental recycling and RoHS information about Lenovo products Recycling and environmental information Lenovo encourages owners of information technology IT equipment to responsibly recycle their equipment when it is no longer needed L...

Страница 92: ...lect and recycle a disused Lenovo computer or monitor If you are a company employee and need to dispose of a Lenovo computer or monitor that is the property of the company you must do so in accordance with the Law for Promotion of Effective Utilization of Resources Computers and monitors are categorized as industrial waste and should be properly disposed of by an industrial waste disposal contract...

Страница 93: ... que sejam encaminhados e processados por empresas especializadas no manuseio de resíduos industriais devidamente certificadas pelos orgãos ambientais de acordo com a legislação local A Lenovo possui um canal específico para auxiliá lo no descarte desses produtos Caso você possua um produto Lenovo em situação de descarte ligue para o nosso SAC ou encaminhe um e mail para reciclar lenovo com inform...

Страница 94: ...be installed inside your Lenovo product You can find details about the battery in the product documentation If the battery needs to be replaced contact your place of purchase or contact Lenovo for service If you need to dispose of a lithium battery insulate it with vinyl tape contact your place of purchase or a waste disposal operator and follow their instructions Dispose of battery packs from Len...

Страница 95: ...equipment RoHS recast or RoHS 2 For more information about Lenovo worldwide compliance on RoHS go to https www lenovo com rohs communication Turkish RoHS The Lenovo product meets the requirements of the Republic of Turkey Directive on the Restriction of the Use of Certain Hazardous Substances in Waste Electrical and Electronic Equipment WEEE Ukraine RoHS India RoHS RoHS compliant as per E Waste Ma...

Страница 96: ...90 E590 and R590 User Guide ...

Страница 97: ...g information refers to ThinkPad E590 and ThinkPad R590 machine types 20NB 20NC and 20ND This equipment has been tested and found to comply with the limits for a Class B digital device pursuant to Part 15 of the FCC Rules These limits are designed to provide reasonable protection against harmful Appendix C Compliance information 91 ...

Страница 98: ...peration is subject to the following two conditions 1 this device may not cause harmful interference and 2 this device must accept any interference received including interference that may cause undesired operation Responsible Party Lenovo United States Incorporated 7001 Development Drive Morrisville NC 27560 Email FCC lenovo com FCC ID and IC Certification information You can find the FCC and IC ...

Страница 99: ...rträglichkeit von Betriebsmitteln EMVG vom 20 Juli 2007 früher Gesetz über die elektromagnetische Verträglichkeit von Geräten bzw der EU Richtlinie 2014 30 EU der EU Richtlinie 2014 53 EU Artikel 3 1b für Geräte der Klasse B Dieses Gerät ist berechtigt in Übereinstimmung mit dem Deutschen EMVG das EG Konformitätszeichen CE zu führen Verantwortlich für die Konformitätserklärung nach Paragraf 5 des ...

Страница 100: ...er When the logo screen is displayed press Enter or tap the prompt to enter the Startup Interrupt menu Then press F9 or tap the Regulatory Information option The E label screen is displayed Korean E label notice TCO certification for E590 only To obtain the TCO certification information for your computer go to https www lenovo com tco cert Export classification notice This product is subject to th...

Страница 101: ...anufacture 20NB 20NC and 20ND For more information about Lenovo ENERGY STAR certified products go to https www lenovo com us en social_responsibility energy By using ENERGY STAR compliant products and taking advantage of the power management features of your computer you reduce the consumption of electricity Reduced electrical consumption contributes to potential financial savings a cleaner enviro...

Страница 102: ...96 E590 and R590 User Guide ...

Страница 103: ... right to improve and or modify the products and software programs described in the manuals included with your computer and the content of the manual at any time without additional notice The software interface and function and hardware configuration described in the manuals included with your computer might not match exactly the actual configuration of the computer that you purchase For the confi...

Страница 104: ...his product Lenovo may update this document at any time without notice For the latest information or any questions or comments contact or visit the Lenovo Web site https support lenovo com Trademarks LENOVO LENOVO logo THINKPAD THINKPAD logo TRACKPOINT and ULTRACONNECT are trademarks of Lenovo Intel and Optane are trademarks of Intel Corporation or its subsidiaries in the U S and or other countrie...

Страница 105: ......

Страница 106: ......

Отзывы: