


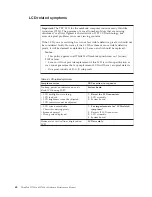


Related service information
This chapter presents following information:
v
“Restoring the factory contents by using Product Recovery discs”
v
“Restoring the factory contents by using Recovery Disc Set” on page 56
v
“Passwords” on page 57
v
“Power management” on page 60
v
“Symptom-to-FRU index” on page 62
Restoring the factory contents by using Product Recovery discs
When the hard disk drive (HDD) or solid state drive (SSD) is replaced because of a
failure, no Product Recovery program is on the new drive. In this case, you must
use the recovery discs for the computer. Order the recovery discs and the drive at
the same time so that you can recover the new drive with the pre-installed
software when they arrive. For information on which discs to order, see “Recovery
discs” on page 195.
To install the factory contents by using Product Recovery discs, do the following:
1.
Insert the bootable
Start Recovery Disc
into the DVD drive.
2.
Select your language and click
Next
.
3.
Read the license. If you agree with the terms, select
I accept these terms and
conditions
and then click
Next
.
4.
Insert the
Operating System Recovery Disc
when prompted and click
Yes
to
begin the operating system recovery process.
5.
Insert the
Product Recovery Disc
when prompted and click
OK
.
6.
If you have a
Supplemental Recovery Disc
, insert it when prompted and click
Yes
. If you do not have a
Supplemental Recovery Disc
, click
No
.
Note:
Not all recovery disc sets come with a
Supplemental Recovery Disc
. If
there is a
Supplemental Recovery Disc
, it will be clearly marked as such.
7.
When all of the data has been copied from the last disc in the set, a message is
displayed prompting you to restart the computer. Remove the disc and then
click
Yes
.
Note:
The remainder of the recovery process is fully automated and no action
is required by you. The computer will restart into the Windows desktop several
times and you might experience periods when no activity is apparent on the
screen for several minutes at a time. This is normal.
Service Web site:
When the latest maintenance diskette and the system program service diskette
become available, they will be posted on
http://www.lenovo.com/spm
Note:
Recovery takes several hours. The length of time depends on the method
you use. If you use recovery discs, recovery takes at least five hours.
© Copyright Lenovo 2008, 2009
55
Содержание ThinkPad 700
Страница 1: ...ThinkPad W700 and W700ds Hardware Maintenance Manual ...
Страница 2: ......
Страница 3: ...ThinkPad W700 and W700ds Hardware Maintenance Manual ...
Страница 8: ...vi ThinkPad W700 and W700ds Hardware Maintenance Manual ...
Страница 18: ...10 ThinkPad W700 and W700ds Hardware Maintenance Manual ...
Страница 19: ...Safety information 11 ...
Страница 26: ...18 ThinkPad W700 and W700ds Hardware Maintenance Manual ...
Страница 27: ...Safety information 19 ...
Страница 28: ...20 ThinkPad W700 and W700ds Hardware Maintenance Manual ...
Страница 29: ...Safety information 21 ...
Страница 30: ...22 ThinkPad W700 and W700ds Hardware Maintenance Manual ...
Страница 31: ...Safety information 23 ...
Страница 34: ...26 ThinkPad W700 and W700ds Hardware Maintenance Manual ...
Страница 35: ...Safety information 27 ...
Страница 37: ...Safety information 29 ...
Страница 41: ...Safety information 33 ...
Страница 42: ...34 ThinkPad W700 and W700ds Hardware Maintenance Manual ...
Страница 43: ...Safety information 35 ...
Страница 45: ...Safety information 37 ...
Страница 46: ...38 ThinkPad W700 and W700ds Hardware Maintenance Manual ...
Страница 78: ...70 ThinkPad W700 and W700ds Hardware Maintenance Manual ...
Страница 84: ...76 ThinkPad W700 and W700ds Hardware Maintenance Manual ...
Страница 88: ...80 ThinkPad W700 and W700ds Hardware Maintenance Manual ...
Страница 92: ...84 ThinkPad W700 and W700ds Hardware Maintenance Manual ...
Страница 97: ...1020 Digitizer pen Table 10 Removal steps of digitizer pen 2 1 Removing and replacing a FRU 89 ...
Страница 105: ...Table 14 Removal steps of palm rest continued 2 3 3 4 5 Removing and replacing a FRU 97 ...
Страница 114: ...Table 19 Removal steps of numeric keypad continued 2 a 106 ThinkPad W700 and W700ds Hardware Maintenance Manual ...
Страница 123: ...Table 24 Removal steps of Intel Turbo Memory Minicard continued 4 Removing and replacing a FRU 115 ...
Страница 130: ...Table 30 Removal steps of video card continued 3 122 ThinkPad W700 and W700ds Hardware Maintenance Manual ...
Страница 153: ...Table 41 Removal steps of LCD panel hinges and LCD cable continued 2 3 3 Removing and replacing a FRU 145 ...
Страница 163: ...Table 44 Removal steps of second LCD panel for ThinkPad W700ds continued 4 Removing and replacing a FRU 155 ...
Страница 197: ...LCD FRUs for ThinkPad W700ds 3 4 8 7 6 2 1 14 13 11 12 10 9 15 5 Parts list 189 ...
Страница 212: ...204 ThinkPad W700 and W700ds Hardware Maintenance Manual ...
Страница 215: ......
Страница 216: ...Part Number 43Y9442_05 1P P N 43Y9442_05 ...


