


4. Press F10 to save changes and exit the Setup Utility program. Press Enter when prompted to
confirm the exit.
• Enabling the after power loss feature
The after power loss feature enables your computer to wake up when the power supply resumes after a
sudden loss of electricity. To enable the after power loss feature, do the following:
1. Start the Setup Utility program.
2. From the Setup Utility program main menu, select
Power
➙
After Power Loss
, and press Enter.
3. Select
Power On
and press Enter.
4. Press F10 to save changes and exit the Setup Utility program. Press Enter when prompted to
confirm the exit.
Changing the BIOS settings before installing a new operating system
BIOS settings vary by operating system. Change the BIOS settings before installing a new operating system.
To change the BIOS settings, do the following:
1. Start the Setup Utility program. See “Starting the Setup Utility program” on page 53.
2. From the Setup Utility program main menu, select
Exit
➙
OS Optimized Default
.
3. Depending on the operating system to be installed, do one of the following:
• To install the Windows 8.1 (64-bit) operating system, select
Enabled
.
• To install an operating system other than Windows 8.1 (64-bit), select
Disabled
.
4. Select
Yes
in the window displayed and press Enter to confirm your selection.
5. Press F10 to save changes and exit the Setup Utility program. See “Exiting the Setup Utility program”
on page 57.
Exiting the Setup Utility program
After you finish viewing or changing settings, press Esc to return to the Setup Utility program main menu.
You might have to press Esc several times. Do one of the following:
• If you want to save the new settings, press F10 to save changes and exit the Setup Utility program.
• If you do not want to save the settings, select
Exit
➙
Discard Changes and Exit
, and then press Enter.
When the Reset Without Saving window shows, select
Yes
, and then press Enter to exit the Setup
Utility program.
• If you want to return to the default settings, press F9 to load the default settings, and then press F10 to
save and exit the Setup Utility program.
Chapter 5
.
Using the Setup Utility program
57
Содержание ThinkCentre M83z
Страница 1: ...ThinkCentre M83z Hardware Maintenance Manual Machine Types 10C2 and 10C3 ...
Страница 6: ......
Страница 13: ...Chapter 1 Safety information 7 ...
Страница 17: ...Chapter 1 Safety information 11 ...
Страница 18: ...1 2 12 ThinkCentre M83z Hardware Maintenance Manual ...
Страница 19: ...1 2 Chapter 1 Safety information 13 ...
Страница 24: ...1 2 18 ThinkCentre M83z Hardware Maintenance Manual ...
Страница 25: ...1 2 Chapter 1 Safety information 19 ...
Страница 28: ...22 ThinkCentre M83z Hardware Maintenance Manual ...
Страница 32: ...26 ThinkCentre M83z Hardware Maintenance Manual ...
Страница 58: ...52 ThinkCentre M83z Hardware Maintenance Manual ...
Страница 64: ...58 ThinkCentre M83z Hardware Maintenance Manual ...
Страница 70: ...64 ThinkCentre M83z Hardware Maintenance Manual ...
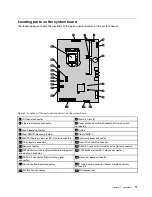
Страница 75: ...Figure 3 Locating major FRUs and CRUs Chapter 7 Locations 69 ...
Страница 78: ...72 ThinkCentre M83z Hardware Maintenance Manual ...
Страница 126: ...120 ThinkCentre M83z Hardware Maintenance Manual ...
Страница 136: ...130 ThinkCentre M83z Hardware Maintenance Manual ...
Страница 137: ......
Страница 138: ......


