


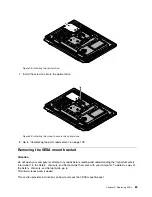


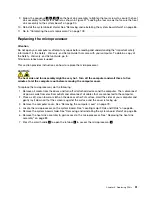


Figure 16. Removing the hard disk drive
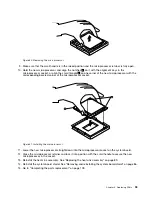
6. Remove the four screws on the hard disk drive bracket, then remove the hard disk drive out of the
bracket. Do not touch the circuit board on the bottom of the hard disk drive.
Figure 17. Removing the hard disk drive out of the bracket
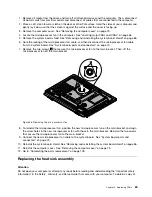
7. To install the new hard disk drive into the bracket, position the hard disk drive so that the four screw
holes align with those in the bracket.
8. Install the four screws that secure the hard disk drive to the hard disk drive bracket.
9. Connect the hard disk drive cable.
10. Slide the new hard disk drive with the bracket into the hard disk drive bay. Align the screw hole in the
hard disk drive with that in the chassis.
11. Install the screw to secure the hard disk drive bracket to the chassis.
12. Go to “Completing the parts replacement” on page 109.
Chapter 9
.
Replacing FRUs
81
Содержание ThinkCentre M72z
Страница 2: ......
Страница 8: ...2 ThinkCentre Hardware Maintenance Manual ...
Страница 15: ...Chapter 2 Safety information 9 ...
Страница 16: ... 18 kg 37 lbs 32 kg 70 5 lbs 55 kg 121 2 lbs 1 2 PERIGO 10 ThinkCentre Hardware Maintenance Manual ...
Страница 19: ...Chapter 2 Safety information 13 ...
Страница 20: ...1 2 14 ThinkCentre Hardware Maintenance Manual ...
Страница 21: ...Chapter 2 Safety information 15 ...
Страница 27: ...Chapter 2 Safety information 21 ...
Страница 31: ...Chapter 2 Safety information 25 ...
Страница 38: ...32 ThinkCentre Hardware Maintenance Manual ...
Страница 68: ...62 ThinkCentre Hardware Maintenance Manual ...
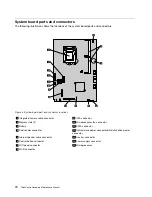
Страница 71: ...6 PS 2 mouse connector optional 13 USB connector USB port 1 7 Serial port Chapter 8 Locations 65 ...
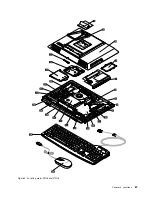
Страница 73: ...Figure 3 Locating major FRUs and CRUs Chapter 8 Locations 67 ...
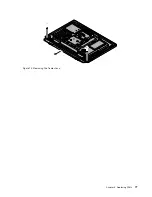
Страница 83: ...Figure 12 Removing the frame stand Chapter 9 Replacing FRUs 77 ...
Страница 120: ...114 ThinkCentre Hardware Maintenance Manual ...
Страница 125: ......
Страница 126: ......