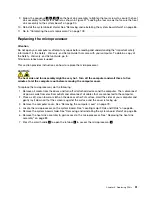

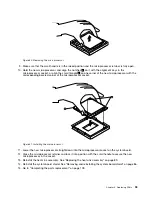


Figure 42. Removing the frame stand
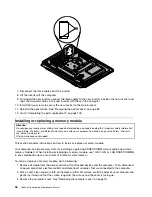
5. Locate the LCD panel in the computer. See “Locating major FRUs and CRUs” on page 66.
6. Remove the optical drive. See “Replacing the optical drive” on page 82.
7. Remove the inverter. See “Replacing the inverter” on page 97.
8. Remove the rear I/O assembly. See “Replacing the rear I/O assembly” on page 84.
9. Remove the system board shield. See “Removing and reinstalling the system board shield” on page 86.
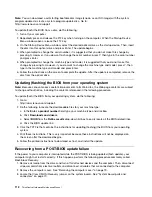
10. Disconnect the LCD panel cable from the system board. See “System board parts and connectors”
on page 70.
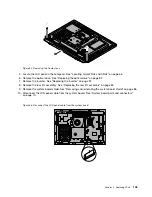
Figure 43. Disconnect the LCD panel cable from the system board
Chapter 9
.
Replacing FRUs
105
Содержание ThinkCentre M72z
Страница 2: ......
Страница 8: ...2 ThinkCentre Hardware Maintenance Manual ...
Страница 15: ...Chapter 2 Safety information 9 ...
Страница 16: ... 18 kg 37 lbs 32 kg 70 5 lbs 55 kg 121 2 lbs 1 2 PERIGO 10 ThinkCentre Hardware Maintenance Manual ...
Страница 19: ...Chapter 2 Safety information 13 ...
Страница 20: ...1 2 14 ThinkCentre Hardware Maintenance Manual ...
Страница 21: ...Chapter 2 Safety information 15 ...
Страница 27: ...Chapter 2 Safety information 21 ...
Страница 31: ...Chapter 2 Safety information 25 ...
Страница 38: ...32 ThinkCentre Hardware Maintenance Manual ...
Страница 68: ...62 ThinkCentre Hardware Maintenance Manual ...
Страница 71: ...6 PS 2 mouse connector optional 13 USB connector USB port 1 7 Serial port Chapter 8 Locations 65 ...
Страница 73: ...Figure 3 Locating major FRUs and CRUs Chapter 8 Locations 67 ...
Страница 83: ...Figure 12 Removing the frame stand Chapter 9 Replacing FRUs 77 ...
Страница 120: ...114 ThinkCentre Hardware Maintenance Manual ...
Страница 125: ......
Страница 126: ......