background image

1   G e t t i n g   t o   k n o w   y o u r   E T 1 8 0

Peripherals tour

10

\

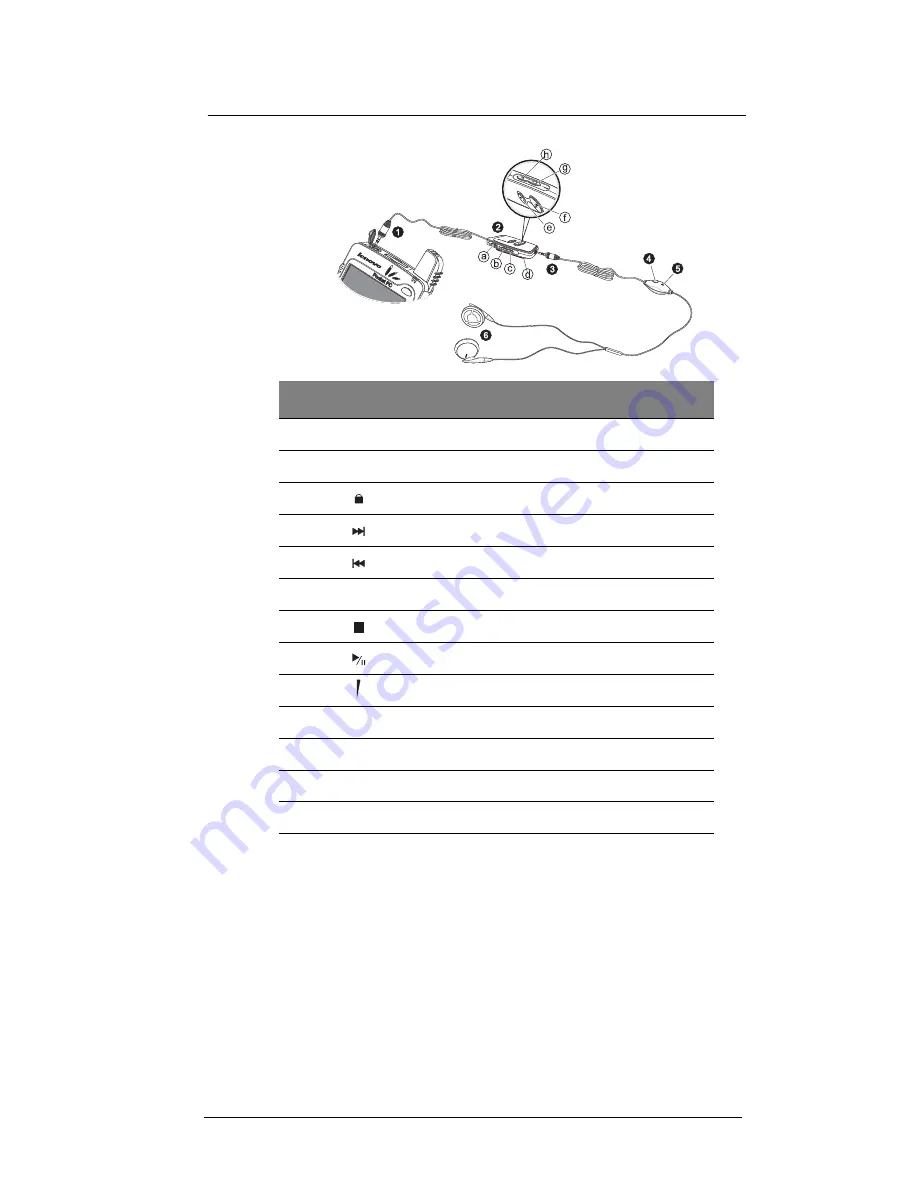
To connect the remote control unit with the headset to the device 

1

 Flip the earphone jack cap open.

2

Plug in the remote control plug to the earphone jack on the top edge of the device 

(

1

), then connect the headset plug to its connector on the remote control unit (

2

).

No.

Icon

Component

1

6-pole, 2.5 mm headset plug 

1

2

Multimedia remote control unit

a

Hold switch 

2

b

Forward button

c

Previous button

d

Clip

e

Stop button

f

Play/Pause button

g

Remote volume rocker key 

3

6-pole, 2.5 mm remote control plug

4

Remote Send/End button

5

Headset microphone 

3

6

Earphones

1

The headset can be directly attached to the earphone jack on your device.

2

When the hold switch is on, all other headset-remote control buttons are locked. 

3

When using the headset microphone during an ongoing call, the built-in device microphone is
disabled. 

Содержание ET180

Страница 1: ...User s Guide ET180 Pocket PC Phone ...

Страница 2: ...ntary documents and publications No part of this publication may be reproduced stored in a retrieval system or transmitted in any form or by any means electronic mechanical photocopy recording or otherwise without the prior written permission of ______ DISCLAIMER AND LIMITATION OF LIABILITY ____ and its subsidiaries makes no representations or warranties either expressed or implied with respect to...

Страница 3: ...uss the following topics ET180 system tour Setup and maintenance procedures Viewing and entering data Using the phone features Managing information using the Microsoft Pocket PC Phone Edition software programs Synchronising data between your ET180 and your computer Connecting your device to a computer a network or the Internet Personalising your device with your own preference settings This Guide ...

Страница 4: ...About this User s Guide iv ...

Страница 5: ... ergonomics 2 ET180 tour 3 Front view 3 Rear view 6 Left view 7 Peripherals tour 8 USB cradle 8 Headset with remote control 9 Keypad module 12 Command interface 13 Hardware buttons and the stylus 13 Today screen 13 Navigation bar and command bar 14 Pop up menus 15 Notifications 15 2 Entering data in your ET180 17 Using the input panel 17 To type with the soft keyboard 18 To use Letter Recognizer 1...

Страница 6: ... book 45 Reading a book 45 Using the Reader features 46 Removing a book 47 6 Getting connected 49 Infrared communication 49 Sending information 49 Receiving information 49 Connecting to the Internet 50 Connecting to a network 50 To create a modem connection to a network 50 Starting a connection 51 Ending a connection 51 Connecting directly to an email server 51 Getting help on connecting 52 7 Wire...

Страница 7: ...aking a call using Call Log 74 Making a call from SIM Manager 75 Emergency call 76 Managing more than one call 76 Call Notification 76 Call Hold 77 Conference Call 77 Other Phone functions 78 Call notes 78 SMS service 80 Voice mail 80 Managing contact information 81 Managing contacts using Microsoft Contacts 81 Managing contacts using SIM Manager 82 Managing the Call Log items 84 Call Log categori...

Страница 8: ...viii Troubleshooting 109 Troubleshooting reminders 109 Troubleshooting procedures 109 Index 115 ...

Страница 9: ...r s Guide Bundled in the ET180 Pocket PC Phone Companion CD it provides online reference for using your device The ET180 Help To view Help tap and then Help Programs on your device 1 Additional programs that can be installed on your device The ET180 Pocket PC Phone Installation CD Connecting to and synchronising with your computer The Quick Start setup flyer ActiveSyncTM Help on your computer To v...

Страница 10: ...he cradle is not yet connected to your computer Connect the cradle only after you have finished installing ActiveSyncTM If you don t have Microsoft Outlook 98 installed please install Microsoft Outlook 2000 now It is recommended that users choosing to install Outlook 2000 from the ET180 Pocket PC Phone Installation CD do so before installing ActiveSyncTM Do not copy the ActiveSyncTM files to your ...

Страница 11: ...e to prevent data loss in instances when the removable battery pack is removed or completely discharged This backup battery cell will support the system for a maximum of 30 minutes only NOTE To enable the internal battery cell to provide backup power supply charge your device without the main battery pack for at least four 4 hours for a minimum capacity of 30 minutes of backup power supply To achi...

Страница 12: ...eSyncTM technology The dual pocket design also allows simultaneous charging of the device and an optional spare battery pack if you have purchased one To connect the cradle 1 Connect the AC adapter cord to the power socket at the back of the cradle 2 Plug the AC adapter into any AC current outlet Charging your ET180 For initial use you need to charge your device for about 4 hours After that you ca...

Страница 13: ...evice screen indicating low or very low battery status see Status icons on page 14 Perform an ActiveSyncTM operation to back up your data then recharge the battery If your device shuts down i e battery is completely drained out you have about 30 minutes to recharge the battery before you lose all data on your device s internal memory During this period the embedded backup battery supplies power to...

Страница 14: ...power outlet 1 Plug the AC adapter into any AC current outlet 2 Connect the AC adapter cord to the universal connector of your device Setting up your ET180 After you have initially charged your device for about 4 hours you can now set it up for use Refer to the instructions below NOTE Make sure that the SIM card holder is close before turning on the device To set up your ET180 1 Turn on your devic...

Страница 15: ...rform the first ActiveSyncTM operation with the help of the New Partnership setup wizard This wizard will help you Set up a partnership so you can synchronise information between your device and your computer Customise your synchronisation settings To perform the first synchronisation process 1 Dock your device in the front pocket of the cradle 2 Plug the cradle s USB connector into a USB port on ...

Страница 16: ...alibrating your device Creating backup files Resetting your device Safety information on using your ET180 Your ET180 s smooth curves belies its tough construction making it an ideal combination of grace and strength to suit your mobile lifestyle Observing the following safety information will help provide you with years of reliable and trouble free service Retain and follow all product safety and ...

Страница 17: ... it for servicing to an authorized service technician The device has been exposed to rain or water The device has suffered considerable impact from being dropped or an object has fallen on it There are noticeable signs of overheating The product does not operate normally when you follow the operating instructions Safety precautions for the main battery pack Your device uses a removable and recharg...

Страница 18: ...age card using the device s built in SD MMC slot When you are at your computer you can use ActiveSyncTM to synchronize files with your computer to serve as backup files Refer to page 29 for more information on using ActiveSyncTM In instances where you are unable to access your computer you can back up files to an SD or MMC card Refer to the following section for instructions To save Word or Excel ...

Страница 19: ... programs you have added and restore the device default factory settings Never perform a hard reset unless a soft reset does not correct your problem When you perform your next ActiveSyncTM operation you can restore any data that you previously synchronised to your computer or you can restore data that you have backed up to a storage card Refer to page xv for synchronisation procedures and to page...

Страница 20: ...ess The Security setting gives you the option of assigning a lock password that will be required to access your device after a set period of inactivity To assign a lock password 1 Tap Settings 2 On the Personal tab tap the Password icon 3 Select a password option Simple 4 digit password Strong alphanumeric password 4 Define the period of inactivity before the lock password will be required for acc...

Страница 21: ...color depth support Software configurable backlight and contrast settings Microsoft ClearType technology for clearer crisper font display Audio Embedded AC 97 CODEC with CD quality stereo output Built in industry standard 2 5 mm earphone jack Built in speaker and microphone Phone features GSM broadband function MC388 model Dual band GSM 900 1800 MC45 model Tri band GSM 900 1800 1900 GPRS function ...

Страница 22: ...stantly using the backlight or using power demanding applications will shorten the length of battery operation Charging time from empty to full capacity Design and ergonomics Stylish and sleek design Form factor 109 mm x 68 5 mm x 21 6 mm length x width x depth NOTE The depth factor indicated above is only for a unit with the battery pack attached if the optional keypad module is also attached dep...

Страница 23: ...vices earphones headphones 3 Infrared IR port Uses infrared technology to transmit and receive data from other IR enabled devices 4 SD MMC expansion slot Accepts an SD or MMC card allowing you to add more memory Install add on applications or use audio or text files stored in it for use with internal applications You can also use it to back up data from your device 5 Antenna stylus holder The ante...

Страница 24: ...CD touchscreen Displays the applications and data stored in your device It is touch sensitive and responds to the stylus or your finger 10 Keypad module Key in numbers to make a call or letters to compose SMS messages NOTE The keypad module is not included in the ET180 package contents you need to purchase this item separately 11 End button When there s an incoming call press to reject the call Du...

Страница 25: ...o insert a storage card Hold your device securely then push the card into the slot until you hear an audible system sound this will signal that the card is already properly seated within the slot The card is secure when it is not protruding from the base 14 Send button When there s an incoming call press to accept the call During an ongoing call press and hold to toggle on off the speakerphone mod...

Страница 26: ...card spring out An audible system sound will signal that the card has been released 2 Gently remove the card from the slot Rear view No Component Description 1 Main battery release latch Press to release the main battery from its bay 2 Reset button Press the end of the stylus into the hole to reset your device 3 Main battery Removable and rechargeable 1480 mAH Lithium Ion polymer battery pack ...

Страница 27: ... Speed Dial From Speed Dial Rotate up down to scroll through the list Press to call the currently selected number From Call Log Rotate up down to scroll through the log items Press to call the currently selected log item Press and hold to display the pop up menu for the currently selected log item From SIM Manager Rotate up down to scroll through the numbers stored in your SIM card Press and hold ...

Страница 28: ...wn to decrease volume 3 Hold switch Slide to lock all buttons from being accidentally pressed when device is placed in pocket or in a bag When hold switch is enabled Backlight is turned off and all hardware buttons are disabled Remote control functions are enabled Auto power off function is still active Sound notification for alarms reminders and SD MMC card movement are enabled When there s an in...

Страница 29: ...comes with your device provides quality sound output with maximum comfort fit Coupled with the clip on remote control unit you can proceed to use your device s phone and multimedia features with utmost ease of operation No Component Description 1 USB connector Connects the cradle to a USB port in your computer 2 Power connector Connects the cradle to a power outlet 3 Supportbracket Holds the devic...

Страница 30: ...6 pole 2 5 mm headset plug 1 2 Multimedia remote control unit a Hold switch 2 b Forward button c Previous button d Clip e Stop button f Play Pause button g Remote volume rocker key 3 6 pole 2 5 mm remote control plug 4 Remote Send End button 5 Headset microphone 3 6 Earphones 1 The headset can be directly attached to the earphone jack on your device 2 When the hold switch is on all other headset r...

Страница 31: ...ld switch is turned on all remote control buttons are disabled The remote control unit won t work when the ET180 device is turned off NOTE If you reset your device you need to first open the Microsoft Windows Media PlayerTM before you can again use the remote control unit Action Remote Control Buttons Play Pause Stop Previous Next Volume up Volume down Quick Press Playback or pause Stop Go to next...

Страница 32: ... x 3 5 mm length x width x depth with a 240 x 144 resolution rate For your convenience the keypad is illuminated in dim lighting conditions NOTE The keypad module is not included in the ET180 package contents you need to purchase this item separately To attach the keypad module to the device 1 Remove the callpad module from the device by sliding it in a downward motion 2 Insert then press down the...

Страница 33: ...s the mouse Tap Touch the screen once with the stylus to open items and select options Drag Hold the stylus on the screen and drag across the screen to select text and images Drag in a list to select multiple items Tap and hold Tap and hold the stylus on an item to see a list of actions available for that item On the pop up menu that appears tap the action you want to perform Today screen When you...

Страница 34: ...unds on and off Backup battery is low Main battery is charging Main battery is low Main battery is very low Main battery is full Connection is active Synchronisation is beginning or ending Synchronisation is occurring Notification 1 that one or more instant messages were received Notification that one or more email SMS messages were received 1 If more notification icons need to be displayed than t...

Страница 35: ...menu appears lift the stylus then do any of the following Tap the action you want to perform Tap anywhere outside the menu to close the menu without performing an action Notifications Your device reminds you in a variety of ways when you have something to do or receive an email SMS message For example if you ve set up an appointment in Calendar a task with a due date in Tasks or an alarm in Clock ...

Страница 36: ...1 Getting to know your ET180 Command interface 16 ...

Страница 37: ... input panel to enter information in any program on your device You can either type using the soft keyboard or write using Letter Recognizer Block Recognizer or Transcriber In either case the characters appear as typed text on the screen NOTE Transcriber is available only for the English and European ET180 models To show or hide the input panel 1 Tap the Input Panel button 2 Tap the arrow next to ...

Страница 38: ...ersonal tab tap the Input icon then the Word Completion tab To type with the soft keyboard 1 Tap the arrow next to the Input Panel button then Keyboard 2 On the soft keyboard that is displayed tap the keys with your stylus To use Letter Recognizer With Letter Recognizer you can write letters using the stylus just as you would on paper 1 Tap the arrow next to the Input Panel button then Letter Reco...

Страница 39: ...s that are similar to those used on other devices 1 Tap the arrow next to the Input Panel button then Block Recognizer 2 Write a letter in the box When you write a letter it is converted to typed text that appears on the screen NOTE For specific instructions on using Block Recognizer with Block Recognizer open tap the question mark next to the writing area To use Transcriber With Transcriber you c...

Страница 40: ...scriber 2 Write anywhere on the screen To see how to write a letter in Transcriber 1 Tap a on the toolbar 2 In the screen that appears select the letter you want to learn about and then tap on one of the examples given NOTE For specific instructions on using Transcriber with Transcriber open tap the question mark in the lower right hand corner of the screen To punctuate in Transcriber 1 Tap the ke...

Страница 41: ...d paste typed text a Tap and hold the selected words b Tap an editing command on the pop up menu or tap a command on the Edit menu Writing on the screen In any program that accepts writing such as the Notes program and in the Notes tab of Calendar Contacts and Tasks you can use your stylus to write directly on the screen Write the way you do on paper You can edit and format what you ve written and...

Страница 42: ...itten text you must select it first 1 Tap and hold the stylus next to the text you want to select until the insertion point appears 2 Without lifting drag the stylus across the text you want to select If you accidentally write on the screen tap Tools then Undo and try again or Tap the Pen button to deselect it and then drag the stylus across the screen 3 You cut copy and paste written text in the ...

Страница 43: ...a time 2 On the pop up menu tap Alternates A menu with a list of alternate words appears 3 Do either of the following a Tap the word you want to use b Tap the writing at the top of the menu to return to the original writing NOTE Hyphenated words foreign words that use special characters such as accents and some punctuation cannot be converted If you add writing to a word to change it such as chang...

Страница 44: ...ngs can be resized while writing cannot To create a drawing 1 Cross three ruled lines on your first stroke A drawing box appears 2 Subsequent strokes in or touching the drawing box become part of the drawing Drawings that do not cross three ruled lines will be treated as writing TIP You may want to change the zoom level so that you can more easily work on or view your drawing Tap Tools and then se...

Страница 45: ...clude a recording in a written note Refer to the succeeding sections for instructions In Inbox you can add a recording to an email message To create a recording in Notes 1 Tap then Notes If you want to include the recording in a note open the note first 2 Tap on the command bar 3 Position your device s microphone near your mouth or other source of sound NOTE Refer to Front view on page 3 for the l...

Страница 46: ...1 Tap My Text on the screen s command bar 2 Tap a message NOTE You can add text after inserting a My Text message before sending it To edit a My Text message 1 In the Tools menu tap Edit and then tap My Text Messages 2 Select the message you wish to edit and make the desired changes Indicates an embedded recording Tap to show or hide the Recording toolbar Tap to begin recording Tap to select a pre...

Страница 47: ...ns Choose from the following options to switch between applications Select another program from the menu NOTE Some programs have abbreviated labels for check boxes and drop down menus To see the full spelling of an abbreviated label tap and hold the stylus on the label Drag the stylus off the label so that the command is not carried out The following table contains a partial list of programs that ...

Страница 48: ...Keep track of your tasks Phone Make and receive calls and SMS messages swap between calls and set up conference calling Pocket Excel Create new workbooks or view and edit Excel workbooks created on your computer Pocket Internet Explorer Browse Web and WAP sites and download new programs and files from the Internet Pocket Word Create new documents or view and edit Word documents created on your com...

Страница 49: ...cations with the latest information For example Keep Pocket Outlook data up to date by synchronising your device with the Microsoft Outlook data on your computer Synchronise Microsoft Word and Microsoft Excel files between your device and your computer Files are automatically converted to the correct format By default ActiveSyncTM does not automatically synchronise all types of information Use Act...

Страница 50: ...hone Quick Start flyer included in the package contents For detailed information about using ActiveSyncTM on your computer start ActiveSyncTM on your computer and then see ActiveSyncTM Help To open ActiveSyncTM on your device Tap and then tap ActiveSync TM To remotely synchronise your device 1 Tap and then ActiveSync 2 In the Tools menu tap Options 3 In the PC tab select Include PC when synchronis...

Страница 51: ...d to address email messages in Inbox Calendar Calendar enables you to conveniently manage your schedules and appointments or any other activities associated with a time and date You can schedule appointments including meetings and other events Checking your appointments is easy using one of several views Agenda Day Week Month and Year NOTE Switch view options by using the View menu To open Calenda...

Страница 52: ... 6 To add notes tap the Notes tab You can enter text draw or create a recording For more information on creating notes go to page 37 7 After completing the details tap OK TIP If you select Remind me in an appointment your device will remind you according to the options set in Settings Personal tab Sounds Notifications To use the Calendar summary screen When you tap an appointment in Calendar a sum...

Страница 53: ...ent 2 In the appointment details hide the input panel and then tap Attendees 3 From the list of email addresses you ve entered in Contacts select the meeting attendees The meeting notice is created automatically and placed in the Outbox folder For more information on sending and receiving meeting requests see the Help menu of Calendar and Inbox in your device Contacts Contacts maintains a list of ...

Страница 54: ...egory 4 To add notes tap the Notes tab You can enter text draw or create a recording For more information on creating notes go to page 37 5 After completing the details tap OK Finding a contact There are six ways to find a contact In the contact list Rotate up and hold the jog dial until alphabetical letters appear on the screen in large type Rotate the dial up or down to scroll through the alphab...

Страница 55: ...of companies your contacts work for in the command bar tap View By Company The number of contacts that work for that company will be displayed to the right of the company name Tap Find enter the contact name select Contacts for the type and then tap Go To use the Contacts summary screen When you tap a contact in the contact list a summary screen is displayed To change the contact information tap E...

Страница 56: ...ies and select a category from the list In the task list you can display tasks by category 5 To add notes tap the Notes tab You can enter text draw or create a recording For more information on creating notes go to page 37 6 After completing the details tap OK Tap to create a new task Select the sort order of the list Indicates high priority Select the category of tasks you want displayed in the l...

Страница 57: ... written note or a recording You can also include a recording in a note If a note is open when you create the recording it will be included in the note as an icon If the note list is displayed it will be created as a stand alone recording To open Notes Tap then Notes Notes will open to the note list Creating a note 1 Tap New View task details View notes Tap to show and hide additional summary info...

Страница 58: ...g For more information about using the input panel writing and drawing on the screen and creating recordings see 2 Entering data in your ET180 on page 17 Tap to return to the note list the note is saved automatically Tap to write on the screen Tap to show or hide the input panel Tap to add a recording to the note ...

Страница 59: ...tween your computer and your device so that you have the most up to date content in both locations For more information on using Pocket Word tap Programs Pocket Word then tap Help from the menu Creating a new file Tap Programs Pocket Word New A blank document appears Or if you ve selected a template for new documents in the Options dialog box that template appears with appropriate text and formatt...

Страница 60: ... Then select the percentage you want Select a higher percentage to enter text and a lower one to see more of your document Typing mode Using the input panel enter typed text into the document For more information on entering typed text refer to Using the input panel on page 17 To format existing text and to edit text first select the text You can select text as you do in a Word document using your...

Страница 61: ...ent on your computer Drawing mode In drawing mode use your stylus to draw on the screen Gridlines appear as a guide When you lift your stylus off the screen after the first stroke you ll see a drawing box indicating the boundaries of the drawing Every subsequent stroke within or touching the drawing box becomes part of the drawing For more information on drawing and selecting drawings see Drawing ...

Страница 62: ...ook appears Or if you ve selected a template for new workbooks in the Options dialog box that template appears with appropriate text and formatting already provided You can open only one workbook at a time when you open a second workbook you ll be asked to save the first You can save a workbook you create or edit in a variety of formats including Pocket Excel pxl Excel xls To use the Pocket Excel ...

Страница 63: ...e top and left most panes in a worksheet to keep row and column labels visible as you scroll through a sheet a Select the cell where you want to freeze panes b Tap View and then Freeze Panes Split panes to view different areas of a large worksheet a Tap View and then Split b Then drag the split bar to where you want it To remove the split tap View and then Remove Split Show and hide rows and colum...

Страница 64: ...80 You can purchase and download book files from the Web to your PC and then synchronize them with your ET180 To do so you need to activate your device you only need to activate it once secure an activated copy of MSReader for your PC and then set up synchronization for files in ActiveSyncTM Follow the steps below 1 Open ActiveSyncTM on your computer then check you have selected Synchronize Files ...

Страница 65: ...ocket PC Phone Installation CD Using Library The Library is your Reader home page it displays a list of all books stored on your device or storage card To open Library On the Reader command bar tap Library or On a book page tap the book title and then tap Library on the pop up menu Opening a book Tap a book title in the Library list Reading a book Each book consists of a cover page an optional tab...

Страница 66: ...ap outside the box To return to your original page tap the title and then tap Return on the pop up menu To copy text You can copy text from books that support this feature into any program that accepts text 1 On a book page select the text you want to copy 2 Tap Copy Text on the pop up menu The text can be pasted into the program of your choice To view book annotations To see a list of a book s an...

Страница 67: ...in the left margin To show or hide the note tap the icon Drawings When you add a drawing a Drawing icon appears in the bottom left corner of the page and drawing tools appear across the bottom of the page Draw by dragging your stylus Removing a book When you finish reading a book you can delete it to conserve space on your device If a copy of the book is stored on your computer you can download it...

Страница 68: ...5 Managing Microsoft Pocket PC 2002 companion programs Microsoft Reader for Pocket PC 48 ...

Страница 69: ... Once connected the added security of a VPN means that you can access the full resources of your company s network For example you can use File Explorer to access the files of computers on that network Infrared communication Using infrared you can send and receive information such as contacts and appointments from another IR enabled device Refer to Front view on page 3 for the location of your dev...

Страница 70: ...e To create a modem connection to a network later on this page Your network administrator may also give you VPN settings To create a modem connection to a network 1 Get the following information from your network administrator Dial up access telephone number User name and password Domain name TCP IP settings 2 If your device does not have a built in modem install a modem card 3 Tap and then Settin...

Страница 71: ...leave when the connection is complete Ending a connection To disconnect do any of the following When connected via cable or cradle detach your device from the cable or cradle When connected via Infrared move your device away from the computer When connected via dial up or VPN tap the Connection icon on your navigation bar and then tap End Connecting directly to an email server You can set up a con...

Страница 72: ... out the Name field for your email account then tap Next 8 Enter your email provider s server name information for incoming and outgoing mail then tap Finish For an explanation of a screen tap and then Help To connect to your email server tap Services and then Connect Getting help on connecting More information on the procedures described here as well as information on additional procedures can be...

Страница 73: ...ed device see page 49 Using Pocket Internet Explorer Use Pocket Internet Explorer to view Web HTML cHTML and WAP pages from your device in either of these ways During synchronisation with your computer download your favorite links and mobile favorites that are stored in the Mobile Favorites subfolder of Internet Explorer on your computer Connect to an Internet service provider ISP or network and b...

Страница 74: ...on page 49 2 To connect and start browsing do one of the following Tap the Favorites button and then tap the favorite you want to view Tap View and then Address Bar In the address bar that appears at the top of the screen enter the Web address you want to visit and then tap Go Tap the arrow to choose from previously entered addresses To add a favorite link while using your device a Go to the page ...

Страница 75: ...veSyncTM to create mobile favorites quickly To create a mobile favorite 1 In Internet Explorer on your computer click Tools and then Create Mobile Favorite 2 To change the link name enter a new name in the Name box 3 Optionally in Update select a desired update schedule NOTE If you did not specify an update schedule you will need to manually download content to keep the information updated on both...

Страница 76: ...AvantGo AvantGo is a free interactive service that gives you access to personalised content and thousands of popular Web sites You subscribe to AvantGo channels directly from your device then you synchronise your device and computer or connect to the Internet to download the content Visit the AvantGo Web site at http avantgo com frontdoor index html for more information Signing up for AvantGo 1 In...

Страница 77: ...ce By default you will receive messages from the past three days only the first 100 lines of each message and file attachments of less than 100 KB in size Email messages in the Outbox folder on your device are transferred to Exchange or Outlook and then sent from those programs Email messages in subfolders must be selected in ActiveSyncTM on your computer in order to be transferred TIP You can als...

Страница 78: ...u ve marked for retrieval and sends the messages you ve composed Using the message list The messages you receive are displayed in the message list By default the most recently received messages are displayed first in the list When you receive a message tap it to open it Unread messages are displayed in bold When you connect to your email server by default you ll receive messages from the last five...

Страница 79: ...ap New 2 In the To field enter an email or SMS address of one or more recipients separating them with a semicolon or select a name from the contact list by tapping the Address Book button All email addresses entered in the email fields in Contacts appear in the Address Book 3 Compose your message To enter preset or frequently used messages tap the My Text menu then select a message If you are send...

Страница 80: ...e Inbox folder If you use POP3 and you move email messages to a folder you created the link is broken between the messages on your device and their copies on the email server The next time you connect the email server will see that the messages are missing from the device s Inbox and delete them from the server This prevents you from having duplicate copies of a message but it also means that you ...

Страница 81: ...ow shows all of your messenger contacts at a glance divided into Online and Not Online categories From this view while connected you can chat send a email block the contact from chatting with you or delete contacts from your list using the pop up menu To see others online without being seen in the Tools menu tap My Status and select Appear Offline If you block a contact you will appear offline but...

Страница 82: ... Terminal Services Client to log onto a Windows NT server type PC that is running Terminal Services software and use all of the programs that are available on that PC from your device For example instead of running Microsoft Pocket Word you can run the PC version of Microsoft Word and access all of the doc files on that PC from your device NOTE You cannot use Transcriber when entering information ...

Страница 83: ...lient window tap and then Shutdown 2 Tap Disconnect NOTE If the network administrator has configured Terminal Services Client to reconnect to disconnected sessions you will be reconnected to this session the next time you connect to this server To disconnect and end a session 1 In the Terminal Services Client window tap and then Shutdown 2 Tap Log Off To navigate inside Terminal Services Client On...

Страница 84: ...e PC 1 On your PC select Settings then Control Panel 2 Click Display 3 Deselect the Clear the Transition effects for menus and tool tips check box To improve browser performance The level of Internet Explorer s performance on your PC is improved by decreasing the time it takes for Web pages to be refreshed 1 In Internet Explorer on your PC select Tools Internet Options Advanced 2 Deselect the Use ...

Страница 85: ...y Installing the SIM card If you wish to use your device phone application you need to first install a valid SIM card You need to separately purchase the SIM card the card is not included in the ET180 package contents To install the SIM card 1 If the device is switched on turn it off by pressing the power button on the front panel 2 Turn over the device so that rear panel faces you 3 If the batter...

Страница 86: ...nction off to minimize power consumption Entering your PIN After you have installed the SIM card you ll be able to activate your mobile service connection In most cases SIM cards are preset with a PIN Personal Identity Number provided by your mobile service provider which you need to enter to establish mobile service connection To enter your PIN 1 Tap then Phone 2 On the Dialer screen enter the pr...

Страница 87: ...ere to create a note Tap to back space over individual numbers Tap to view the Speed Dial list Icon Description Tap to make a phone call Tap to erase the number you entered Tap to end a call Tap during a call to create a a note for that particular call Tap to view the Speed Dial list Tap to see all calls received made and missed Icon Name Description Phone off or out of network service Tap to turn...

Страница 88: ...on performs the following actions When there s an incoming call press to reject the call During an ongoing call press to end the call When manually dialing a number press to delete the number input Press and hold to toggle on off the mobile service connection Phone operation This section explains the procedures for basic phone operations including how to Toggle the phone function on and off Erase ...

Страница 89: ...the mobile service connection To turn on the phone function Press and hold the End button on your device until appears in the navigation bar or Tap and then select Turn phone on from the pop up screen To turn off the phone function Press and hold the End button on your device until appears in the navigation bar or Tap and then select Turn phone off from the pop up screen Backspacing and deleting n...

Страница 90: ...onversation volume you must do it during a call If you adjust the volume at another time it will only affect the level of the system sounds i e ring and notification alerts wmv MP3 playback To adjust the phone conversation volume You can either Tap on the navigation bar to bring up the Volume callout then drag the slider up down or Press the volume rocker key up down The Volume callout will also a...

Страница 91: ...ing phone calls You can end an incoming or outgoing call To end a call On the Dialer screen tap or press the End button Making phone calls The integrated nature of your device s phone function lets you make calls in a variety of ways across different applications You can make a call by Manually entering a phone number using the Dialer keypad or the keypad module Accessing numbers using Speed Dial ...

Страница 92: ...refix 00 2 Enter the full phone number you want to dial It includes the country code area code without the leading zero and phone number 3 On the Dialer screen tap or press the Send button Making a call using Microsoft Contacts Contacts is a Pocket Outlook application which lets you maintain a list of your friends and colleagues contact information For detailed information in how to use this appli...

Страница 93: ...E mail On the pop up menu phone numbers for this contact is displayed with a dot next to the priority number Tap which number to call Making a call using Speed Dial Speed Dial is a list you create for number you regularly call Only numbers stored in Microsoft Contacts can be added to this list For instructions go to To export contacts from Microsoft Contacts on page 81 To make a call using Speed D...

Страница 94: ...tate down the jog dial b On the Speed Dial window use the jog dial to go through the list to find the number you want to call c Once the number is selected you can either press the jog dial or the Send button to initiate the call Making a call using Call Log Call Log is a record of all incoming outgoing and missed calls For more information on this feature go to page 84 To make a call using Call L...

Страница 95: ...ial Press the Send button Tap the category icon on the left of the selected log item Refer to page 85 for more information on Call Log category icons Making a call from SIM Manager SIM Manager is a program you can use to view add and transfer the contents of your SIM card For more information on this program go to Managing contacts using SIM Manager on page 82 To make a call from SIM Manager To ma...

Страница 96: ...mobile phone service provider To make an emergency call 1 Enter the international emergency number 112 either in the Dialer keypad or in the keypad module 2 On the Dialer screen tap or press the Send button Managing more than one call Flexibility is a hallmark of your device s phone function This is manifested in such features as Call Notification Call Hold and Conference Call which allows you to ...

Страница 97: ...he incoming call and put the original one on hold To swap between calls You can choose to swap backwards and forwards between two callers by tapping on the Dialer screen Conference Call With the Conference Call feature you can create a conversation line between several callers To set up a conference call 1 You can either put a call on hold then dial a second number and wait for it to be picked up ...

Страница 98: ...the conference call Other Phone functions In addition to making and receiving phone calls Phone also provides features for creating call notes receiving and sending SMS email messages and retrieving voice mails Call notes Regardless of how you made a call manually or using any of the call features you have the option to create a note during a call The call note will be saved as an attachment to yo...

Страница 99: ...l Log window or from the Notes program From the Call Log window 1 On the Dialer screen tap or rotate up the jog dial to access Call Log 2 From the All Calls or Outgoing category in Call Log select a log item marked with this icon indicates that a note was created for this particular call For information on Call Log categories refer to page 85 3 Tap and hold the selected log item then tap View Note...

Страница 100: ...e My Text menu then select a message If you are sending an SMS message and want to know if it was received tap the Edit menu select Options then select the Request SMS text message delivery notification check box 6 Tap Send when you ve finished the message If you are working offline the message is moved to the Outbox folder and will be sent the next time you connect Voice mail With the voice mail ...

Страница 101: ... for transferring contact information to Microsoft Contacts As a backup in case you lose your SIM card while using it with another device If you are using your SIM with another device you may need the numbers stored in Microsoft Contacts Transferring numbers to Microsoft Contacts allows you to create a more detailed record NOTE Transferring contacts from one location to another e g from Microsoft ...

Страница 102: ...ars to display the transfer status b In the next screen add the contact details c Select a location By default the Location function will give you the next available position in the Speed Dial list If you want to put a number in a position that is already occupied the new number will overwrite the number already there d Tap OK Managing contacts using SIM Manager The SIM Manager program lets you ma...

Страница 103: ... transfer all contacts to Microsoft Contacts To export individual SIM Manager contact 1 Tap and hold a contact then from the pop up menu select Save to Contacts A pop out message will confirm transfer to Microsoft Contacts 2 Tap OK to close the box To export all SIM Manager contacts 1 Tap Tools from the command bar then select Save All To Contacts ...

Страница 104: ...Manager Managing the Call Log items Call Log is a record of all incoming outgoing and missed calls You can refer to it to check call details as well as access any notes taken during a call For instructions on making calls from Call Log go to page 74 To access the Call Log On the Dialer screen tap or rotate up the jog dial Tap and hold icon to display Note options Tap to view call details Tap to pl...

Страница 105: ...an set a limit for the number of entries retained after a specific period of time To set the Call Log limit 1 From the command bar tap Tools Options 2 On the Options window tap the Delete call log items older than pick list Icon Category Description All Calls Shows all calls made to and from the phone in chronological order Missed Only shows calls that were not answered Outgoing Only shows calls m...

Страница 106: ...tacts To transfer Call Log entries to Microsoft Contacts 1 Tap and hold the number you want to transfer 2 In the pop up menu that appears select New Contact 3 On the Contact screen add additional contact details 4 Tap OK or press the jog dial The call details in the Call Log for the transferred number will be amended to display the contact name specified Deleting Call Log entries You can choose to...

Страница 107: ...You can configure most features of your phone application to suit your preferences You do this by accessing the Phone option under Settings To access Phone Settings Do either of the following From the Dialer screen s command bar tap Tools Options From any other screen tap then Settings On the Personal tab tap the Phone icon The Phone settings window has four tabs Phone Services Network and Special...

Страница 108: ...the drop down menu Downloading ring tones For a more personalize ring tone you can choose to download wav files to your device in a variety of ways Via synchronization using ActiveSyncTM go to page 29 Via Internet access using Pocket Internet Explorer go to page 53 Via IR transfer go to page 49 NOTE Only wav format sound files can be used as ring tones Managing ring tones Tap then Settings On the ...

Страница 109: ... remove to deselect the check box beside it then tap NOTE You can add and remove several ring tone files simultaneously To configure your PIN Under the Security options you can change your PIN and have it enabled or disabled To enable your PIN Select the Require PIN when phone is used check box To disable your PIN Deselect the Require PIN when phone is used check box To change your PIN 1 Tap the C...

Страница 110: ...radio button for Everyone I call to enable Caller ID or Never provide caller ID to disable Caller ID 4 Tap OK Call forwarding This service allows you to forward incoming calls to another phone number You can choose to forward all calls to the same number or specify a number based on the following conditions Unavailable your phone is turned off or your phone is out of network service Busy when you ...

Страница 111: ... OK Call waiting This service allows you to receive another call during an active call To enable or disable call waiting 1 Tap Call waiting from the services list 2 Tap the Get Settings button retrieving settings may take a few minutes 3 In the next screen you can either tap Notify me to enable call waiting or Do not notify me to disable call waiting 4 Tap OK Voice mail and SMS By default your dev...

Страница 112: ...ut of network service and you want to conduct a search Tap the Find Network button search process may take a few minutes To select a network Set the mode for conducting a network search Under Network selection tap either Automatic or Manual NOTE Retrieving network settings may take a few minutes if you select Manual To set preferred networks If there are many mobile phone service providers availab...

Страница 113: ...lls are accepted and or terminated when the optional keypad module is attached to your device in this tab Select the Any Key Answer check box to accept an incoming call by pressing any button on the keypad module Select the Auto Pickup check box to accept an incoming call after a specified number of rings without pressing any hardware or software button Options include auto pickup after 5 6 7 8 9 ...

Страница 114: ...8 Using Phone Customizing the phone functions 94 ...

Страница 115: ...just the device settings Add or remove programs Adjusting device settings You can adjust the settings of your device to suit the way you work To access Settings Tap then Settings The Settings window has three tabs Personal System and Connections each of which has its own set of options The succeeding sections show the configuration page of each the Settings options For detailed instructions on the...

Страница 116: ...96 Buttons Assign commonly used application programs to any of the hardware buttons Input Select an input method options for word completion and other related settings Menus Customise what appears on the menu and enable a pop up menu from the New button ...

Страница 117: ...sonal information and customise text display when device is turned on Password Set a password to prevent unauthorized access to your device Phone Set up the phone function of your device For more information on this Settings option refer to Customizing the phone functions on page 87 ...

Страница 118: ...ur device For more information on this Settings option refer to Managing ring tones on page 88 Sounds Notification Select the types of action you want to hear sounds for and define how you want to be notified about different events Today Customise the look and the information that is displayed on the Today screen ...

Страница 119: ...bout Displays your device s version and copyright information includes an option to define a device ID About MyDevice Displays your device s hardware version and model information Also displays a log showing the duration all calls received and made on your device ...

Страница 120: ...9 Customising your ET180 Adjusting device settings 100 Brightness Define settings for the display brightness and backlight control Clock Change the time or set alarms ...

Страница 121: ...9 Customising your ET180 Adjusting device settings 101 Memory Adjust allocation of storage and main memory Power Define settings to minimise power consumption ...

Страница 122: ...9 Customising your ET180 Adjusting device settings 102 Regional Settings Set default number and time display formats and other related options Remove Programs Remove programs from storage memory ...

Страница 123: ...9 Customising your ET180 Adjusting device settings 103 Screen Recalibrate screen and enable the ClearType feature Connections AvantGo Connect Set server settings and related options for AvantGo ...

Страница 124: ...justing device settings 104 Beam Define settings for the beam function Connections Adjust settings for connecting to the Internet or to a local network Network Adapters Select your device s network adapter and set its properties ...

Страница 125: ...er You may see a single xip exe or zip file a Setup exe file or several versions of files for different device types and processors Be sure to select the program designed for a Pocket PC and your device s processor type NOTE Read any installation instructions Read Me files or documentation that come with the program Many programs provide special installation instructions 3 Connect your device to y...

Страница 126: ... tap Remove Programs 3 Tap the program you wish to remove 4 Tap Remove If the program does not appear in the list of installed programs use File Explorer on your device to locate the program 1 Tap and hold the program 2 Tap Delete on the pop up menu Adding a program to the Start menu To add a Start menu program using Settings 1 Tap Settings Menus 2 In the Start Menu tab select the check box for th...

Страница 127: ...u For more information on using File Explorer refer to the To use File Explorer section on page 29 To add a Start menu program using ActiveSyncTM on your computer 1 Use the Explorer in ActiveSyncTM to explore your device files and locate the program 2 Right click the program and then click Create Shortcut 3 Move the shortcut to the Start Menu folder in the Windows folder 4 The shortcut now appears...

Страница 128: ...9 Customising your ET180 Adding a program to the Start menu 108 ...

Страница 129: ...ice be reminded that the hold switch do not lock the reset button you can still reset your device even if the hold switch is turned on Troubleshooting procedures Battery problem Memory on your Pocket PC Phone is shared between storage memory SDRAM and program memory Flash ROM Storage memory is used to store the information you create and programs you install Program memory is used to run programs ...

Страница 130: ... check boxes for the Volume and Reminders tabs Turn off notification light a Tap and then Settings b On the Personal tab tap Sounds Reminders c On the Reminders tab clear the check box for Flash light Disable the phone function when no SIM card is installed on your device Password problem Forgotten password If you forget your password you ll need to clear your device s memory by hard resetting it ...

Страница 131: ...as when confirmation dialog boxes are waiting for a user response the program may not be able to automatically stop To check the state of your active programs a Tap and then Settings b On the System tab tap Memory and then the Running Programs tab c Tap the program you want to view and then tap Activate d Close any open windows or messages and return the program to list view If this doesn t work y...

Страница 132: ... s wireless connection to your mobile service provider is switched on and the signal unobstructed For more information refer to page 67 Contact your mobile phone service provider for assistance Internet connection problem If you re having difficulty establishing Internet connection try the following Make sure you have properly set up a connection to your device ISP Internet Service Provider Check ...

Страница 133: ...ected To change your device s name a Tap and then Settings b On the System tab tap About c Tap the Device ID tab Additional troubleshooting information is available in Connections Help of your device and on the ActiveSyncTM Help on your computer Cable and cradle problem The following solutions may help if you encounter problems when connecting to your computer Make sure that your device is turned ...

Страница 134: ...10 User support Troubleshooting 114 ...

Страница 135: ...H handheld guides ix optional accessories x package contents ix resetting xix handheld setup charging LED status xiii installing Microsoft ActiveSync software x I Inbox 57 connect to an email server 57 create email 59 message list 58 open 57 synchronise emails 57 input panel 17 international calls 72 Internet 50 L Letter Recognizer 18 M maintenance procedures xvi manage applications application li...

Страница 136: ...screen 66 emergency call number 76 end calls 71 enter PIN 66 install the SIM card 65 make calls 71 international calls 72 using Call Log 74 using Dialer 71 using Microsoft Contacts 72 using SIM Manager 75 using Speed Dial 73 using the keypad module 72 respond to calls 70 settings 87 SMS service 80 speakerphone mode 71 status icons 67 turn off 69 turn on 69 voice mail 80 PIN configuration 89 Pocket...

Отзывы: