background image

Chapter 3 . 3-2 

Troubleshooting 

If you have a problem setting up or using your monitor, you might be able to solve it 

yourself. Before calling your dealer or Lenovo, try the suggested actions that are 

appropriate to your problem. 

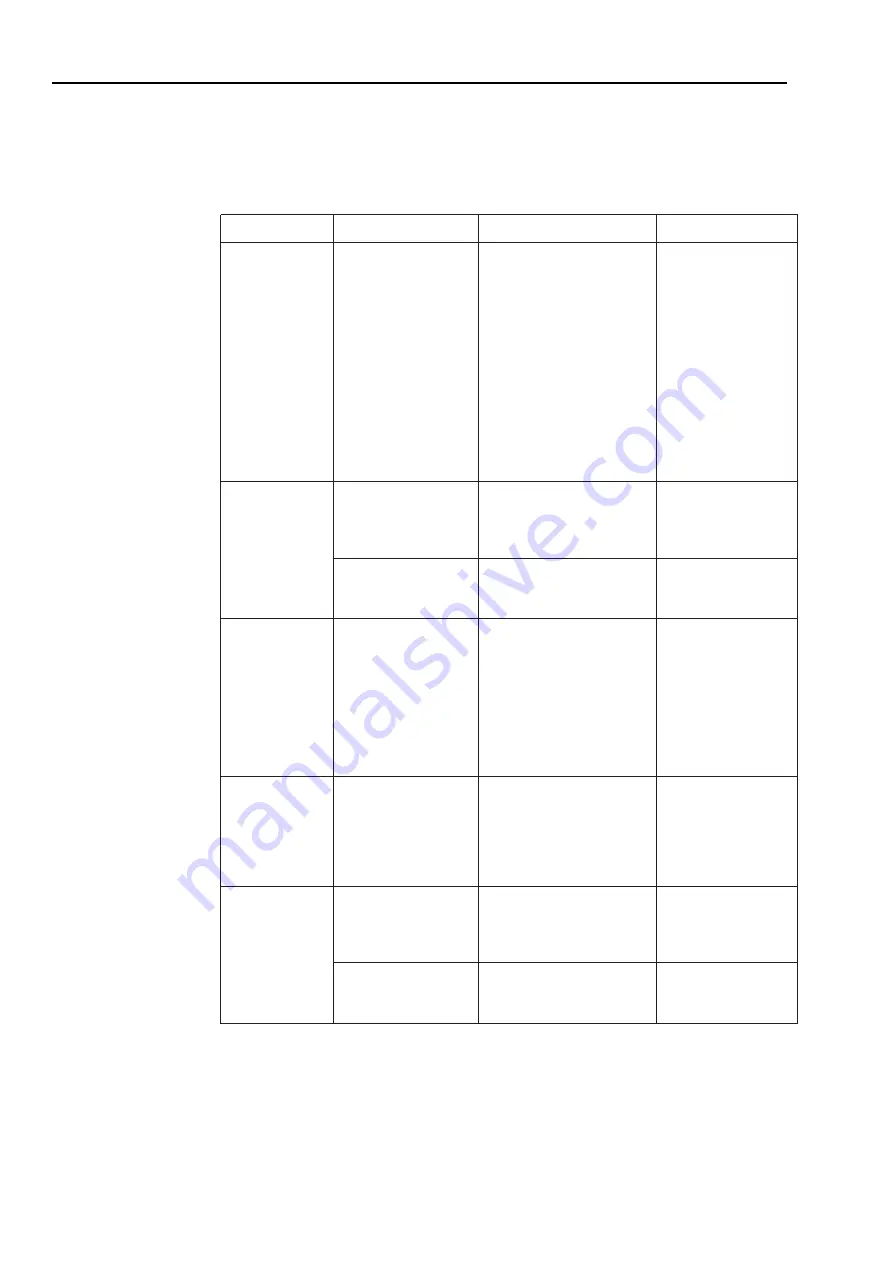
Table3-2.Troubleshooting 

Problem

Possible cause

Suggested action

Reference

The words “Out 

of Range” are 

shown on the 

screen, and the 

power indicator 

is flashing white.

The system is set to a 

display mode which is 

not supported by the 

monitor.

If you are replacing an old 

monitor, reconnect it and 

adjust the display mode to 

within the specified range for

your new monitor.

If using a Windows system, 

restart the system in safe 

mode, then select a supported 

display mode for your 

computer.

If these options do not work, 

contact the Support Center.

“Selecting a supported 

display  mode”on  page 

2-

The image 

quality is 

unacceptable.

The video signal cable 

is not connected with 

the monitor or system 

completely.

Be sure the signal cable 

is firmly plugged into the

system and monitor.

“Connecting and 

turning on your 

monitor”on page 1-3

The color settings may 

be incorrect.

Select another color setting 

from the OSD menu.

“Adjusting your 

monitor image”on 

page 2-4

The power 

indicator is not 

lit and there is no 

image.

y

The monitor’s

power switch is not

switched on.

y

The power

cord is loose or

disconnected.

y

There is no power

at the outlet.

y

Be sure the power cord is

connected properly.

y

Be sure the outlet has

power.

y

Power on the monitor.

y

Try using another power

cord.

y

Try using another

electrical outlet.

“Connecting and 

turning on your 

monitor”on page 1-3

Screen is blank 

and power 

indicator is 

amber.

The monitor is in 

Standby / Suspend 

mode.

y

Press any key on the

keyboard or move

the mouse to restore

operation.

y

Check the Power Options

settings on your computer.

“Understanding power 

management”on page 

2-6

The power 

indicator is 

amber, but there 

is no image.

The video signal 

cable is loose or 

disconnected from the 

system or monitor.

Be sure the video cable is 

connected with the system 

properly.

“Connecting and 

turning on your 

monitor”on page 1-3

The monitor brightness 

and contrast are at the 

lowest setting.

Adjust the brightness and 

contrast setting on the OSD 

menu.

“Adjusting your 

monitor image”on 

page 2-4

Содержание 66A3-GACB-WW

Страница 1: ...Lenovo G27c 10 User Guide ...

Страница 2: ...se and are sold to governmental entities as commercial items as defined by 48 C F R 2 101 with limited and restricted rights to use reproduction and disclosure LIMITED AND RESTRICTED RIGHTS NOTICE IF products data computer software or services are delivered pursuant a General Services Administration GSA contract use reproduction or disclosure is subject to restrictions set forth in Contract No GS ...

Страница 3: ...nformation 2 3 Adjusting your monitor image 2 4 Using the direct access controls 2 4 Using the On Screen Display OSD controls 2 4 Selecting a supported display mode 2 6 Understanding power management 2 6 Caring for your monitor 2 7 Detaching the monitor stand 2 7 Wall Mounting Optional 2 7 Chapter 3 Reference information 3 1 Monitor specifications 3 1 Troubleshooting 3 2 Manually installing the mo...

Страница 4: ...t will be attached must also be connected to properly wired and grounded power outlets To isolate the monitor from the electrical supply you must remove the plug from the power outlet The power outlet should be easily accessible To take special precautions to avoid the introduction of hazards when operating installing servicing transporting or storing equipment the necessary instructions shall be ...

Страница 5: ...l Monitor Information Flyer Monitor Stand Monitor base Power Cord HDMI Cable Notice for use To setup your monitor please see the illustrations below Note Do not touch the monitor within the screen area The screen area is glass and can be damaged by rough handling or excessive pressure HDMI Chapter 1 1 1 1 Carefully lay the monitor on a flat surface 2 Put the stand and base to the monitor Note To a...

Страница 6: ...djustments Tilt Please see the illustration below for an example of the tilt range User controls Your monitor has controls on the front which are used to adjust the display For information on how to use these controls please see Adjusting your monitor image on page 2 3 Height Adjustment For height adjustment user needs to press down or lift up the monitor 130mm ...

Страница 7: ...rmation to help you set up your monitor Connecting and turning on your monitor Note Be sure to read the Safety information on page iii before carrying out this procedure 1 Power off your computer and all attached devices and unplug the computer power cord 2 Connect the DP cable to the DP connector of the monitor and the other end on the back of the computer DP DP Chapter 1 1 3 ...

Страница 8: ... the Lenovo HDMI to HDMI cableOB47070 For more information go to the following www lenovo com support monitoraccessories HDMI HDMI 3 Connect one end of the HDMI cable to the HDMI connector on the back of the computer and 4 Connect the speaker s audio cable and audio jack of monitor to transfer audio source from DP HDMI Note The audio output in DP HDMI modes ...

Страница 9: ...stallation and or equipment regulations shall be considered A certified power supply cord not lighter than ordinary polyvinyl chloride flexible cord according to IEC 60227 designation H05VV F 3G 0 75mm or H05VVH2 F2 3G 0 75mm shall be used Alternative a flexible cord be of synthetic rubber according to IEC 60245 designation H05RR F 3G 0 75mm shall be used 6 Connect the cables with cable clip ...

Страница 10: ...h information that will help Lenovo to better serve you in the future Your feedback is valuable to us in developing products and services that are important to you as well as in developing better ways to communicate with you Register your option on the following Web site http www lenovo com register Lenovo will send you information and updates on your registered product unless you indicate on the ...

Страница 11: ...ition Use a viewing distance that is most comfortable for you Monitor height Position the monitor so your head and neck are in a comfortable and neutral vertical or upright position If your monitor does not have height adjustments you might have to place books or other sturdy objects under the base of the monitor to achieve the desired height A general guideline is to position the monitor such tha...

Страница 12: ...tatic activity it is particularly important to take short breaks from your work Periodically stand up in front of your work area stretch walk for a drink of water or otherwise take a short break from using your computer A short break from work gives your body a welcome change in posture and helps to ensure you remain comfortable and productive while you do work Eye Strain Break Times Computer user...

Страница 13: ...s users can access information in the way most appropriate to their disability Some of these technologies are already provided in your operating system others can be purchased through vendors or accessed at https lenovo ssbbartgroup com lenovo request_vpat php Chapter 2 2 3 to move among the icons Select icon and press to access 4 Use or or 3 Use function to move among the functions Select Low Blu...

Страница 14: ...o move among the icons Select an icon and press function If there is a sub menu you can move between options using or then to make adjustments Press to press to select that function Use or save 3 Press to move backwards through the sub menus and exit from the OSD 4 Press and hold for 10 seconds to lock the OSD This will prevent accidental adjustments to the OSD Press and hold for 10 seconds to unl...

Страница 15: ...er English French Franç ais Italian Italiano 简体中文 Spanish Español Japanese 日本語 German Deutsch Russian Русский Menu Horizontal Adjust bar Menu Vertical Adjust bar Refresh Rate Off Left Top Right Top Left Bottom Right Bottom Off 20 40 60 80 100 DP 1 1 DP 1 2 OSD Timeout Adjust bar 5 60 Cancel Factory Reset Preset Mode Basic image setting Scaling Mode Over Drive DP Select Game Mode signal input Reset...

Страница 16: ...he factory Table 2 3 Factory set display modes Understanding power management Power management is invoked when the computer recognizes that you have not using your mouse or keyboard for a user definable period There are several states as described in the table below For optimal performance switch off your monitor at the end of each working day or whenever you expect to leave it unused for long per...

Страница 17: ...Detaching the monitor stand After placing the monitor face down on a clean surface or soft cloth Press the release button to remove the stand and base from the monitor Wall Mounting Optional Chapter 2 2 7 Refer to the instructions that come with the base mounting kit To convert your LCD display from a desk mounted to a wall mounted display do the following Step 1 Verify that the Power button is tu...

Страница 18: ... 5W 0 3W Video input Digital Input signal Horizontal addressability Vertical addressability Clock frequency DP Video input Digital Input signal Horizontal addressability Vertical addressability Clock frequency Communications VESA DDC CI Altitude Test Operation 16400 ft Supported Display Modes VESA Standard modes between noted ranges Horizontal frequency Vertical frequency Native Resolution Tempera...

Страница 19: ...rning on your monitor on page 1 3 The color settings may be incorrect Select another color setting from the OSD menu Adjusting your monitor image on page 2 4 The power indicator is not lit and there is no image y The monitor s power switch is not switched on y The power cord is loose or disconnected y There is no power at the outlet y Be sure the power cord is connected properly y Be sure the outl...

Страница 20: ...h the image y Image setup has not been optimized y Your system Display Properties setting have not been optimized Adjust the resolution settings on your system to match the native resolution for this monitor 1920 x 1080 at 165 Hz Adjusting your monitor image on page 2 4 Perform automatic image setup If automatic image setup does not help perform manual image setup Selecting a supported display mod...

Страница 21: ... display settings tab 7 Click the Advanced Settings icon 8 Click the Monitor tab 9 Click the Properties button 10 Click the Driver tab 11 Click Update Driver then click Browse the computer to find the driver program 12 Select Pick from the list of device driver program on the computer 13 Click the Have Disk button By clicking the Browse button browse and point to the following path X Monitor Drive...

Страница 22: ...tab 9 Click the Properties button 10 Click the Driver tab 11 Click Update Driver then click Browse the computer to find the driver program 12 Select Let me pick from a list of device drivers on my computer 13 Click the Have Disk button By clicking the Browse button browse and point to the following path X Monitor Drivers Windows 10 Where X indicates the folder in which the downloaded driver is loc...

Страница 23: ...ations The following are examples of misuse or abuse and not covered by warranty Images burned on to the screen of a CRT monitor Burned image is preventable by utilizing a moving screen saver or power management Physical damage to covers bezel base and cables Scratches or punctures on monitor screens Getting further help If you still can t solve your problem please contact the Customer Support Cen...

Страница 24: ...nfiguration support through the Customer Support Center will be available until 90 days after the option has been withdrawn from marketing After that time the support is cancelled or made available for a fee at Lenovo s discretion Additional support is also available for a nominal fee Before contacting a Lenovo technical support representative please have the following information available option...

Страница 25: ...d in this document are not intended for use in implantation or other life support applications where malfunction may result in injury or death to persons The information contained in this document does not affect or change Lenovo product specifications or warranties Nothing in this document shall operate as an express or implied license or indemnity under the intellectual property rights of Lenovo...

Страница 26: ... Utilization of Resources the collecting and recycling of home used computers and monitors by the manufacturer was begun in October 1 2003 This service is provided free of charge for home used computers sold after October 1 2003 For details visit the Lenovo Web site at www ibm com jp pc service recycle personal Disposing of Lenovo computer components Some Lenovo computer products sold in Japan may...

Страница 27: ...Chapter B B 3 Power cords Use only the power cords supplied by the product manufacture Do not use the ac power cord for other devices ...

Отзывы: