background image

QUICK START GUIDE

For a full explanation of all features and instructions, please refer to the User’s Guide (available for 
download from support.hubbleconnected.com).

1.  Setting up your Nursery Pal Premium

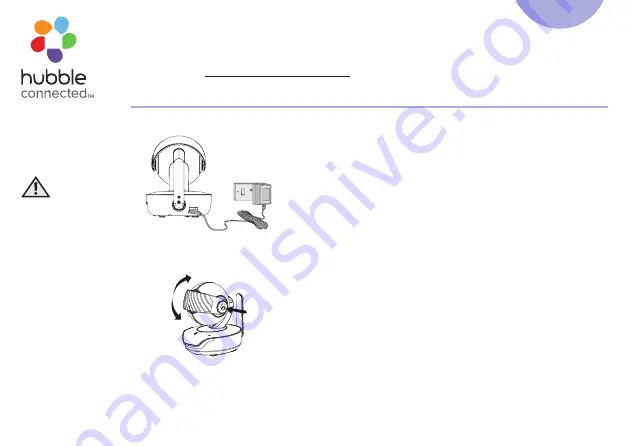
A. Connecting the Power Supply of the Baby Unit.

•  Connect the USB type-C plug of the power adapter to the 

Baby Unit and the other end to mains power.

•  Only use the enclosed adapter (5V DC / 1500mA).

Privacy Protector

This is to disable the live camera video feed by blocking the 
camera lens.
•  Press the knob to release the lock.
•  You can move the protector to its open or closed position 

after the lock is released.

•  When you hear the click sound the protector is at its proper 

positions.

IMPORTANT:

Make sure the privacy protector does not cover the camera lens 

when in use.

Sound is NOT disabled when the protector covers the camera 

lens.

Model: 
Nursery Pal 

Premium


WARNING:

Strangulation 
hazard. 
Children can be 
STRANGLED on 
cords. Keep this 
cord out of the 
reach of children 
(more than 3 feet 
away). Never use 
extension cords 
with AC Adapters. 
Only use the
AC Adapters 
provided.

UK EN

Summary of Contents for Nursery Pal Premium

Page 1: ...e live camera video feed by blocking the camera lens Press the knob to release the lock You can move the protector to its open or closed position after the lock is released When you hear the click sound the protector is at its proper positions IMPORTANT Make sure the privacy protector does not cover the camera lens when in use Sound is NOT disabled when the protector covers the camera lens Model N...

Page 2: ...it without losing the link and picture from the Baby Unit We recommend charging the parent unit for at least 4 hours before first use and when the Parent Unit indicates the battery is low Press and hold the POWER button on the top of the Parent Unit to turn it ON Flip out the stand on the back of the Parent Unit and rotate it by 90 degrees to set up the desktop stand 2 Overview of Parent Unit Ante...

Page 3: ... or for Hubble Wi Fi Setup Located on the bottom of the camera Power ON OFF switch Slide the power switch to the left to switch on the Unit Slide the power switch to the right to switch off the Unit 4 Touch screen operation 25 C 25 C Swipe up at the screen bottom to pop up the menu bar Swipe down at the screen bottom to hide the menu bar Scroll left right on the menu bar to see all the options Swi...

Page 4: ...cates alarm set and when flashing that alarm time has been reached or missed Tap to talk to Baby Unit Camera Control add del view scan View multiple cameras on screen Available when you have more than 1 Baby Unit Camera Set Screen Off Timer Off 5 mins 15 mins 30 mins Temperature scale select C F Readings display in grey but turns RED if 29 C 84 F or 14 C 57 F Displays HH C F if 36 C 97 F Displays ...

Page 5: ... sound or lullaby playlist Tap to display audio book playlist Volume control of media playback Play selected audio media on the playlist Stop playing audio media 5 Display icons Signal Level 5 Levels Night Vision Mode Video also changes to Black White Indicates the screen off timer is set Volume Level Control 8 Levels No Baby Unit detected Battery Level Indicator 4 Levels ...

Page 6: ...ce B View on Compatible Smartphones and Tablets Camera Unit Connect to Internet via Wi Fi Compatible Viewing Devices 1 Open the HubbleClub by Hubble Connected App on your compatible smartphone or tablet 2 Follow the in app instructions to create your Hubble account and connect to your device Please take note of the following minimum system requirements Smartphones Tablets iOS 12 0 Android 8 0 Wi F...

Page 7: ...ects in material and workmanship under normal use for a period of 1 year from the date of purchase and that any certified accessory Accessory sold for use with this product will be free from defects in materials and workmanship under normal use for a period of 90 days from the date of purchase This Limited Warranty is your exclusive warranty and is not transferable What is not covered This Limited...

Page 8: ...PURPOSE IS LIMITED TO THE DURATION OF THIS LIMITED WARRANTY REPAIR OR REPLACEMENT IS YOUR SOLE AND EXCLUSIVE REMEDY AGAINST BINATONE AND Hubble Smart Nursery IN NO EVENT SHALL BINATONE OR Hubble Smart Nursery s LIABILITY TO REPAIR OR REPLACE YOUR PRODUCT OR ACCESSORY EXCEED THE ORIGINAL PURCHASE PRICE OF THE PRODUCT AND ACCESSORY AND BINATONE AND Hubble Smart Nursery s TOTAL LIABILITY FOR DAMAGES ...

Page 9: ...57 09677 UK only Calls cost 7p per minute plus your telephone company s access charge https support hubbleconnected com You will receive instructions on how to ship the Products or Accessories at your expense and risk to a BINATONE Authorized Repair Center You must include a the Product or Accessory b the original proof of purchase receipt which includes the date place and seller of the Product c ...

Page 10: ...d not dispose of this product with normal household waste Take this product to a collection point for the recycling of electrical and electronic equipment The symbol on the product user s guide and or box indicates this Some of the product materials can be re used if you take them to a recycling point By reusing some parts or raw materials from used products you make an important contribution to t...

Reviews: