background image

Computer locks

10

Computer locks

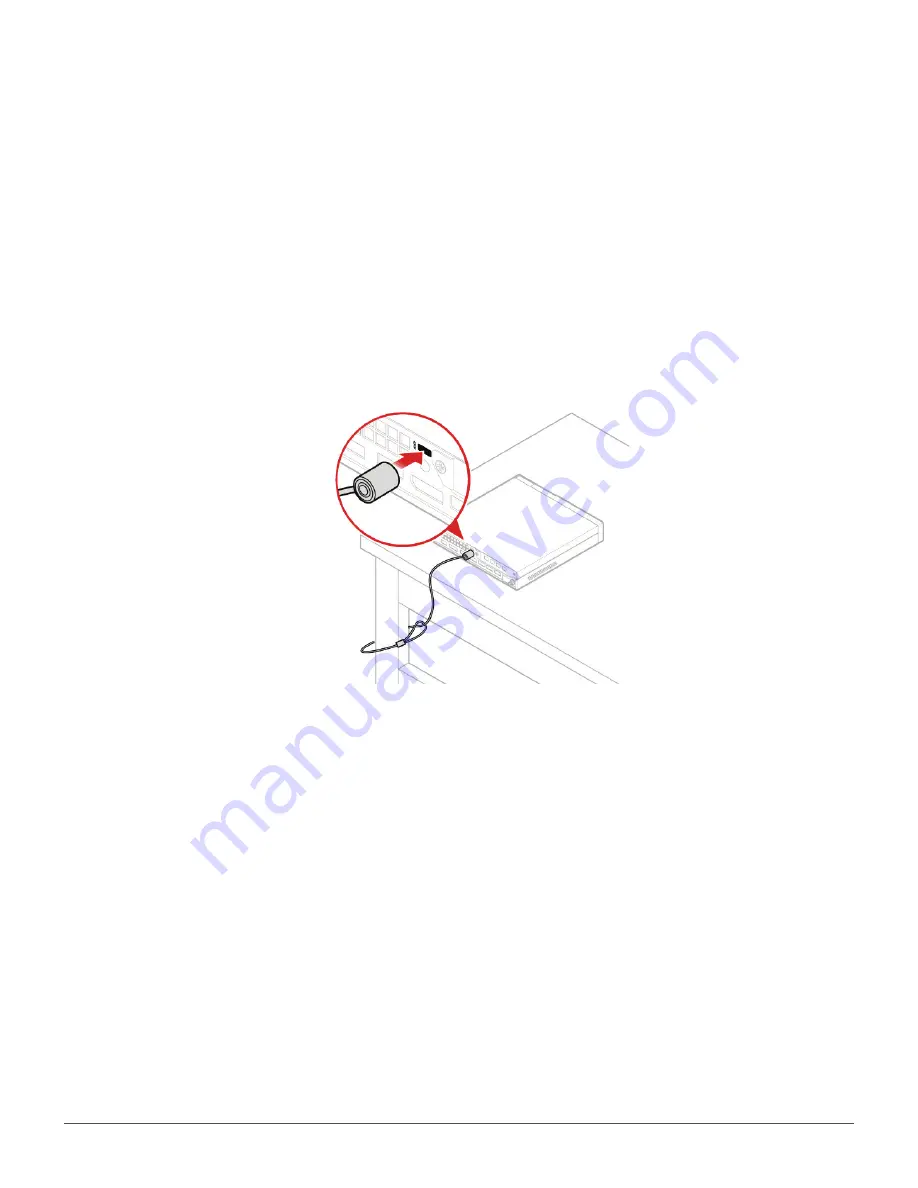
Attaching a Kensington-style cable lock

You can use a Kensington-style cable lock to secure your computer to a desk, table, or other 

nonpermanent fixture. The cable lock connects to the security-lock slot at the rear of your computer. 

Depending on the type selected, the cable lock can be operated with a key or combination. The cable lock 
also locks the buttons used to open the computer cover. This is the same type of lock used with many 

notebook computers. You can order such a cable lock directly from Lenovo by searching for Kensington at: 
http://www.lenovo.com/support.

Содержание 10MY

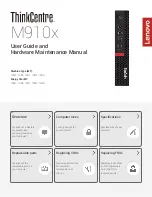
Страница 1: ...rs and controls provided on your computer Replaceable parts Locations of the replaceable parts on your computer Specifications Specifications of your computer Replacing FRUs Replacing instructions for field replaceable units FRUs for technicians only Computer locks Locking devices for your computer Replacing CRUs Replacing instructions for customer replaceable units CRUs ...

Страница 2: ...acket 24 Replacing the external optical drive 25 Replacing the external I O box 26 Replacing the power adapter bracket 27 Removing the computer cover 28 Replacing the storage drive 29 Replacing the internal speaker 30 Replacing the system fan 31 Replacing the PCI Express card and PCI Express card adapter 32 Replacing the Wi Fi card 34 Replacing the bottom cover 37 Replacing the memory module 38 Re...

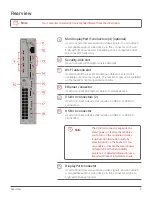
Страница 3: ...t with the computer using speech recognition software 5 Headset connector Used to connect a headset or headphones to your computer 6 USB 3 0 connector Used to connect a USB compatible device such as a USB keyboard mouse scanner printer or personal digital assistant PDA For optimal data transfer connect a USB 3 0 device to a USB 3 0 connector instead of a USB 2 0 connector 7 Always On USB 3 0 conne...

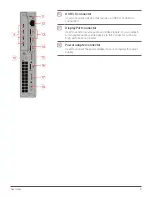
Страница 4: ...ntenna cable connector 12 Ethernet connector Used to connect an Ethernet cable for network access 13 USB 3 0 connectors 2 Used to connect a device that requires a USB 2 0 or USB 3 0 connection 14 USB 3 0 connector Used to connect a device that requires a USB 2 0 or USB 3 0 connection Note The USB 3 0 connector supports the smart power on feature that enables you to turn on the computer or wake it ...

Страница 5: ...B 3 0 connection 17 DisplayPort connector Used to send or receive audio and video signals You can attach a compatible audio or video device to this connector such as a high performance monitor 18 Power adapter connector Used to connect the power adapter to your computer for power supply ...

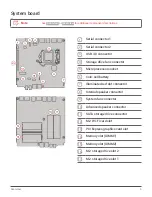
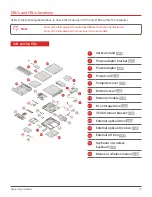
Страница 6: ...e drive fan connector 5 Microprocessor socket 6 Coin cell battery 7 Illuminated red dot connector 8 Internal speaker connector 9 System fan connector 10 Advanced speaker connector 11 SATA storage drive connector 12 M 2 Wi Fi card slot 13 PCI Express graphics card slot 14 Memory slot DIMM1 15 Memory slot DIMM2 16 M 2 storage drive slot 2 17 M 2 storage drive slot 1 ...

Страница 7: ...l label identifies your computer When you contact Lenovo for help the machine type and model information helps support technicians to identify your computer and provide faster service The machine type and model label is attached on the side of your computer as shown ...

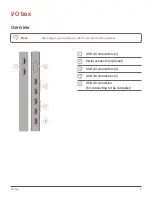
Страница 8: ...erview Note Depending on your computer model the I O box might be optional 1 USB 2 0 connectors 2 2 Serial connector optional 3 USB 2 0 connectors 2 4 USB 3 0 connectors 2 5 USB 3 0 connector for connecting to the computer ...

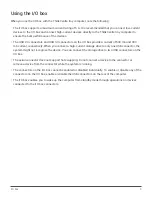
Страница 9: ...y When you connect a high current storage drive to only one USB connector the system might not recognize the device You can connect the storage drive to two USB connectors on the I O box The serial connector does not support hot swapping Do not connect a device to the connector or remove a device from the connector while the system is running The connectors on the I O box cannot be enabled or disa...

Страница 10: ...k connects to the security lock slot at the rear of your computer Depending on the type selected the cable lock can be operated with a key or combination The cable lock also locks the buttons used to open the computer cover This is the same type of lock used with many notebook computers You can order such a cable lock directly from Lenovo by searching for Kensington at http www lenovo com support ...

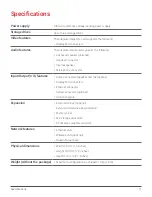
Страница 11: ...er Microphone connector Input Output I O features Audio connectors headset and microphone DisplayPort connectors Ethernet connector Serial connectors optional USB connectors Expansion External I O box optional External optical drive box optional Memory slots M 2 storage drive slots PCI Express graphics card slot Network features Ethernet LAN Wireless LAN optional Bluetooth optional Physical dimens...

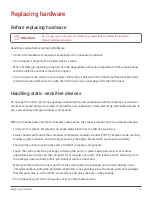
Страница 12: ...ugh harmless to you can seriously damage computer components When you handle parts and other computer components take these precautions to avoid static damage Limit your movement Movement can cause static electricity to build up around you Always handle parts and other computer components carefully Handle PCI PCI Express cards memory modules system boards and microprocessors by the edges Never tou...

Страница 13: ...rs are responsible for replacing all self service CRUs Optional service CRUs Handling optional service CRUs requires some technical skills and simple tools such as a screwdriver These CRUs are isolated parts within the computer They are usually concealed by an access panel that is secured by more than two screws You must remove the screws and panel to access the specific CRU Optional service CRUs ...

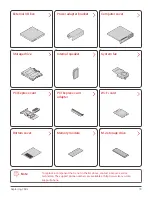
Страница 14: ...he following parts are optional on some models Self service CRU 1 Vertical stand p 23 2 Power adapter bracket p 27 3 Power adapter p 22 4 Power cord p 22 5 Computer cover p 28 15 Bottom cover p 37 16 Memory module p 38 17 M 2 storage drive p 39 27 VESA mount bracket p 24 28 External optical drive p 25 29 External optical drive box p 25 30 External I O box p 26 31 Keyboard or wireless keyboard p 19...

Страница 15: ...15 Optional service CRU 8 Internal speaker p 30 12 System fan p 31 19 Storage drive p 29 20 Storage drive bracket p 29 21 Wi Fi card shield p 34 22 Wi Fi card p 34 23 PCI Express card p 32 24 PCI Express card adapter p 32 ...

Страница 16: ...icroprocessor p 50 7 Coin cell battery p 52 9 Illuminated red dot cable p 43 10 Advanced speaker p 44 11 Antenna bracket p 54 13 System board p 55 14 Chassis p 55 18 Storage drive cable p 48 25 Wi Fi antennas p 45 26 Heat sink p 49 ...

Страница 17: ...l service To check the locations of CRUs see CRUs and FRUs locations Attention Do not open your computer or attempt any repairs before reading the Important Product Information Guide Before replacing a CRU click the illustration of the part to check the brief procedures Keyboard or wireless keyboard Vertical stand Power adapter External optical drive Mouse or wireless mouse VESA mount bracket ...

Страница 18: ...d PCI Express card adapter Bottom cover Power adapter bracket Internal speaker Storage drive Wi Fi card M 2 storage drive Note To replace a component that is not in the list above contact a Lenovo service technician The support phone numbers are available at http www lenovo com support phone ...

Страница 19: ... keyboard to the appropriate connector on the computer Replacing the wireless keyboard 1 Remove your old wireless keyboard 2 Take out the new wireless keyboard from the package 3 Open the battery compartment cover and install two AAA batteries according to the polarity indicators 4 Remove the USB dongle from the keyboard compartment or from the wireless mouse compartment and connect it to an avail...

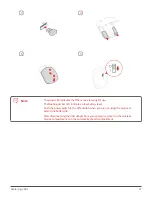
Страница 20: ...disconnect all power cords from electrical outlets 2 Disconnect the old mouse cable from the computer 3 Connect a new mouse to the appropriate connector on the computer Replacing the wireless mouse 1 Disconnect the USB dongle from your computer Then remove your old wireless mouse 2 Remove the new wireless mouse from the package 3 Replace the wireless mouse 1 2 ...

Страница 21: ...he flashing amber LED indicates a low battery level Push the power switch to the off position when you are not using the mouse to extend the battery life After disconnecting the USB dongle from your computer store it in the wireless mouse compartment or in the wireless keyboard compartment ...

Страница 22: ...nt Product Information Guide 1 Remove any media from the drives and turn off all connected devices and the computer 2 Disconnect all power cords from electrical outlets and disconnect all cables that are connected to the computer 3 Replace the power adapter Note Your power cord might look different from the one illustrated 1 2 3 4 ...

Страница 23: ...y repairs before reading the Important Product Information Guide 1 Remove any media from the drives and turn off all connected devices and the computer 2 Disconnect all power cords from electrical outlets and disconnect all cables that are connected to the computer 3 Replace the vertical stand 1 2 ...

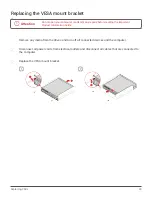
Страница 24: ...y repairs before reading the Important Product Information Guide 1 Remove any media from the drives and turn off all connected devices and the computer 2 Disconnect all power cords from electrical outlets and disconnect all cables that are connected to the computer 3 Replace the VESA mount bracket 1 2 ...

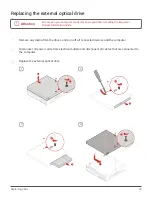
Страница 25: ...repairs before reading the Important Product Information Guide 1 Remove any media from the drives and turn off all connected devices and the computer 2 Disconnect all power cords from electrical outlets and disconnect all cables that are connected to the computer 3 Replace the external optical drive 1 2 3 4 ...

Страница 26: ...ore reading the Important Product Information Guide 1 Remove any media from the drives and turn off all connected devices and the computer 2 Disconnect all power cords from electrical outlets and disconnect all cables that are connected to the computer and the external I O box 3 Replace the external I O box 1 2 ...

Страница 27: ...y repairs before reading the Important Product Information Guide 1 Remove any media from the drives and turn off all connected devices and the computer 2 Disconnect all power cords from electrical outlets and disconnect all cables that are connected to the computer 3 Replace the power adapter bracket 1 2 ...

Страница 28: ...any repairs before reading the Important Product Information Guide 1 Remove any media from the drives and turn off all connected devices and the computer 2 Disconnect all power cords from electrical outlets and disconnect all cables that are connected to the computer 3 Remove the computer cover ...

Страница 29: ...ter 2 Disconnect all power cords from electrical outlets and disconnect all cables that are connected to the computer 3 Remove the computer cover For details see Removing the computer cover 4 Disconnect the storage drive cables from the system board 5 Replace the storage drive 1 2 3 4 6 Connect the storage drive cables to the system board 7 Reinstall the computer cover and reconnect the cables For...

Страница 30: ...rom electrical outlets and disconnect all cables that are connected to the computer 3 Remove the computer cover For details see Removing the computer cover 4 Disconnect the internal speaker cable from the internal speaker connector on the system board 5 Replace the internal speaker 1 2 6 Connect the internal speaker cable to the internal speaker connector on the system board 7 Reinstall the comput...

Страница 31: ...see Removing the computer cover 4 Remove the storage drive For details see Replacing the storage drive 5 Remove the internal speaker For details see Replacing the internal speaker 6 Release the illuminated red dot cable from the system fan 7 Disconnect the system fan cable from the system fan connector on the system board 8 Replace the system fan 1 2 9 Connect the system fan cable to the system fa...

Страница 32: ...n off all connected devices and the computer 2 Disconnect all power cords from electrical outlets and disconnect all cables that are connected to the computer 3 Remove the computer cover For details see Removing the computer cover 4 Remove the internal speaker For details see Replacing the internal speaker 5 Remove the system fan For details see Replacing the system fan 6 Replace the PCI Express c...

Страница 33: ...Replacing CRUs 33 3 4 7 Reinstall the computer cover and reconnect the cables For details see Completing the parts replacement ...

Страница 34: ...al outlets and disconnect all cables that are connected to the computer 3 Remove the computer cover For details see Removing the computer cover 4 Remove the storage drive For details see Replacing the storage drive 5 Remove the system fan For details see Replacing the system fan 6 Remove the PCI Express card For details see Replacing the PCI Express card and PCI Express card adapter 7 Depending on...

Страница 35: ...Replacing CRUs 35 3 4 5 6 Type 2 1 2 ...

Страница 36: ...Replacing CRUs 36 3 4 5 6 8 Reinstall the computer cover and reconnect the cables For details see Completing the parts replacement ...

Страница 37: ...the drives and turn off all connected devices and the computer 2 Disconnect all power cords from electrical outlets and disconnect all cables that are connected to the computer 3 Remove the computer cover For details see Removing the computer cover 4 Replace the bottom cover 1 2 5 Reinstall the computer cover and reconnect the cables For details see Completing the parts replacement ...

Страница 38: ...ll the other into the DIMM 2 slot See System board for the locations of the slots 1 Remove any media from the drives and turn off all connected devices and the computer 2 Disconnect all power cords from electrical outlets and disconnect all cables that are connected to the computer 3 Remove the computer cover For details see Removing the computer cover 4 Remove the bottom cover For details see Rep...

Страница 39: ... and then install the other into the slot 2 See System board for the locations of the slots 1 Remove any media from the drives and turn off all connected devices and the computer 2 Disconnect all power cords from electrical outlets and disconnect all cables that are connected to the computer 3 Remove the computer cover For details see Removing the computer cover 4 Remove the bottom cover For detai...

Страница 40: ...ious components in your computer 2 Ensure that the cables are routed correctly before reinstalling the computer cover Keep cables clear of the hinges and sides of the computer chassis to avoid interference when reinstalling the computer cover 3 Install the computer cover 4 Install the screw to secure the computer cover 5 Place the computer in an upright position 6 If a locking device is available ...

Страница 41: ...ce an FRU ensure that the model of the machine and the FRU part number are correct by referring to the website http www lenovo com serviceparts lookup An FRU should not be replaced because of a single unreproducible failure Single failures can occur for a variety of reasons that have nothing to do with a hardware defect such as cosmic radiation electrostatic discharge or software errors Consider r...

Страница 42: ...d red dot cable Storage drive cable Coin cell battery Chassis Wi Fi antennas Microprocessor System board Advanced speaker Heat sink Antenna bracket Note To replace a component that is not in the list above contact a Lenovo service technician The support phone numbers are available at http www lenovo com support phone ...

Страница 43: ... 1 Remove the computer cover For details see Removing the computer cover 2 Disconnect the illuminated red dot cable from the system board See System board 3 Replace the illuminated red dot cable 1 2 4 Connect the illuminated red dot cable to the system board See System board 5 Reinstall the removed parts and computer cover For details see Completing the parts replacement ...

Страница 44: ... storage drive 3 Remove the system fan For details see Replacing the system fan 4 Remove the PCI Express card For details see Replacing the PCI Express card and PCI Express card adapter 5 Disconnect the advanced speaker cable from the advanced speaker connector on the system board See System board 6 Replace the advanced speaker 1 2 7 Connect the advanced speaker cable to the advanced speaker conne...

Страница 45: ...For details see Removing the computer cover 2 Remove the storage drive For details see Replacing the storage drive 3 Remove the system fan For details see Replacing the system fan 4 Remove the PCI Express card For details see Replacing the PCI Express card and PCI Express card adapter 5 Replace the front Wi Fi antenna 1 2 3 4 6 Reinstall the removed parts and computer cover For details see Complet...

Страница 46: ...acing the storage drive 3 Remove the system fan For details see Replacing the system fan 4 Remove the PCI Express card For details see Replacing the PCI Express card and PCI Express card adapter 5 Disconnect the rear Wi Fi antenna cable from the Wi Fi card 6 Replace the rear Wi Fi antenna Note Record the cable routing before removing the rear Wi Fi antenna cable 1 2 3 4 ...

Страница 47: ...Replacing FRUs 47 5 6 7 Connect the rear Wi Fi antenna cable to the Wi Fi card 8 Reinstall the removed parts and computer cover For details see Completing the parts replacement ...

Страница 48: ...ding the Important Product Information Guide 1 Remove the computer cover For details see Removing the computer cover 2 Remove the storage drive For details see Replacing the storage drive 3 Replace the storage drive cable 1 2 4 Reinstall the removed parts and computer cover For details see Completing the parts replacement ...

Страница 49: ...storage drive For details see Replacing the storage drive 3 Remove the internal speaker For details see Replacing the internal speaker 4 Remove the system fan For details see Replacing the system fan 5 Remove the PCI Express card For details see Replacing the PCI Express card and PCI Express card adapter 6 Replace the heat sink 1 2 3 4 7 Reinstall the computer cover and reconnect the cables For de...

Страница 50: ... the storage drive 3 Remove the internal speaker For details see Replacing the internal speaker 4 Remove the system fan For details see Replacing the system fan 5 Remove the PCI Express card For details see Replacing the PCI Express card and PCI Express card adapter 6 Remove the heat sink For details see Replacing the heat sink 7 Replace the microprocessor Note Your microprocessor and socket might...

Страница 51: ...Replacing FRUs 51 3 4 5 6 8 Reinstall the removed parts and computer cover For details see Completing the parts replacement ...

Страница 52: ... however no coin cell battery lasts forever If the coin cell battery fails the date time and configuration information including passwords are lost An error message is displayed when you turn on the computer To replace the coin cell battery 1 Remove the computer cover For details see Removing the computer cover 2 Remove the storage drive For details see Replacing the storage drive 3 Remove the int...

Страница 53: ...cell battery 1 2 3 4 8 Reinstall the removed parts and computer cover For details see Completing the parts replacement To dispose of the coin cell battery refer to the Lithium coin cell battery notice topic in the Safety and Warranty Guide ...

Страница 54: ...nternal speaker For details see Replacing the internal speaker 4 Remove the system fan For details see Replacing the system fan 5 Remove the PCI Express card For details see Replacing the PCI Express card and PCI Express card adapter 6 Remove the advanced speaker For details see Replacing the advanced speaker 7 Remove the Front Wi Fi antenna For details see Replacing the Wi Fi antennas 8 Replace t...

Страница 55: ...s card and PCI Express card adapter 6 Remove the heat sink For details see Replacing the heat sink 7 Remove the Wi Fi card For details see Replacing the Wi Fi card 8 Remove the Wi Fi antennas For details see Replacing the Wi Fi antennas 9 Remove the microprocessor For details see Replacing the microprocessor 10 Remove the bottom cover For details see Replacing the bottom cover 11 Remove the memory...

Страница 56: ...he system board by its edges 1 2 3 4 16 Route all the cables that you disconnected from the failing system board and then reconnect the cables to the new system board See System board 17 Reinstall the removed parts and computer cover For details see Completing the parts replacement ...

Страница 57: ...ANTY OF ANY KIND EITHER EXPRESS OR IMPLIED INCLUDING BUT NOT LIMITED TO THE IMPLIED WARRANTIES OF NON INFRINGEMENT MERCHANTABILITY OR FITNESS FOR A PARTICULAR PURPOSE Some jurisdictions do not allow disclaimer of express or implied warranties in certain transactions therefore this statement may not apply to you This information could include technical inaccuracies or typographical errors Changes a...

Страница 58: ...ained in other operating environments may vary significantly Some measurements may have been made on development level systems and there is no guarantee that these measurements will be the same on generally available systems Furthermore some measurements may have been estimated through extrapolation Actual results may vary Users of this document should verify the applicable data for their specific...

Отзывы: