background image

Page 42

12 -  

If the appliance will not operate, follow the 

instructions “Turning Off Gas to Unit” and call your 

service technician or gas supplier.

Turning Off Gas to Unit

1 -   Set the thermostat to the lowest setting.
2 -   Turn off all electrical power to the unit if service is to 

be performed.

3 -   Remove the upper access panel.
4 -   Move gas valve switch to 

OFF 

position. Do not 

force. See figure 34 or 35.

5 -   Replace the upper access panel.

Failure To Operate

If the unit fails to operate, check the following:

1 -    Is the thermostat calling for heat?
2 -   Are access panels securely in place?
3 -   Is the main disconnect switch closed?
4 -   Is there a blown fuse or tripped circuit breaker?
5 - 

 Is the filter dirty or plugged? Dirty or plugged filters 

will cause the limit control to shut the unit off.

6 -   Is gas turned on at the meter?
7 -   Is the manual main shut-off valve open?
8 -   Is the internal manual shut-off valve open?
9 -   Is the unit ignition system in lock out? If the unit locks 

out again, call the service technician to inspect the 

unit for blockages.

10 - 

 Is  pressure  switch  closed?  Obstructed  flue  will 

cause unit to shut off at pressure switch. Check flue 

and outlet for blockages.

11 - 

 Are flame rollout switches tripped? If flame rollout 

switches are tripped, call the service technician for 

inspection.

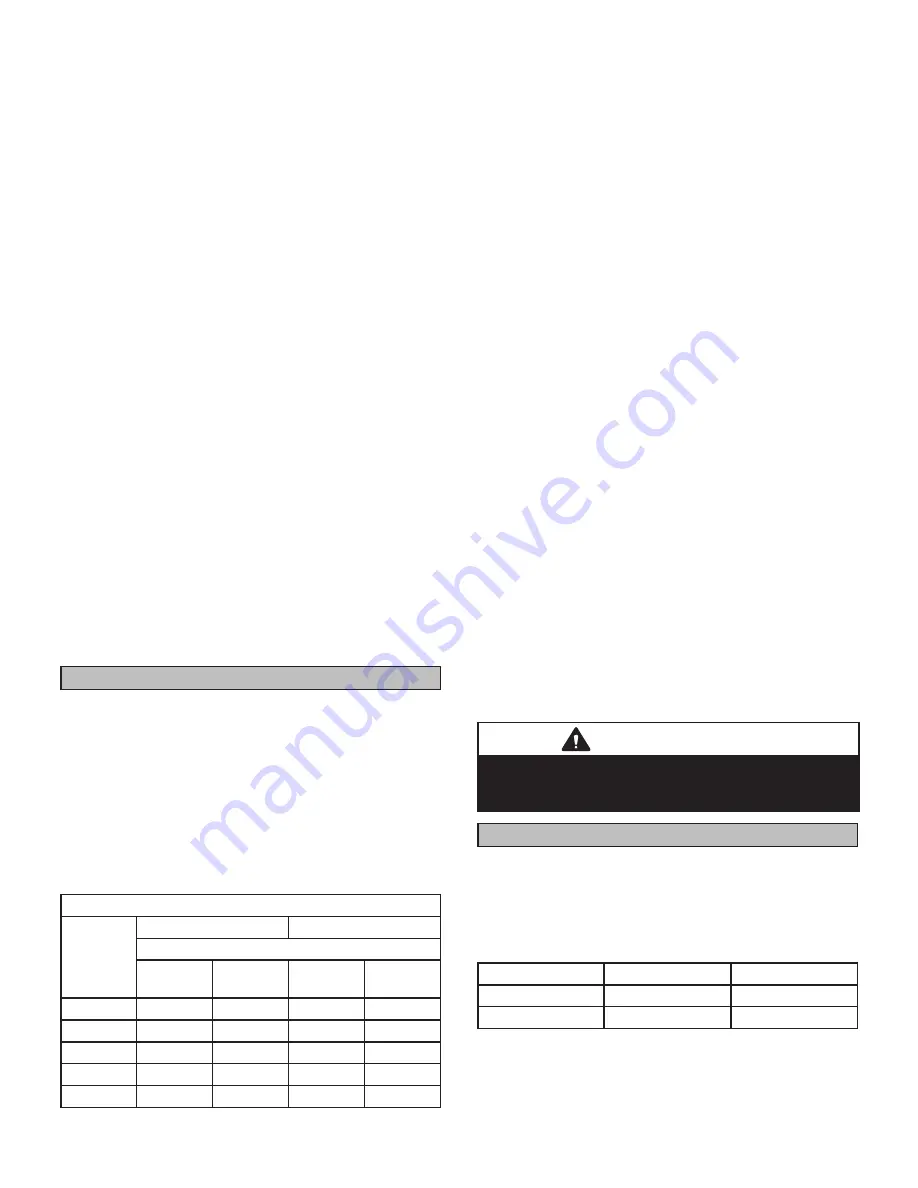
Gas Pressure Adjustment

Furnace should operate at least 5 minutes before check-

ing gas flow. Determine time in seconds for two revolu

-

tions of gas through the meter. (Two revolutions assures 

a more accurate time.) Divide by two and compare to time 

in table 17 below. If manifold pressure matches table 19 

and rate is incorrect, check gas orifices for proper size and 

restriction. Remove temporary gas meter if installed.

NOTE - Shut unit off and remove manometer as soon as 

an accurate reading has been obtained. Take care to re-

place pressure tap plug.

TABLE 17 

GAS METERING CLOCKING CHART

SL280 

Unit

Natural 1000 btu/cu ft

LP 2500 btu cu/cu ft

Seconds For One Revolution

1 cu ft 

dial

2 cu fr 

dial

1 cu ft 

Dial

2 cu ft 

Dial

-045

80

160

200

400

-070

55

110

136

272

-090

41

82

102

204

-110

33

66

82

164

-135

27

54

68

136

Supply Line Pressure

White Rodgers Gas Valve

An inlet post located on the gas valve provides access 

to the supply pressure. See figure 34. Back out the 3/32 

hex screw one turn, connect a piece of 5/16 tubing and 

connect to a manometer to measure supply pressure. See 

table 19 for supply line pressure.

Honeywell Gas Valve

A threaded plug on the inlet side of the gas valve provides 

access to the supply pressure tap. Remove the thread-

ed plug, install a field-provided barbed fitting and connect 

a manometer to measure supply pressure. See table 19 

for supply line pressure. Replace the threaded plug after 

measurements have been taken.

Manifold Pressure

NOTE - Pressure test adapter kit (10L34) is available from 

Lennox to facilitate manifold pressure measurement.

1 -   

Connect test gauge to manifold pressure post 

(figure 34) or tap (figure 35) on gas valve.

2 - 

 Ignite unit on high fire and let run for 5 minutes to 

allow for steady state conditions.

3 -   After allowing unit to stabilize for 5 minutes, record 

manifold pressure and compare to value given in 

table 19.

4 -   If necessary, make adjustments. Figures 34 and 35 

show location of high fire adjustment screw.

5 - 

 If  an  adjustment  is  made  on  high  fire,  re-check 

manifold pressure on low fire. Do not adjust low fire 

manifold pressure. If low fire manifold pressure is 

more  than  1/2”  above  or  below  value  specified  in 

table 19, replace valve.

6 -   Shut unit off and remove manometer as soon as an 

accurate reading has been obtained. Take care to 

replace pressure tap plug if removed.

7 -   Start unit and perform leak check. Seal leaks if 

found.

 IMPORTANT

For safety, shut unit off and remove manometer as soon 

as an accurate reading has been obtained. Take care to 

replace pressure tap plug.

Proper Combustion

Furnace should operate minimum 15 minutes with correct 

manifold pressure and gas flow rate before checking com

-

bustion. Table 18 shows acceptable combustion for ALL 

SL280UHV models.

 The maximum carbon monoxide 

reading should not exceed 100 ppm.

TABLE 18 

Firing Rate

CO

2

% For Nat

CO

2

% For LP

High Fire

6.8 - 7.4

7.5 - 9.0

Low Fire

4.2 - 5.7

5.0 - 6.0

Содержание SL280135V60D

Страница 1: ...ommunicating applications In non communicating applications the Lennox ComfortSense 7500 thermostat may be used as well as other non communicating thermostats In all cases setup is critical to ensure...

Страница 2: ...9 14 356 9 16 14 3 76 Right 7 178 Left 2 FLUE OUTLET Either Side 3 OPTIONAL EXTERNAL SIDE RETURN AIR FILTER KIT Either Side 16 406 14 3 4 375 3 OPTIONAL EXTERNAL SIDE RETURN AIR FILTER KIT Either Side...

Страница 3: ...STION AIR INDUCER BLOWER ASSEMBLY BURNER BOX INNER BLOWER ACCESS PANEL ACCESS PANEL SIGHT GLASS COMBUSTION AIR INDUCER PRESSURE SWITCH GAS VALVE CONTROL BOX Includes two stage integrated control trans...

Страница 4: ...d protective clothing Certifications SL280UHV units are CSA International certified to ANSI Z21 47 In the USA installation of gas furnaces must conform with local building codes In the absence of loca...

Страница 5: ...ter during any phase of construc tion Very low return air temperatures harmful vapors and operation of the unit with clogged or misplaced filters will damage the unit SL280UHV units may be used for he...

Страница 6: ...information has been reprinted with permission from the National Fuel Gas Code ANSI Z223 1 This reprinted material is not the complete and official position of the ANSI on the referenced subject whic...

Страница 7: ...FIGURE 3 Air from Inside If the confined space that houses the furnace adjoins a space categorized as unconfined air can be brought in by providing two permanent openings between the two spac es Each...

Страница 8: ...the total input rating of all equipment in the enclosure If the equipment room is located against an outside wall and the air openings ing shall have a free area of at least one square inch 645 mm2 pe...

Страница 9: ...The bolt and washer must be removed before the furnace is placed into opera tion After the bolt and washer have been removed the rigid leg will not touch the blower housing RIGID LEG remove shipping b...

Страница 10: ...OW Single Side Return Air with transition and filter FIGURE 9 FIGURE 10 Optional Return Air Base Upflow Applications Only For use with A B C and D cabinets NOTE Optional Side Return Air Filter Kits ar...

Страница 11: ...ce Either suspend the furnace from roof rafters or floor joists as shown in figure 13 or install the furnace on a platform as shown in figure 14 Typical Horizontal Application Unit Suspended in Attic...

Страница 12: ...more frequently during the winter and the indoor coil to freeze in the summer resulting in an increase in the number of service calls Before using any filter with this system check the specifications...

Страница 13: ...it is installed the flue transition must be in the 9 o clock 12 o clock or 3 o clock position If necessary reposition the combustion air inducer pres sure switch and or make up box as needed per the f...

Страница 14: ...re switch HORIZONTAL LEFT POSITION Side Vent Discharge Disconnect pressure switch hose from barbed fitting on the pressure switch assembly Remove pressure switch assembly 1 screw and cut wire tie to f...

Страница 15: ...The exhaust vent for this furnace must be securely connected to the furnace flue transition at all times FLUE TRANSITION COLLAR VENT CONNECTION VENT PIPE min 6 length DISCONNECTED VENT WARNING STICKE...

Страница 16: ...s been sized according to the provided venting tables and the vent pipe manufacturer s instructions A fan assisted furnace may be commonly vented into an existing lined masonry chimney if the followin...

Страница 17: ...xceed 7 times the smallest listed appliance categorized vent area drafthood outlet area or flue collar area unless designed according to approved engineering methods 6 The entire length of single wall...

Страница 18: ...he provided venting tables If the existing venting system does not meet these requirements it must be resized TABLE 3 Capacity of Type B Double Wall Vents with Type B Double Wall Connectors Serving a...

Страница 19: ...51 128 66 195 3 24 47 37 87 53 139 67 210 10 1 22 43 34 78 49 123 65 189 2 23 47 36 86 51 136 67 206 3 24 50 37 92 52 146 69 220 15 1 21 50 33 89 47 142 64 220 2 22 53 35 96 49 153 66 235 3 24 55 36 1...

Страница 20: ...es which could cause an unsafe condition 3 Close all building doors and windows and all doors between the space in which the appliances remaining connected to the common venting system are located and...

Страница 21: ...require the installation of a manual main shut off valve and union furnished by the installer external to the unit The union must be of the ground joint type IMPORTANT Compounds used on threaded join...

Страница 22: ...en testing pressure of gas lines gas valve must be disconnected and isolated See figure 28 Gas valves can be damaged if subjected to pressures greater than 1 2 psig 3 48 kPa 14 inches w c MANUAL MAIN...

Страница 23: ...mage Size wiring and circuit breaker s per Product Specifications bulletin EHB and unit rating plate NOTE Unit nameplate states maximum current draw Maximum over current protection allowed is shown in...

Страница 24: ...on the C terminal of the icomfort communication terminal strip RSBus Using an additiona wire come off C terminal and wire nut all the extra wires together Termination on the outdoor control must match...

Страница 25: ...PTIONAL DISCHARGE AIR SENSOR CLIP ON BOARD LINK W915 Y1 TO Y2 FOR TWO STAGE OPERATION iComfort THERMOSTAT Communicating systems using the iComfort thermostat require four thermostat wires between the...

Страница 26: ...wire is 18 RSBus Rf W Gh Gs Cf HVAC EQUIP DEHUMIDIFIER CONTROL HVAC EQUIPMENT DH STANDARD 1 OR 2 STAGE AC OR HP UNIT 24V IN JUMPER iComfort ENABLED FURNACE iComfort ENABLED FURNACE iComfort THERMOSTA...

Страница 27: ...N DO NOT CUT ANY ON BOARD LINKS S1 T STAT FURNACE TERM STRIP OUTDOOR UNIT 1 Heat 2 Cool NOTE Use DIP switch 2 to set second stage heat ON delay OFF 7 minutes ON 12 minutes ON CUT ON BOARD LINK W915 2...

Страница 28: ...915 2 STAGE COMPR S1 T STAT FURNACE TERM STRIP OUTDOOR UNIT 2 Heat 2 Cool with t stat with humidity control OFF CUT ON BOARD LINK W915 2 STAGE COMPR CUT ON BOARD LINK W914 DEHUM OR HARMONY S1 T STAT F...

Страница 29: ...T ON BOARD LINK W951 HEAT PUMP T STAT FURNACE TERM STRIP HEAT PUMP 67M41 Y H L Y2 D B L Y2 T T outdoor sensor Dual Fuel Two Stage Heat Pump ComfortSense thermostat w bilities Capable of 2 stage gas he...

Страница 30: ...BOARD LINK W914 DEHUM OR HARMONY T STAT FURNACE TERM STRIP HEAT PUMP 67M41 Y H L Y2 D B L Y2 T T outdoor sensor Dual Fuel Two Stage Heat Pump ComfortSense thermostat w bilities Capable of 2 stage gas...

Страница 31: ...Page 31 FIGURE 32 SL280UHV Schematic Wiring Diagram...

Страница 32: ...HEAT DEMAND FROM 1ST STAGE T STAT R CLASS 2 VOLTAGE TO THERMOSTAT G MANUAL FAN FROM T STAT C THERMOSTAT SIGNAL GROUND CONNECTED TO TRANSFORMER GRD TR CHASIS GROUND GRD Y1 THERMOSTAT 1ST STAGE COOL SI...

Страница 33: ...lay time that the blower operates after the heating de mand has been satisfied can be adjusted by moving switches 3 and 4 on the integrated control The unit is shipped from the factory with a blower o...

Страница 34: ...at 100 until demand is satisfied Once demand is met motor ramps down to stop OFF OFF 100 CFM COMPRESSOR DEMAND Switches 11 12 and 13 Heating Mode Blower Speed The switches are factory set to the OFF...

Страница 35: ...board link W915 is a clippable connection between terminals Y1 and Y2 on the integrated control W915 must be cut if two stage cooling will be used If the Y1 to Y2 link is not cut the outdoor unit wil...

Страница 36: ...Heating Speed cfm Second Stage Heating Speed cfm 24 1300 1420 18 1250 1335 12 1185 1285 6 1145 1240 Factory Default 1070 1170 6 1015 1100 12 970 1035 18 880 980 COOLING 1 Cooling Speed DIP Switch Set...

Страница 37: ...DIP Switch Settings First Stage Heating Speed cfm Second Stage Heating Speed cfm 24 1420 1565 18 1355 1490 12 1285 1415 6 1215 1335 Factory Default 1145 1260 6 1080 1185 12 1010 1110 18 940 1035 COOL...

Страница 38: ...Pressure Range HEATING 1 Heating Speed DIP Switch Settings First Stage Heating Speed cfm Second Stage Heating Speed cfm 24 1875 2065 18 1785 1965 12 1695 1865 6 1605 1765 Factory Default 1515 1665 6...

Страница 39: ...PRECISION MODE operates independent of a Y1 demand Normal Operation 1 On On On Acceptable 24 VAC High 100 Dehumidification mode begins when humidity is greater than set point Dehumidification Call 2 O...

Страница 40: ...oom space to maintain a cooler room thermostat setpoint ROOM THERMOSTAT CALLS FOR FIRST AND SECOND STAGE COOLING BASIC MODE only active on a Y1 thermostat demand Normal Operation 1 On On On On Accepta...

Страница 41: ...rners will automatically light The ignitor does not get hot when there is no call for heat on units with an automat ic ignition system WARNING If you do not follow these instructions exactly a fire or...

Страница 42: ...al 2 cu ft Dial 045 80 160 200 400 070 55 110 136 272 090 41 82 102 204 110 33 66 82 164 135 27 54 68 136 Supply Line Pressure White Rodgers Gas Valve An inlet post located on the gas valve provides a...

Страница 43: ...3 034 032 4 9 10 0 4 9 10 0 4 9 10 0 11 0 1 This is the only permissible derate for these units 2 Natural gas high altitude orifice kit required 3 A natural to L P propane gas changeover kit is necess...

Страница 44: ...trol The integrated control runs a self diagnostic program and checks high temperature limit switches for normally closed contacts and pressure switches for normally open contacts The combustion air i...

Страница 45: ...nitiates a second stage on delay factory set at 7 minutes adjustable to 12 minutes 5 If the heating demand continues beyond the secondstage on delay the integrated control energizes the combustion air...

Страница 46: ...h air grilles and louvers on the unit and in the room where the furnace is installed must be properly sized open and unobstructed to provide combustion air 10 Inspect the furnace venting system to mak...

Страница 47: ...he burner manifold assembly to the vestibule panel and remove theassembly from the unit 4 To clean burners run a vacuum cleaner with a soft brush attachment over the face of burners Visually inspect i...

Страница 48: ...rts Upper access panel Blower panel Top cap Control Panel Parts Transformer Two stage variable speed integrated control Door interlock switch Circuit breaker Blower Parts Blower wheel Blower housing M...

Страница 49: ...ss the flame signal mode The integrated control will display the flame current on 7 segment LED in in micro amps uA Flame signal mode is exited after any of the following Power is reset Pressing and h...

Страница 50: ...clears 5 seconds after fault recovered E111 Low line voltage Reverse line power voltage wiring System resumes normal operation 5 seconds after fault recovered E112 Ground not detected System shuts dow...

Страница 51: ...riate feature will be set as installed and that could be seen in About screen In normal operation after control recognizes sensors alarm will be sent if valid temperature reading is lost To get rid of...

Страница 52: ...ect operation and restriction Resumes normal operation after fault is cleared E227 Low pressure switch open during trial for ignition or run mode Check pressure inches w c of low pressure switch closi...

Страница 53: ...ctions 1 hour soft lockout Clears when calibration has finished successfully E290 Ignitor circuit fault Failed ignitor or triggering cir cuitry Measure resistance of hot surface ignitor Replace if ope...

Страница 54: ...tween R O on integrated control with non communicating outdoor unit Dual fuel module required for heat pump application Configuration link R to O needs to be restored Replace link or hard wire Applica...

Страница 55: ...button next to 7 segment LED display until solid P symbol appears Release button Turn room thermostat to OFF Solid P starts blinking on 7 Segment LED Push and hold button Integrated control will disp...

Страница 56: ...OFF NO INDUCER OFF AFTER POST PURGE HARD LOCKOUT ERROR CODE FLASHES YES YES YES 1 2 1 LOW PRESSURE SWITCH OPENS 1 2 HARD LOCKOUT REQUIRES THERMOSTAT RESET OR CYCLING OF POWER TO RESET THE LOCKOUT 3 IN...

Страница 57: ...ZED ONLY FOR 1ST REQUEST FOR 2ND STAGE HEAT YES CALL FOR HEAT SATISFIED INDUCER SWITCHED TO HIGH SPEED SINGLE STAGE THERMOSTAT 2 STAGE THERMOSTAT NO INDUCER SWITCHED TO LOW SPEED 5 MINUTE DELAY ERROR...

Страница 58: ...2ND STAGE CALL FOR HEAT SATISFIED NO YES DE ENERGIZE 2ND STAGE GAS VALVE INDUCER SPEED SWITCHED TO LOW SPEED 1 2 3 1ST STAGE HEAT 1ST STAGE CALL FOR HEAT SATISFIED NO YES GAS VALVE DE ENERGIZED INDUC...

Страница 59: ...RAMPING PROFILES THE SPECIFIC PROFILE IS SELECTED USING THE 1 1 2 2 1 1 1 2 2 DE ENERGIZE 1ST STAGE COOLING CONTACTOR COMPRESSOR FAN 2ND STAGE COOLING REQUEST STILL ACTIVE COOLING REQUEST STILL ACTIV...

Страница 60: ...ST FOR HEAT RECEIVED REQUEST FOR COOLING RECEIVED GO TO CALL FOR 1ST STAGE HEAT YES GO TO CALL FOR COOLING 1 1 1 4 YES NO CALL FOR FAN INDOOR BLOWER ON CONTINUOUS FAN SPEED MAINTAIN INDOOR BLOWER AT C...

Отзывы: