background image

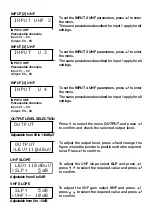
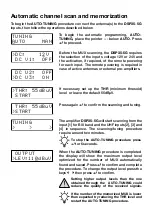
To begin the automatic programming, 

AUTO-

TUNING,

 place the pointer --- below 

AUTO

. Press 


to proceed.

Automatic channel scan and memorization

Setting higher output levels than the one 

obtained through the  AUTO-TUNING could 

reduce the quality of the received signals.

TUNING

AUTO     MAN

TUNING

>    >     >

 OUTPUT

>LEV:110dBuV

>DC:    12V

 DC V1:  OFF

 DC U2:  OFF

>DC U3:  ON

>THR: 55dBuV

 START

If necessary set up the 

THR

 (minimum thresold) 

level  or leave the default 55dB

μ

V.

 THR:  55dBuV

>START

Press again 


to confirm the scanning and tuning

.

If the number of the memorized MUX is lower 

than expected try reducing the THR level and 

restart the AUTO-TUNING procedure.

To stop the AUTO-TUNING procedure press 

 for 5 seconds.

To begin the 

AUTO-TUNING

 procedure connect the antenna(s) to the 

DSP35-4G 

inputs, then follow the operations described below.

The amplifier 

DSP35-4G

 will start scanning from the 

input [1] for BIII band and the UHF inputs [2], [3] and 

[4] in sequence. The scanning/tuning procedure 

require around two minutes. 

Before the MUX scanning, the 

DSP35-4G

 requires 

the selection of the inputs voltage 12V or 24V and 

the activation, if required, of the remote powering 

for each input. The remote powering is required in   

case of active antennas or external pre-amplifiers.

When the 

AUTO-TUNING

 procedure is completed 

the display will show the maximum output level 
optimized for the number of MUX automatically 
found and saved. Press 


to con

fi

 rm and complete 

the procedure. To change the output level press the 
keys



then press 


to con

fi

 rm.

Содержание DSP35-4G

Страница 1: ...NCY RANGE MHz FM 40 108 BIII 170 230 DAB 170 240 UHF 470 790 LTE PROTECTION LTE790 SINGLE CHANNEL FILTERS 32 NUMBER OF CHANNEL PER FILTERS 1 2 INPUT LEVEL RANGE dB V FM 35 90 BIII DAB 40 110 UHF 45 10...

Страница 2: ...rocesses CAUTION To avoid the risk of electric shock do not open the equipment LEM GUI AUTO TUNING High rejection SAW filters for optimal protection against Lte 4G interferences In addition to the eas...

Страница 3: ...P55 rating and fix it safely using the provided fixing plugs 4 Connect the power adapter cord to a detachable power supply socket Safety instructions IMPORTANT Use only the power supplier YS25 1501250...

Страница 4: ...uts 3 Connect the MATV output and terminate the unused inputs with 75 loads 4 Connect the power supplier unit to the DSP35 4G and then connect the power supplier to mains plug Installation and start u...

Страница 5: ...loads 4 Connect the power supplier unit to the coaxial DC injector INS02 and then connect the power supplier to mains plug DC Coaxial Injector not included Installation and start up UHF BIII DAB UHF...

Страница 6: ...g menu OUTPUT LEV 110dBuV Confirmation Key Menu browsing keys Display LDC 2 x 12 Pointer to scroll figures Function Selector Note the display will go out after 3 minutes if inactive but the menu will...

Страница 7: ...ING procedure press for 5 seconds To begin the AUTO TUNING procedure connect the antenna s to the DSP35 4G inputs then follow the operations described below The amplifier DSP35 4G will start scanning...

Страница 8: ...to enter the menu INPUT 1 VHF INPUT 1 VHF Processable channels Input E5 E13 DAB Output E5 69 Press the keys at the same time to go back to the main menu from anywhere in the INPUT menu PREAMP OFF DC O...

Страница 9: ...eys then press twice to confirm 5 5 L 65 PREAMP ON To activate the filtering and conversion function on a single MUX set the desired input channel through the keys and press to confirm Select the outp...

Страница 10: ...To adjust the UHF slope select SLP and press press to select the required value and press to confirm UHF SLOPE Adjustablefrom0to5dB SLP 5dB VHF 10dB To adjust the VHF gain select VHF and press press t...

Страница 11: ...t THR the AUTO TUNING and MONITOR miminum threshold function and press Use the keys to select the required value and press to confirm REMOTE POWER SUPPLY PROTECTION PASSCODE AUTO TUNING INPUTS THRESHO...

Страница 12: ...mode and press to confirm To carry on with the programming select NO and press to confirm THR 55dBuV RESET MONITOR RESET MONIT OFF The MONITOR function activates a real time monitoring procedure whic...

Страница 13: ...lease check the power supplier DC NOT VALID Display Error Messages OVERCURRENT Input short circuit or over current Please check the input s with the remote power supply activated and remove the issue...

Страница 14: ...DSP35 4G Label with serial and tracking data Model Serial Manuf Week Manuf Year HW Rel FW Rel 1 DownloadthelatestGUIreleasefromourwebsitehttp www lemelettronica it 2 Install the GUI selecting the file...

Страница 15: ...LEM ELETTRONICA srl Via Grezze 38 25015 Desenzano d G Italy Tel 39 0309120006 Fax 39 0309123035 info lemelettronica it www lemelettronica it...

Страница 16: ...EQUENCY RANGE MHz FM 40 108 BIII 170 230 DAB 170 240 UHF 470 694 LTE PROTECTION LTE700 SINGLE CHANNEL FILTERS 32 NUMBER OF CHANNEL PER FILTERS 1 2 INPUT LEVEL RANGE dB V FM 35 90 BIII DAB 40 110 UHF 4...

Страница 17: ...sses CAUTION To avoid the risk of electric shock do not open the equipment LEM GUI AUTO TUNING High rejection SAW filters for optimal protection against Lte 4G and 5G interferences In addition to the...

Страница 18: ...P55 rating and fix it safely using the provided fixing plugs 4 Connect the power adapter cord to a detachable power supply socket Safety instructions IMPORTANT Use only the power supplier YS25 1501250...

Страница 19: ...uts 3 Connect the MATV output and terminate the unused inputs with 75 loads 4 Connect the power supplier unit to the DSP35 5G and then connect the power supplier to mains plug Installation and start u...

Страница 20: ...loads 4 Connect the power supplier unit to the coaxial DC injector INS02 and then connect the power supplier to mains plug DC Coaxial Injector not included Installation and start up UHF BIII DAB UHF...

Страница 21: ...g menu OUTPUT LEV 110dBuV Confirmation Key Menu browsing keys Display LDC 2 x 12 Pointer to scroll figures Function Selector Note the display will go out after 3 minutes if inactive but the menu will...

Страница 22: ...ING procedure press for 5 seconds To begin the AUTO TUNING procedure connect the antenna s to the DSP35 5G inputs then follow the operations described below The amplifier DSP35 5G will start scanning...

Страница 23: ...to enter the menu INPUT 1 VHF INPUT 1 VHF Processable channels Input E5 E13 DAB Output E5 69 Press the keys at the same time to go back to the main menu from anywhere in the INPUT menu PREAMP OFF DC O...

Страница 24: ...eys then press twice to confirm 5 5 L 65 PREAMP ON To activate the filtering and conversion function on a single MUX set the desired input channel through the keys and press to confirm Select the outp...

Страница 25: ...To adjust the UHF slope select SLP and press press to select the required value and press to confirm UHF SLOPE Adjustablefrom0to5dB SLP 5dB VHF 10dB To adjust the VHF gain select VHF and press press t...

Страница 26: ...t THR the AUTO TUNING and MONITOR miminum threshold function and press Use the keys to select the required value and press to confirm REMOTE POWER SUPPLY PROTECTION PASSCODE AUTO TUNING INPUTS THRESHO...

Страница 27: ...mode and press to confirm To carry on with the programming select NO and press to confirm THR 55dBuV RESET MONITOR RESET MONIT OFF The MONITOR function activates a real time monitoring procedure whic...

Страница 28: ...lease check the power supplier DC NOT VALID Display Error Messages OVERCURRENT Input short circuit or over current Please check the input s with the remote power supply activated and remove the issue...

Страница 29: ...DSP35 5G Label with serial and tracking data Model Serial Manuf Week Manuf Year HW Rel FW Rel 1 DownloadthelatestGUIreleasefromourwebsitehttp www lemelettronica it 2 Install the GUI selecting the file...

Страница 30: ...LEM ELETTRONICA srl Via Grezze 38 25015 Desenzano d G Italy Tel 39 0309120006 Fax 39 0309123035 info lemelettronica it www lemelettronica it...

Отзывы: