background image

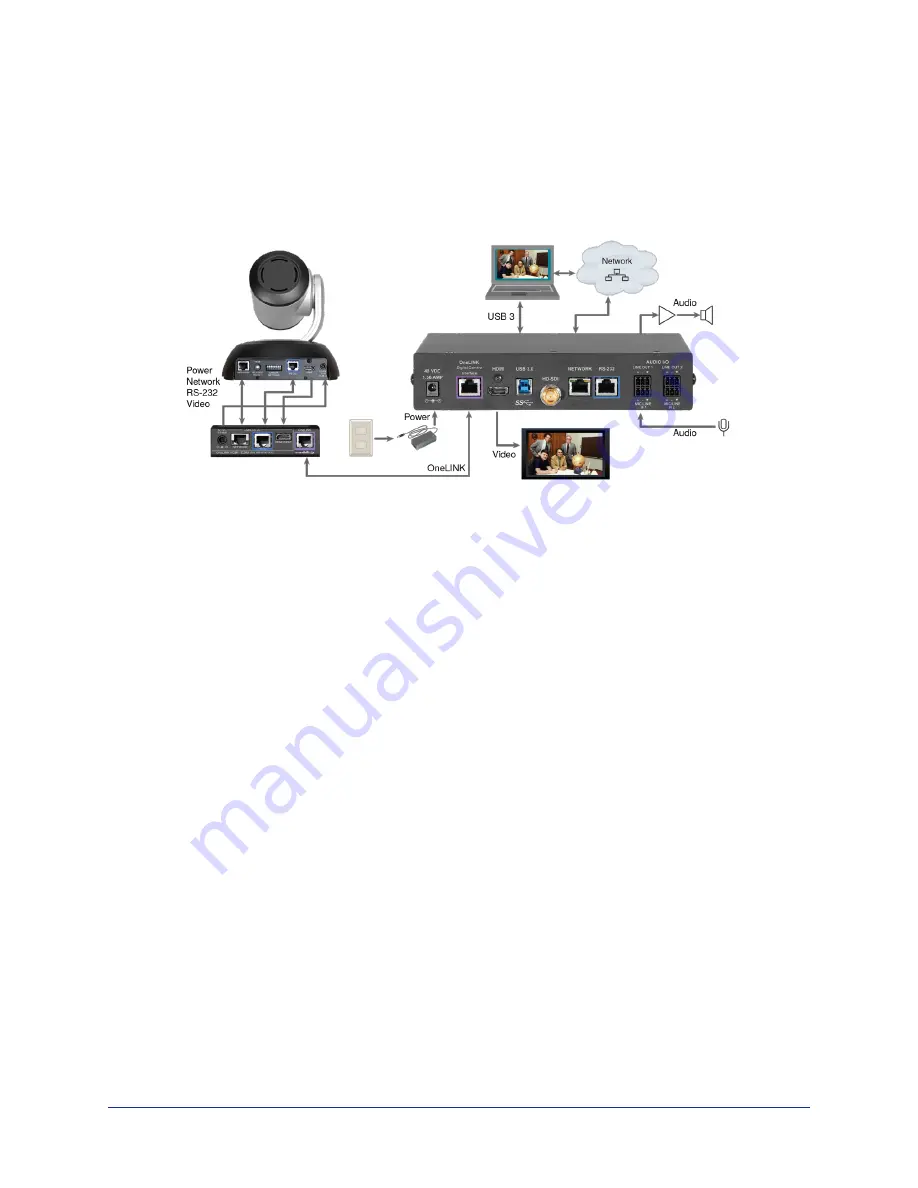
Connecting a RoboSHOT HDMI Camera

This diagram shows a RoboSHOT HDMI camera.

The RoboSHOT 12 HDMI and RoboSHOT 30 HDMI cameras are discontinued. OneLINK devices are
not compatible with RoboSHOT 12E HDMI and RoboSHOT 30E HDMI cameras, as these cameras are
PoE+ powered.

Installation Guide for the OneLINK Bridge AV Interface

8

Содержание Vaddio OneLINK

Страница 1: ...HDMI camera it is shipped with a OneLINK EZCamera Interface Module EZIM Note OneLINK devices are not compatible with PoE powered HDMI cameras such as RoboSHOT 12E HDMI and RoboSHOT 30E HDMI OneLINK devices are compatible with the discontinued RoboSHOT 12 HDMI and RoboSHOT 30 HDMI cameras What s in this Guide This guide provides information about n The OneLINK device s physical features n Installin...

Страница 2: ...as n Kits available for use with Polycom and Cisco codecs A Quick Look at the OneLINK Device This section covers the physical features of the OneLINK Bridge AV interface All OneLINK kits include a receiver which is typically co located with other equipment up to 328 ft 100 m away from the camera OneLINK kits for use with HDMI cameras also include an EZCamera Interface Module EZIM HDBaseT converter...

Страница 3: ...controller n Audio I O Line Out 1 and Line Out 2 Far end audio from conferencing application or as configured in the audio matrix n Audio I O Mic Line In 1 and Mic Line In 2 Connections for microphones or other audio inputs Connector Panel of the EZCamera Interface Module EZIM If the OneLINK device is used with an HDMI camera the EZIM HDBaseT converter is required From the left n Power output jack...

Страница 4: ...oid the warranty Cabling Notes n Maximum cable distance between the OneLINK device and the camera or EZIM is 328 ft 100 m using Cat 6 or Cat 7 cable or 230 ft 70 m using Cat 5e cable n Cat 6 or Cat 7 cabling allows longer maximum cabling distance and may provide better performance in noisier RF or EMF environments n We recommend shielded cabling if the cables will be coiled run tightly with other ...

Страница 5: ...in Profile Wall Mount for the camera may include mounting holes to attach the EZIM to the underside of the mount using two 6 32 screws Connect all required cables during camera installation Rack and under table mounting kits are available for the receiver Follow the mounting instructions supplied with the kit About Installations Using the Half Recessed Ceiling Mount If the connected camera is moun...

Страница 6: ...INK device s RS 232 port or it may control the camera over the network In either case the OneLINK device passes communication between the controller and the camera If an IP stream is available from the camera the OneLINK device passes it to the network Ethernet pass through is limited to 100 Mb s HDMI output resolution and streaming parameters including resolution are configured on the camera not ...

Страница 7: ...rectly to the OneLINK device s RS 232 port or it may control the camera over the network In either case the OneLINK device passes communication between the controller and the camera If an IP stream is available from the camera the OneLINK device passes it to the network Ethernet pass through is limited to 100 Mb s HDMI output resolution and streaming parameters including resolution are configured ...

Страница 8: ...SHOT HDMI camera The RoboSHOT 12 HDMI and RoboSHOT 30 HDMI cameras are discontinued OneLINK devices are not compatible with RoboSHOT 12E HDMI and RoboSHOT 30E HDMI cameras as these cameras are PoE powered Installation Guide for the OneLINK Bridge AV Interface 8 ...

Страница 9: ...NK device power up together Next Steps The OneLINK device is now ready to configure and use This information is available in the Complete Manual for the OneLINK Bridge AV Interface Operation Storage and Care For smears or smudges on the product wipe with a clean soft cloth Use a lens cleaner on the lens Do not use any abrasive chemicals Keep this device away from food and liquids Do not operate or...

Отзывы: