background image

Setting the software (quick start guide)

After clicking on the “SEND ALL PARA” button a pop up window will appear and click OK.

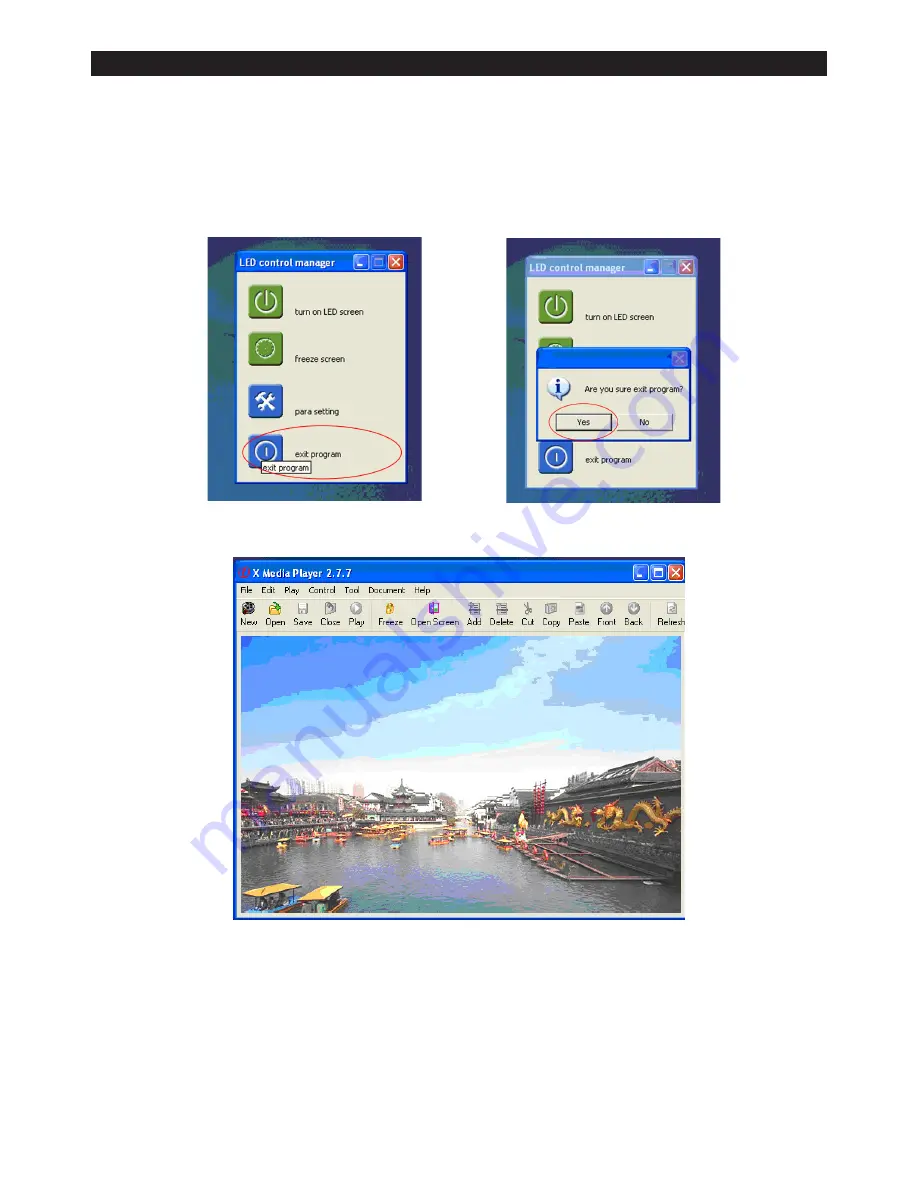
Once it has sent the information click on the “EXIT” button (fig 15) and exit the LED Control Manager

After exiting the control manager a pop up window will appear asking you 

“are you sure you want to exit the programme”, simply click OK (fig 16).

Once you have exited the programme the original programme window will appear (fig 17).

The XMPLAYER is now set up and ready to use with the P85 5.5 x 40M Pixel Cloth.

Note: Before playing the software, please be sure you have selected multiple screen display 

          options from your PC. To set this please follow the instructions on the following page.

LEDJ P85 5.5 x 4M Pixel Cloth System   


             Setting The Software

Fig 8.

Fig 15.

Fig 16.

Fig 17.

8.

Содержание LEDJ P85

Страница 1: ...LEDJ P85 5 5 x 4M Pixel Cloth System Order code STAR40 USER MANUAL...

Страница 2: ...tial start up please make sure that there is no damage caused during transportation Should there be any consult your dealer and do not use the equipment To maintain the equipment in good working condi...

Страница 3: ...dropped or damaged disconnect the mains power supply immediately Have a qualified engineer inspect the equipment before operating again If the equipment has been exposed to drastic temperature fluctua...

Страница 4: ...tch 2 Audio socket 3 USB socket 4 RJ 45 Out sockets 5 DVI in socket 6 IEC power in socket 7 Powercon in socket 8 Powercon out socket 9 Fuse 10 RJ 45 in sockets 11 RJ 45 data out sockets for cloths 12...

Страница 5: ...g system and hardware Operating system Windows98 me 2000 NT or XP Hardware configuration CPU Pentium ablove 300MHz Memory 64Meg Video card Standard above VGA 256 display Related software Windows media...

Страница 6: ...ow the connection instructions below Note Please make sure that you follow the above diagram exactly and that you put the cloths into the correct corresponding RJ 45 socket see above LEDJ P85 5 5 x 4M...

Страница 7: ...e and click on the INSTALL button to continue fig 2 A window will appear the soft need wincap if you already have installed wincap click on cancel fig 3 If you need to install wincap please click on O...

Страница 8: ...RA SETTING fig 10 icon in the window and enter the password DBSTARLED and click OK fig 11 A new window will now appear LED CONTROL SETTING fig 12 In the LED CONTROL SETTING window click on the IMPORT...

Страница 9: ...are you sure you want to exit the programme simply click OK fig 16 Once you have exited the programme the original programme window will appear fig 17 The XMPLAYER is now set up and ready to use with...

Страница 10: ...to multiple screen display right click on your desktop and go to GRAPHICS PROPERTIES fig 1 and the graphics properties window will appear fig 2 In the Set up multiple displays screen on the display mo...

Страница 11: ...your LED screen size which should already be set for the P85 Pixel Cloth W64 x H46 click OK fig 4 In the CHOOSE PROGRAMME STYLE window you can choose from 8 different styles for your screen layout fig...

Страница 12: ...media file click on the PLAY button the top tab bar and it will output to the LEDJ P85 Pixel Cloth Always be sure to save your file to your desktop or dedicated folder so you can simply go back into...

Страница 13: ...onvenient Screen Options The basic parameter of the monolithic receiving card will be established LED Driver The driving chip of the LED Pixel Cloth that the receiving card is equipped with The main s...

Страница 14: ...13...

Страница 15: ...14...

Страница 16: ......

Отзывы: