


DM Series Digital Matrix Processors
LECTROSONICS, INC.
18
After cycling the power, navigate to the SysInfo screen
and check the status of the unit (see
System Informa-
tion Screen
). A stand-alone unit must be set to the
MASTER mode and will present itself as “Unit: 01 of 01”
on the SysInfo screen. If a unit is set to SLAVE, but is
running by itself or not connected to a Master unit, an
error message will appear at power up stating that no
Master is detected.
Preset Setup Screens
Preset setup screens differ from the other setup
screens in that changes in a Preset screen makes per-
manent changes in the DM’s nonvolatile memory.
In order for the change to become effective, the change
must be “OK’d” prior to exiting the screen to prevent ac-
cidental loss of data.
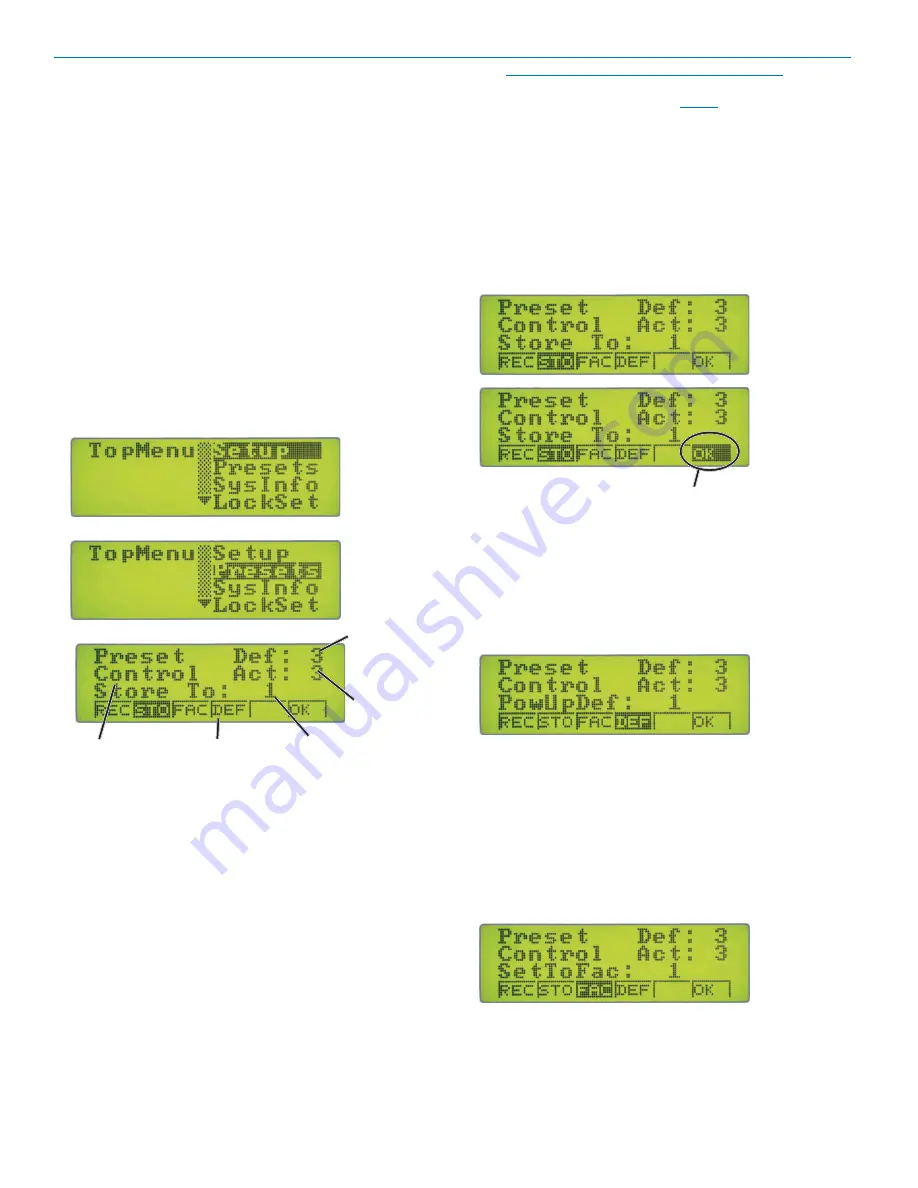
To open the Presets Setup Screen, navigate to the Top-
Menu, use the PRESS FOR MENU/SELECT control
to highlight Presets, then press the control to open the
Presets Setup Screen.
⇓
⇓
Parameter
Display Area
Items List
Screen Title
Active Setup
Default Setup
There are four sections to the Input Setup Screen:
Screen Title, Items List, Parameter Display Area and
Default/Active Setup. The various entries in the Items
List are accessed via the Item Select Buttons below the
LCD.
Using the “OK” Item on all screens
Because actions available through the Preset Control
screens result in permanent changes to the DM’s non-
volatile memory, a three-step sequence is required to
make changes.
The first step is to select the Preset Control screen and
make the necessary changes in that screen. The sec-
ond step is to use “OK” to authorize the change. Finally,
the PUSH FOR MENU/SELECT control is pressed to
change the units nonvolatile memory.
NOTE: As a safeguard, the OK button must be
pressed to confirm an action before pressing the
PUSH FOR MENU/SELECT control to initiate the
action.
In the example, the STO (store active setup) action has
been selected, with preset 1 as the destination. In the
lower screen, “OK” has been selected. When PUSH
FOR MENU/SELECT control is pressed, preset 1 will
be overwritten with the contents of the active setup. In
this case,
Act: 3
is the active setup.
If “OK” had not been selected, pressing the PUSH FOR
MENU/SELECT control would have had no effect.
The Preset screens require an additional step to
apply the action selected - the OK button. This
provides a safeguard against accidental preset
activities or overwriting a stored preset.
DEF - PowUpDef
DEF is used to view or change the setting for the
powerup default preset. This preset then becomes the
active (default) configuration the next time the unit’s
power is cycled.
DEF is accessed by pressing the appropriate Item
Select Button below the LCD. Rotate the PUSH FOR
MENU/SELECT control to set the value, then, us-
ing the Item Select Button, select “OK.” Finally, press
the PUSH FOR MENU/SELECT control to accept the
selection.
FAC - SetToFac
FAC is used to reset the contents of a memory preset
location to factory default settings.
FAC is accessed by pressing the appropriate Item
Select Button below the LCD. Rotate the PUSH FOR
MENU/SELECT control to set the value, then, us-
ing the Item Select Button, select “OK.” Finally, press
the PUSH FOR MENU/SELECT control to accept the
selection.
Содержание DM812
Страница 2: ...DM Series Digital Matrix Processors LECTROSONICS INC 2 ...
Страница 50: ......


