background image


Operating instructions 

– LBA4/6/7 – 2017 Version 


General information 

1.1 

Foreword 

Thank  you  for  choosing  La  Barrière  Automatique  to  secure  and  regulate  your  access  areas.  Be  rest 
assured that your acquisition will provide you with the greatest satisfaction for a number of years.  

However,  before  installing  your  equipment,  we  recommend  that  you  read  the  following  operating 
instructions and the quick installation guide attached. 

Despite the care taken in drafting these instructions, if specific points seem incorrect or unclear, please 
let us know. We are at your disposal for any comments or additional information. 

Before installing or repairing the automatic lifting barrier, please read these instructions carefully.  

The  lifting  barrier  must  be  installed  and  serviced  by  a  professional  installer,  in  accordance  with  the 
instructions and regulations in force. 

All  of  the  instructions  must  be  respected  to  prevent  any  harm  to  people.  Failure  to  observe  these 
instructions may cause physical injuries, which, in some cases, may be serious. 


Содержание LA BARRIERE AUTOMATIQUE 4

Страница 1: ...ur equipment we recommend that you read these user and operating instructions carefully We are at your disposal for any additional information or comments Please contact our After Sales Service on 33 0 4 78 86 02 86 from Monday to Friday 9 am to 6 pm 451 Chemin de Champivost 69760 LIMONEST Tél 33 0 4 78 86 02 86 www grouplba com contact lbagroup fr ...

Страница 2: ...Operating instructions LBA4 6 7 2017 Version 2 ...

Страница 3: ... 4 MODIFICATIONS AND TRANSFORMATIONS 11 2 5 QUALIFIED STAFF 12 2 6 HAZARDOUS AREA 12 3 IDENTIFICATION 12 4 TECHNICAL FEATURES 13 4 1 DIMENSIONS AND DIRECTION 13 4 1 1 LBA 4 13 4 1 2 LBA 6 6R 63PK 14 4 1 3 LBA 7 7R 74 15 4 2 MAIN FEATURES 16 4 3 POWER SUPPLY 16 4 4 CONDITIONS OF USE 16 4 5 PERFORMANCES 17 5 OPERATING PRINCIPLE 18 6 TRANSPORT AND STORAGE 19 6 1 TRANSPORT INSTRUCTIONS 19 6 2 CHECKS A...

Страница 4: ...t assignment of the inputs outputs 36 11 CONTROLS AND VIEWING 37 11 1 LOCAL CONTROLS 37 11 2 VIEWING 37 11 2 1 Screen 37 11 2 2 LEDs 39 12 MESSAGES AND SAFETY COMPONENT ACTIVATION 40 12 1 STATUS MESSAGES OF THE BARRIER 40 12 2 MESSAGES FOR SAFETY ACTIVATION OF THE BARRIER 40 13 MAIN MENU 41 13 1 CHOICE OF THE USER 41 13 2 INFORMATION CHARACTERISTICS OF THE PROGRAMME 42 13 3 START STOP PLC STARTING...

Страница 5: ...OLTAGE LBA4 6 7 58 17 2 MANUAL OPENING IN THE EVENT OF NO VOLTAGE LBA6R 63PK 7R 74 58 17 3 FREQUENT ADJUSTMENTS AND FAILURES 59 17 4 VARIABLE SPEED DRIVE ERROR MESSAGES 61 18 REPAIRS 62 18 1 REPLACEMENT OF THE BOOM 62 18 2 REPLACEMENT OF THE GEARED MOTOR UNIT 63 18 2 1 LBA4 63 18 2 2 LBA 6 6R 63PK 64 18 2 3 LBA 7 7R 74 65 18 3 REPLACEMENT OF THE STOPS EXCEPT FOR LBA 4 66 18 3 1 LBA 6 6R 63PK 66 18...

Страница 6: ...uide attached Despite the care taken in drafting these instructions if specific points seem incorrect or unclear please let us know We are at your disposal for any comments or additional information Before installing or repairing the automatic lifting barrier please read these instructions carefully The lifting barrier must be installed and serviced by a professional installer in accordance with t...

Страница 7: ...ly locked before leaving Pedestrian traffic must be prohibited in the obstacle passage area except if its movement is highlighted efficiently light and or audible warning marking on the ground sign board etc You are responsible for the condition of this signalling You are solely responsible for the installation of and compliance with appropriate signs taking into account the following note Note in...

Страница 8: ...on inspection and placing into operation must be carried out according to the standard in force Dispose of waste materials in compliance with the local standard in force 1 4 Intellectual property rights It is prohibited to give the operating instructions to third parties without the manufacturer s written consent The contents texts drawings figures and other illustrations are protected by intellec...

Страница 9: ...C Machinery Directive No 2014 35 EC Low Voltage Directive No 2014 30 EC Electromagnetic Compatibility Directive No 2011 65 EC ROHS Directive NF EN 61800 3 amendment A11 Table 2 Minimum immunity requirements for harmonics second environment NF EN 61800 3 amendment A11 Table 3 and 4 Immunity requirements for voltage variations unbalances and frequency variations second environment NF EN 61800 3 amen...

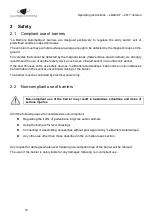
Страница 10: ...matique shall under no circumstances be held liable in the event of uncontrolled closing of the barrier The barrier must be controlled by electrical power only 2 2 Non compliant use of barriers Non compliant use of the barrier may result in hazardous situations and risks of serious injuries All of the following uses are considered as non compliant Regulating the traffic of pedestrians bicycles and...

Страница 11: ...d and understood this user manual Make sure that this same employee is clearly equipped with personal protective equipment PPE for any operation whatsoever on the barrier In addition the operator is responsible for Training staff at regular intervals on the handling of the barrier and informing them of potential risks Keeping the barrier in good condition Respecting barrier cleaning and maintenanc...

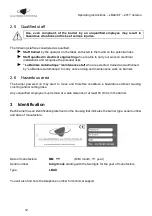
Страница 12: ...ho are selected trained and authorised by La Barrière Automatique to carry out servicing and maintenance work on barriers 2 6 Hazardous area The barrier powered on may start to move and therefore constitute a hazardous element causing crushing and or cutting risks Any unqualified employee must remain at a safe distance of at least 50 cm from the barrier 3 Identification Each barrier has an identif...

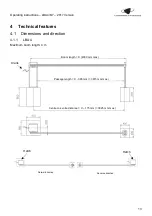
Страница 13: ... 4 Technical features 4 1 Dimensions and direction 4 1 1 LBA 4 Maximum boom length 4 m Normal direction Reverse direction Crank Hatch Hatch Boom length X 4000 mm max Passage length X 385 mm 3615 mm max Centre to centre distance X 175 mm 3825 mm max ...

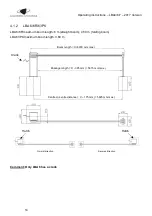
Страница 14: ...imum boom length 6 m straight boom 4 50 m folding boom LBA 63PK maximum boom length 3 80 m Comment Only LBA6 has a crank Normal direction Reverse direction Crank Hatch Hatch Boom length X 6000 mm max Passage length X 385 mm 5615 mm max Centre to centre distance X 175 mm 5825 mm max ...

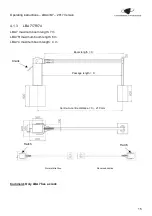
Страница 15: ...3 LBA 7 7R 74 LBA 7 maximum boom length 7 m LBA 7R maximum boom length 6 m LBA 74 maximum boom length 4 m Comment Only LBA7 has a crank Normal direction Reverse direction Crank Hatch Hatch Boom length X Passage length X Centre to centre distance X 210 mm ...

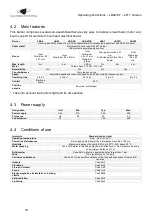
Страница 16: ... Operating time 3 to 6 s 2 to 9 s 0 8 to 3 s 2 to 9 s 2 to 4 s Control Electronic board PLC Position sensors Inductive contactless Take into account the boom length and its accessories 4 3 Power supply Designation Unit Min Typ Max Power supply Vac 210 230 250 Frequency Hz 48 50 52 Consumption W 180 250 4 4 Conditions of use Immunity Standard code or level Operating temperature From 30 C to 55 C Po...

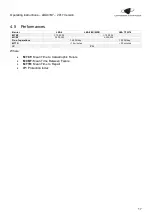
Страница 17: ...LBA 4 LBA 6 6R 63PK LBA 7 7R 74 MTBF 10 000 h 15 000 h MCBF 3 000 000 5 000 000 No of operations 15 000 day 10 000 day MTTR 15 minutes 30 minutes IP IP 54 Where MTCF Mean Time to Catastrophic Failure MCBF Mean Time Between Failure MTTR Mean Time to Repair IP Protection Index ...

Страница 18: ...agnetic loop IR sensor etc is recommended below the barrier to detect a vehicle or a pedestrian under the boom so that the control unit prevents the barrier from closing if necessary Automatic closing after passage or after time delay functions can be activated via the control board s terminal boards The control board also transmits information on the barrier s status in the form of dry contacts N...

Страница 19: ...se suitable lifting equipment for the barrier s boom straps etc 6 2 Checks after transport The delivery must be checked upon receipt to make sure that everything is there and that there is no damage due to transport In the event of visible damage due to transport or missing parts Do not accept the delivery or only accept it subject to reservations Note the extent of the damage on the delivery note...

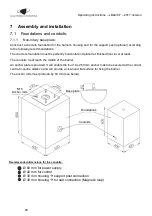
Страница 20: ...hed floor level at least The conduits must reach the middle of the barrier An anchor plate is provided It will enable the four 16 x 250 mm anchor rods to be secured at the correct centre to centre distance and will provide a clean and flat surface for fixing the barrier The anchor rods must protrude by 60 mm see below Recommended dimensions for the conduits Base plate Foundations Conduits M16 Anch...

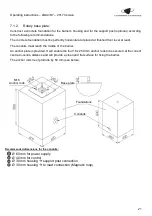
Страница 21: ...onduits must reach the middle of the barrier An anchor plate is provided It will enable the four 16 x 250 mm anchor rods to be secured at the correct centre to centre distance and will provide a clean and flat surface for fixing the barrier The anchor rods must protrude by 60 mm see below Recommended dimensions for the conduits Conduits Foundations Base plate M16 Anchor rods Ø 60 mm for power supp...

Страница 22: ...g care not to jam the wires C Install the M16x40 flat washers then the M16 nuts to secure the barrier Lock the nuts D Install the M16 locknuts to prevent any loosening E Tighten the nuts securely because they hold the entire barrier in place F The barrier must be earthed using a braid tightened on one of the 4 mounting studs 4 x M16 galvanised locknuts 4 x M16 galvanised nuts 4 x M16x40 galvanised...

Страница 23: ...or rods They must be positioned on the edge of the housing D Install the clamping ring E Install the M16x40 flat washers then the M16 nuts to secure the barrier Lock the nuts Check the rotation Install and lock the locknuts F The barrier must be earthed using a braid tightened on one of the 4 mounting studs 4 x M16 galvanised locknuts 4 x M16 galvanised nuts 4 x M16x40 galvanised flat washers 4 x ...

Страница 24: ...age the boom until it protrudes slightly 1 cm C Retighten the screws D Replace the cap 7 3 2 LBA6 6R 63 A Install the clamping collar equipped with the gib B Install the four M8x16 stainless steel screws tightening them slightly C Remove the cap and engage the boom up to the clamping collar take care not to drop the boom sensor if present D Retighten the clamping collar and gib screws E Replace th...

Страница 25: ...ng instructions LBA4 6 7 2017 Version 25 7 3 3 LBA7 7R 74 A Engage the boom until it is in contact with the bottom of the half shell B Install and tighten the 3 screws and the nuts passing through the boom A B ...

Страница 26: ... is activated by creating a shunt between terminals 5 and 6 Automatic mode default The automatic opening and closing orders magnetic opening loop closing after passage and closing after time delay are activated Manual mode The automatic opening and closing orders magnetic opening loop closing after passage and closing after time delay are deactivated The barrier only opens or closes with one comma...

Страница 27: ...l risks It must be type 3G 1 5 mm2 or 2 5 mm2 depending on the cable distance Provide for electrical protection at head end differential circuit breaker 10A 30 mA barrier The power cable earth must without fail be connected to the earth strip next to the terminal board As soon as the barrier has been installed it must be switched on to prevent any condensation inside ...

Страница 28: ...peration The barriers are designed and set based on the equipment controlled Any change made to the barrier e g boom length may require adjustment of the settings 9 2 Switching on the barrier To switch on the barrier once it has been electrically connected simply close the main selector switch and the circuit breakers by lifting the switches WARNING RISK OF INJURY DUE TO AUTOMATIC BARRIER CLOSING ...

Страница 29: ...e direction the sensor positions are reversed Opening sensor setting 1 Set the sensor so that it is activated the sensor s light must be on at approximately 10 before the vertical position 90 2 The barrier must stop in vertical position 3 When you have reached the ideal setting tighten the nut on the detection cam side using a 17 mm spanner Closing sensor setting 1 Set the sensor so that it is act...

Страница 30: ...s in the event of faulty sensors To adjust the stops 1 Remove the top cover 2 Switch off the barrier 3 Unlock the locknut of the stop that you want to adjust 4 Screw or unscrew the stop until it locks the boom to avoid over travel slightly after the final position 5 Lock the stop s locknut LBA 6 LBA 7 Opening stop Closing stop Opening stop Closing stop ...

Страница 31: ... are used to define the barrier s open and closed positions To adjust the stops 1 Remove the top cover 2 Switch off the barrier 3 Unlock the locknut of the stop that you want to adjust 4 Screw or unscrew the stop until it reaches the required position 5 Lock the stop s locknut LBA 6R 63 LBA 7R 74 Opening stop Closing stop Opening stop Closing stop ...

Страница 32: ...st reach the stop slowly 3 When you have reached the ideal setting tighten the nut on the detection cam side using a 17 mm spanner Closing sensor setting 1 Set the sensor so that it is activated the sensor s light must be on at approximately 10 before the horizontal position 0 2 The barrier must reach the stop slowly 3 When you have reached the ideal setting tighten the nut using a 17 mm spanner C...

Страница 33: ... the counterbalance Activation Increase of automatic lifting Reducing the counterbalance Reduction Deactivation of automatic lifting The counterbalance is adjusted switched off The counterbalance is adjusted in the following way 1 Unscrew the locknut on the spring rod 2 Tighten or loosen the nut to have more or less counterbalance 3 Tighten the locknut Comments Automatic lifting must be slow to pr...

Страница 34: ...uttons ESC and ENTER Makes it possible to browse through the barrier menu and modify various settings LEDs LEDs for viewing the digital inputs transistor outputs and relay outputs as well as voltages 24V 5V 3 3V LED off 0 LED on 1 Digital inputs x8 Analogue or digital inputs x4 Transistor outputs 24Vdc x6 Dry contact relay outputs x6 SD Card Power 230Vac Relay Brake Modbus RTU Encoder Ethernet RJ4...

Страница 35: ...r Encod Encod Encoder input for the connecting of an absolute angular position sensor Motor connection Terminal block s Terminals Description Motor phases Motor U V W GND 3 phase power supply of the motor and the ground Max power 0 55kW Brake relay R Br R Br Dry contact relay output for the controlling of the brake of the motor if needed Power supply Terminal block s Terminals Description 230V AC ...

Страница 36: ...ening end of travel sensor NO AI2 Opening slowdown sensor NO AI3 Closing slowdown sensor NO or crank end of travel irreversible barriers AI4 Closing end of travel sensor NO Transistor outputs Description Q1 Flashing light on cover Q2 Lights on arm Q3 Suction cup locking Q4 Unhinging alarm Q5 Green light Q6 Red light Relay outputs Description QR1 Open barrier report NO QR2 Closed barrier report NO ...

Страница 37: ... Outputs screens ESC key 2s Display of the advanced settings ENTER key 2s Display of the input output statuses ESC ENTER 3s Main menu Informations Fr 7 Hz Cycles 125 BARRIER CLOSED USER SELECT OP ADMIN Advanced 1 2 Cycles 125 Unhingings 37 Prog PROG009714 A ENTER 2s ENTER Or 60s ESC ENTER 3s ESC Opening Closing Or Or Advanced 2 2 U 304 Vdc Temp 49 C IP 192 168 0 3 ESC 2s ESC Or 60s Inputs Outputs ...

Страница 38: ...he advanced settings Number of cycles of the barrier this number of cycles corresponds to the number of openings carried out by the barrier Number of unhingings that the barrier was subjected to this number indicates the number of unhingings that the barrier has been subjected to Programme of the barrier this shows the programme number as well as its version This information is useful when trouble...

Страница 39: ...1 to QR6 Note The screen display automatically returns to the Information screen after 60s if no button is pressed Details on the main menu will be provided hereinafter 11 2 2 LEDs The LEDs also make it possible to view the status of the inputs outputs as well as the useful voltages LED on input output active 1 LED off input output inactive 0 Note Contrary to the screen for viewing the status of t...

Страница 40: ... safety loop Closing the barrier is impossible DETECTION CELL A vehicle is present in front of the infrared or ultrasound cell s Closing the barrier is impossible BARRIER UNHINGED The barrier is unhinged The closing of the barrier is impossible if the option Automatic rehinging is activated CRANK MISSING The crank is not in its housing Controlling the barrier is impossible The motor is cut off 12 ...

Страница 41: ...er requires a password because it provides access to more features and more settings Function OP ADMIN INFORMATIONS START STOP PLC USER PARAMETERS IP CONFIG DOWNLOAD PLC PROG UPLOAD PLC PROG ERASE PLC PROG ERASE PLC RETAIN ERASE USERPARAM LOCATED VARS REBOOT Entering the password To access the ADMIN user profile you must enter the 4 digit password with ESC Cancel Previous digit and Digit selection...

Страница 42: ...ware update of the µC1 microcontroller Version of the firmware present in the µC1 microcontroller microcontroller for motor control Latest date of the firmware update of the µC2 microcontroller Project name Project version Product name Product version Date and time of the latest compilation of the project Name of our company Project language 13 3 START STOP PLC Starting stopping the program The ST...

Страница 43: ...fault 0 5s s T_PVT Duration of the small speed timed for closing case with irreversible barriers default 1s s Presign_OUV Duration of the pre signalling before the opening of the barrier default 0s s Presign_FERM Duration of the pre signalling before the closing of the barrier default 0s s Clignotement_feux Activation of blinking lights on arm TRUE activated FALSE deactivated Mode_1_BP Activation ...

Страница 44: ...63PG TRUE activated FALSE deactivated Reversibilite Option to be activated when the barrier is reversible in order to activate the holding torque function TRUE activated FALSE deactivated Reouverture_secu Activation of the automatic reopening on detection of a safety component loops IR cell ultrasound etc TRUE activated FALSE deactivated Param_Boost_1 Value of the boost applied to the motor during...

Страница 45: ...the directional arrows and the Enter key select the setting that you want to modify The value is displayed 2 Press Enter again to be able to modify the value 3 Set the desired value using the up and down arrows 4 Press Enter again to confirm 5 Then press ESC to return to the list of parameters 6 Press ESC again to exit the menu 13 5 IP CONFIG IP address configuration See 5 TCP IP Modbus Communicat...

Страница 46: ...rier the following question will be displayed a Click on ENTER if you wish to retain the parameters of the settings speeds timers etc of the current barrier b Click on ESC if you wish to copy the parameters of the settings speeds timers etc from the barrier that was used to program the SD card Otherwise go directly to the next step 7 The message Done is displayed after a few seconds to confirm tha...

Страница 47: ...SC and ENTER keys simultaneously for 3s 3 Select the OP profile by clicking on ENTER 4 Using the arrow select the UPLOAD PLC PROG function with the ENTER key 5 The message Done is displayed after a few seconds to confirm that the program has been updated successfully from the SD card 6 Then press ENTER to return to the menu 7 Click on ESC to exit the menu 8 Remove the SD card and insert the origin...

Страница 48: ...gondage Unhinging sensor status NC Etat_Capteur_Fdc_Ouv Opening end of travel sensor status NO Etat_Capteur_Ral_Ouv Opening slowdown sensor status NO Etat_Capteur_Ral_Ferm Closing slowdown sensor status NO Etat_Capteur_Fdc_Ferm Closing end of travel sensor status NO Report_Barriere_Ouverte Open barrier report status NO Report_Barriere_Fermee Closed barrier report status NO Report_Barriere_Degondee...

Страница 49: ...P address can be modified or configured in DHCP To modify the IP address you must 1 Go to the OP menu of the control board by pressing the ESC and ENTER keys simultaneously for 3s 2 Using the arrow select the IP CONFIG function with the ENTER key 3 Choose your IP address assignment mode DHCP automatic assignment of the IP address STATIC configuration of a static IP address 4 If you select the DHCP...

Страница 50: ... non unhinged Boolean Read Write Input Discretes 3 Barrier in fault 0 not in fault 1 fault Boolean Read Write Input Discretes 4 Open command status CTM 0 non active 1 active Boolean Read Write Input Discretes 5 Closed command status CTM 0 non active 1 active Boolean Read Write Input Discretes 6 Open command status Modbus 0 non active 1 active Boolean Read Write Input Discretes 7 Closed command sta...

Страница 51: ...onnection to the barrier To connect to the barrier simply connect the barrier to the network using an Ethernet cable via the RJ45 port located to the lower right of the control board In the event several barriers are installed it is of course possible to use a switch Once the barrier is connected enter the barrier s IP address in your browser The default IP address is 192 168 0 100 Network cable S...

Страница 52: ...se buttons o Access to IP address configuration o Access to the barrier s settings that can be accessed via the OP profile Admin profile o Viewing of the barrier o Controlling the barrier with the Open and Close buttons o Access to IP address configuration o Access to the barrier s settings that can be accessed via the Admin profile To log in simply select the desired ID none OP or ADMIN at the to...

Страница 53: ...e of the home page for an OP profile In this example the barrier is closed and is in fault We also have the Ouverture Open and Fermeture Close buttons that were not present before authentication Here is the key for the various images and or messages that can be displayed on this home page Image Message Description None The barrier is closed The barrier closed report is activated None The barrier i...

Страница 54: ...le Unhinged barrier Unhinged The barrier is unhinged or the arm has fallen Barrier in fault Fault The barrier is in fault Motor control is cut off List of possible faults The time delay for manoeuvring was exceeded obstacle broken reduction gear defective sensors The crank is not in place The motor is not or is incorrectly connected A phase of the motor is disconnected A phase of the motor is shor...

Страница 55: ... want the IP address to be assigned automatically by the network that the barrier is connected to DHCP Note The IP address can be modified only with the OP and ADMIN profiles 15 4 2 Userparam tab authentication required The Userparam tab provides access to the various settings allowed by the user profile and also allows them to be modified see 3 4 USER PARAMETERS Settings for the program To confir...

Страница 56: ...f the local variables of the barrier for the purposes of troubleshooting for example Note The page has to be refreshed in order to view the new status of the variables 15 4 4 Informations tab The Informations tab includes the list of advanced information for the barrier s program and control board see 3 2 INFORMATIONS Characteristics of the program ...

Страница 57: ...Previously described cleaning operations Check the tightening of all of the screws and bolts including securing to the ground as well as the accessories Check the connectors on the control board or PLC Tightening of wires good contact in the terminals Visual inspection of the horizontal position of the boom Visual inspection of the vertical position of the boom Yearly Visual inspection of the abse...

Страница 58: ...The crank is positioned on a contactor for cutting off the power supply of the electronic board user protection C Insert the crank into the hole located on the side of the barrier D Rotate in the clockwise direction to raise the barrier or rotate in the anti clockwise direction to lower the barrier 17 2 Manual opening in the event of no voltage LBA6R 63PK 7R 74 In the event of a power cut the barr...

Страница 59: ...Sales Service to replace the geared motor unit see 13 2 Replacement of the geared motor unit The crank is not put back in place LBA 4 6 7 Put the crank back in its place on the side of the board The barrier does not close The closing control does not reach the PLC Look at the status of the PLC inputs outputs see 9 6 Setting the PLC Check the wiring of the closing control An opening control is acti...

Страница 60: ...not activated Activate the closing after passage by creating a shunt between terminals 7 and 8 of the terminal board The barrier does not close after the time delay Closing after time delay is not activated Activate the closing after time delay by creating a shunt between terminals 9 and 10 of the terminal board The barrier does not stay open Automatic closing after passage or after time delay is ...

Страница 61: ...es Here are common variable speed drive error messages Message Designation Recommended actions FAN F Variable speed drive failure Check that the fan is not blocked Contact the after sales service to replace the variable speed drive It Ac Output current overload time exceeded Make sure that the boom is not blocked Reset the position sensors see 9 3 Adjustment of stops and sensors O Ld1 Overload on ...

Страница 62: ... carrying out repair operations on the barrier If operations are carried out with the power on the barrier must be disconnected from all access control systems to prevent unexpected barrier movements 18 1 Replacement of the boom To replace the boom please refer to paragraph 7 3 Assembly of the boom ...

Страница 63: ...riable frequency drive D Unscrew and remove the 4 locknuts of the geared motor support brackets E Remove the geared motor unit F Install the new geared motor unit in the place of the old one G Rescrew the 4 locknuts H Tighten the 2 nut screws that secure the bearing on the bracket I Reconnect the new geared motor unit to the variable speed drive with terminals U V W and to the earth J Replace the ...

Страница 64: ...red motor connected to the variable frequency drive E Unscrew and remove the 4 locknuts of the geared motor support brackets F Remove the geared motor unit G Install the new geared motor unit in the place of the old one H Rescrew the 2 locknuts located on the boom side by aligning the flange with the edge of the housing I Tighten the 2 nut screws that secure the bearing on the bracket J Rescrew th...

Страница 65: ...to the variable frequency drive E Unscrew and remove the 4 locknuts of the geared motor support brackets F Remove the geared motor unit G Install the new geared motor unit in the place of the old one H Rescrew the 2 locknuts located on the boom side by aligning the flange with the edge of the housing I Tighten the 2 nut screws that secure the bearing on the bracket J Rescrew the other 2 locknuts l...

Страница 66: ...nscrew the stop to remove it completely and replace it with the new one H Readjust the stops see paragraph 9 3 Adjustment of stops and sensors 18 3 2 LBA 7 7R 74 The LBA 7 7R 74 stops are replaced following the procedure below A Remove the top cover B Position the boom in horizontal position with the crank if LBA7 C Unlock the locknut of the vertical position stop D Unscrew the stop to remove it c...

Страница 67: ...e nut on the outside because it is affixed to the threadlock B Disconnect the 3 wires on the terminal board at the top of the control board C Remove the sensor via the holes provided for this purpose D Install the new sensor at approximately 2 mm from the detection cam E Connect the new sensor to the terminal board at the top using the same terminals as the old one F Readjust the position sensors ...

Страница 68: ...st loosen it first by opening the barrier slightly further than the vertical position screw the opening stop A After loosening it remove the counterbalance unit with its chain by removing the quick link of the pinion B Unscrew the locknut and nut C Remove the spring bearing washer D Remove the spring E Remove the locking device with its chain F Remove the spring centring pin G Dismantle the quick ...

Страница 69: ...e the position sensors and the nut at the end of the shaft using a 36 mm spanner C Reverse the detection cam D Replace the shaft nut using a 36 mm spanner and the 2 sensors after having reversed them Opening becomes Closing and vice versa E Reverse the two phases for the variable frequency drive F Put the boom back in place G Readjust the position sensors see paragraph 9 3 Adjustment of stops and ...

Страница 70: ...hain using needle nose pliers F Remove the counterbalance unit with its chain G Pivot the plate 180 H Reinstall the counterbalance unit by engaging the chain in the other hole of the upper steel sheet I Tilt the plate on the chain side and reinstall the quick link J Pivot the detection cam K Reinstall the support of the stops in the other direction by retightening the 2 screws L Reinstall the nut ...

Страница 71: ...sed position then dismantle the stop system E Remove the 2 half shells by unscrewing the 3 screws on either side F Using a hub puller pull off the 2 lobes G Remove the nut at the end of the shaft using a 36 mm spanner H Reverse the detection cam I Reinstall the nut then the lobes reversing their direction J Reinstall the counterbalance unit by engaging the chain in the other hole of the upper stee...

Страница 72: ... new control board 5 When it starts the new control board will automatically detect the presence of a programmed SD card coming from another control board and will ask you if you want to program the control board using this SD card 6 Click on ENTER to program the new control board identically to the old control board 7 The message Done is displayed after a few seconds to confirm that the program h...

Страница 73: ...Operating instructions LBA4 6 7 2017 Version 73 20 Wiring diagram LBA4 6 63PK 7 ...

Страница 74: ...Operating instructions LBA4 6 7 2017 Version 74 ...

Страница 75: ...____ _________________________________________________________________________________ _________________________________________________________________________________ _________________________________________________________________________________ _________________________________________________________________________________ ___________________________________________________________________...

Страница 76: ...Operating instructions LBA4 6 7 2017 Version 76 ...

Страница 77: ...LA BARRIERE AUTOMATIQUE 451 Chemin de Champivost 69760 LIMONEST FRANCE Tél 33 0 4 78 86 02 86 E mail contact lbagroup fr Internet www grouplba com ...

Отзывы:

Похожие инструкции для LA BARRIERE AUTOMATIQUE 4