23
A STEELFORT PRODUCT
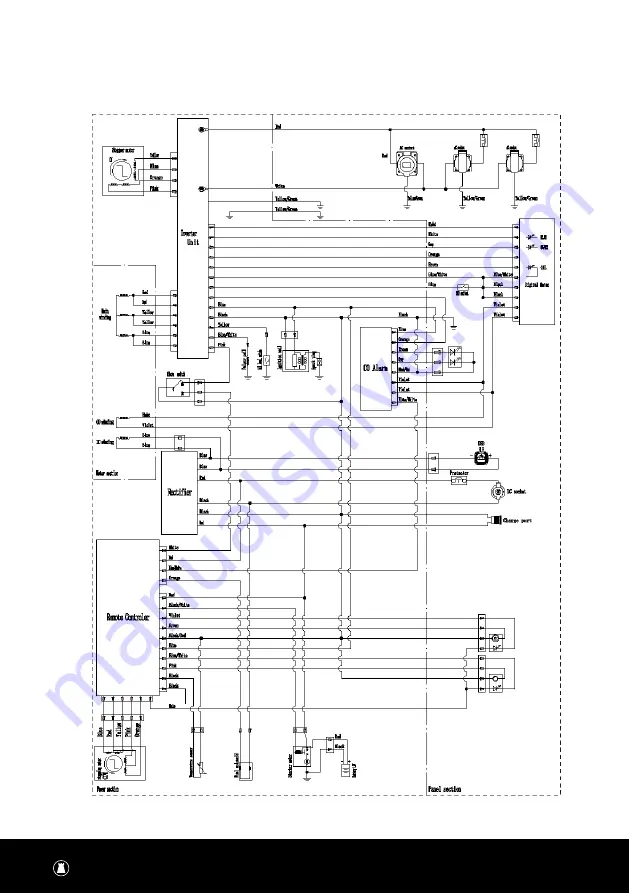
2. WIRING DIAGRAMS
BQH9000E ELECTRIC START
Note: Because of the difference of generator, the wiring diagram is only for reference.
Страница 1: ...SAFETY AND OPERATING MANUAL PLEASE READ THIS MANUAL CAREFULLY BEFORE OPERATING THE UNIT PROUDLY NZ OWNED A STEELFORT PRODUCT INVERTER GENERATOR LGBQH9200 E ...
Страница 2: ...unding Battery Connection STARTING THE GENERATOR 12 Electric Start Wireless Remote Start Manual Start CONNECTING TO THE ELECTRICAL DEVICES 14 Loading Capacity Wattage Reference Chart STOPPING THE ENGINE 15 MAINTENANCE 15 Maintenance Schedule Generator Engine Maintenance Air Filter Spark Plug Spark Killer STORAGE TRANSPORT 19 TROUBLESHOOTING 20 SPECIFCATIONS WIRING DIAGRAMS 22 WARRANTY 24 TABLE OF ...
Страница 3: ...cial use may void warranty These generators are designed for full time operation No personal modifications should be made to any part of the unit DANGER TOXIC FUMES The exhaust of the engine contains carbon monoxide an odorless colorless poison gas Using the engine in confined indoor spaces can be extremely dangerous and life threatening DO NOT use the generator inside and or in enclosed spaces EV...
Страница 4: ...en or untrained people to operate the unit DO NOT leave the generator unattended when it is in operation Always turn off the generator prior to leaving the area ELECTRIC SHOCK The generator produces powerful voltage and the electricity and can be dangerous and cause serious life threatening injuries if an electric shock is received Please ensure that the unit is properly connected to an appropriat...
Страница 5: ...2 Bolt M6X16 ASSEMBLE REAR ARMREST After aligning the rear armrest mounting holes with the generator mounting holes fasten them with bolts 1 Rear Armrest 2 Bolt M8X14 INSTALL HANDLE Align the handle and the nylon washer of the brake pin with the mounting hole of the push handle and then install the washer and retaining ring after the pin is passed through The installation steps of the handle rack ...
Страница 6: ...ocked and will not fall freely Before lowering the handle lift it up slightly then turn the handle inward and press down to lower the handle MOVING THE GENERATOR WARNING Failure to follow these instructions could result in personal injury or damage to the generator CAUTION ALWAYS turn the generator off and ensure the fuel valve is closed ALWAYS make sure engine and muffler are cooled down before t...
Страница 7: ... Filter Maintenace Cover 12 Muffler Blind Window 13 Muffler 14 Oil Drain Cover 15 Oil Maintenace Cover 16 Rear Armrest 1 Start Stop Switch Outer 2 Fuel Switch Inner 3 Energy Saving Switch 4 Learning Button 5 Breaker 6 12V DC 7 USB 8 Ground Terminal 9 RCD 10 Charge Port 11 Output Receptacle 12 Engine Switch 13 Power Indicator 14 Overload Indicator 15 Running Indicator 16 Low Oil Light 17 Reset Buto...
Страница 8: ... lights up when generating set starts and has normal output OIL ALARM LAMP YELLOW When the oil level drops below the lower limit the oil protection system will stop the engine automatically and oil alarming lamp will blink when recoil starter is pulled The engine will not run until the oil has been filled to the proper level Note If the generator fails to start when the engine is turned off please...
Страница 9: ...erate the generator on a flat level surface and in a clean dry operating environments Only use the generator for applications within its operating scope If you have any question regarding applicable scope please speak to your nearest Service Agent In some locations and regions the generator may require additional provisions and or regulations for operation please consult with your nearest Service ...
Страница 10: ...evel should be between the upper and lower limit Fill to the upper limit of the dipstick with the recommended oil if the oil level is too low Reinstall and fully tighten the dipstick Refer to add oil instruction in MAINTENANCE section for more information Oil level 1 1 L Recommended grade of engine oil SAE10W 30 WARNING Oil is a major factor affecting performance and service life We recommend usin...
Страница 11: ...minimise gum deposits in your fuel system and to insure easy starting do not use petrol that is left over from the previous seasons Pressure can build up in the fuel tank Allow the generator to cool for at least two minutes before removing fuel cap Loosen the fuel cap slowly to relieve any pressure in the tank 4 GROUNDING The generating set must be properly connected to an appropriate ground It he...
Страница 12: ...e a few attempts to start in cold weather If machine does not start in the first 10 seconds wait for 30 seconds before attempting again If the motor turns a little then stops when you press the Start key it may indicate a low battery Charge the battery before operation or start by recoil start CAUTION During the operatoin of the unit the battery supplies power for the solenoid valve of the carburet...
Страница 13: ...tarter cord will pull hand and arm towards the engine faster than you can let go Unintentional startup can result in entanglement traumatic amputation or laceration Broken bones fractures bruises or sprains could result When the battery power of the generator is too low to start please operate the choke handle as the following figure to start the generator CAUTION Choke plate should be setting in ...
Страница 14: ...ust make sure your generator can supply enough rated running and surge starting watts for the electrical devices you plan to power at the same time Follow these simple steps to calculate the running and starting watts that are necessary for your purposes WARNING DO NOT overload the generator Exceeding the generator s capacity can damage the generator and or electrical devices connected to it Fault...
Страница 15: ...on the battery will be depleted of power making it impossible to start the generator normally MAINTENANCE It is the operator s responsibility to complete all scheduled maintenance and or servicing in a timely manner Always correct any issues before operating the generator Follow all inspection and maintenance recommendations that are listed in the manual WARNING Improper maintenance and or failure...
Страница 16: ... operating in adverse conditions Contact your local LawnMaster Service Dealer if the generator requires maintenance Note 1 Applicable types if available Note 2 Before each season and after whichever comes first Note 3 Service more frequently under severe dusty dirty conditions Note 4 To be performed by knowledgeable and or experienced owners However we recommend using an authorised service agent t...
Страница 17: ...average temperature in your area is within the indicated range OIL MUST BE PLACED IN ENGINE BEFORE STARTING Ambient temperature Oil capacity rated See Parameters 3 2 ADDING OIL WARNING The engine is not filled with oil at the factory Any operation before it has been properly filled with the recommended type and amount of oil may result in engine damage and void your warranty 1 Place the engine on ...
Страница 18: ... 4 AIR FILTER 1 Unscrew the air filter maintenance cover 2 Take out the air filter element 3 Check whether the paper filter element is damaged if damaged please replace it in time 4 Gently tap the filter element to remove the dust or debris attached to the filter element 5 Put the filter element back into the assembly and screw it tightly with the air filter maintenance cover WARNING The air filte...
Страница 19: ...y remove the carbon deposits from the spark arrester screen with a wire brush 5 Replace the spark arrester if it is damaged 6 Reinstall the spark arrester in the muffler and reinstall the muffler blind window SPEED The speed has been pre set at the factory and should rarely require readjustment Consult your local authorized LawnMaster dealer for such needs WARNING Unapproved adjustment will damage...
Страница 20: ...ng transported or put into short term storage the generator should be in the normal operating position and fixed vertically to prevent fuel leakage The combination switch should be in the stop position and knob of the fuel cap should be turned to the OFF position WARNING When transporting do not overfill the tank Do not operate the generating set while it is on vehicle Take the generating set off ...
Страница 21: ...21 A STEELFORT PRODUCT ...
Страница 22: ... PRODUCT SPECIFICATIONS WIRING DIAGRAMS 1 SPECIFICATION PARAMETER TABLE Note The generating set with different specification and configurations may have different parameters and may change at any time without notice ...
Страница 23: ...23 A STEELFORT PRODUCT 2 WIRING DIAGRAMS BQH9000E ELECTRIC START Note Because of the difference of generator the wiring diagram is only for reference ...
Страница 24: ...f of purchase documentation are required and must include the engine serial number and frame serial number as appropriate for all warranty claims Authorised LawnMaster dealers are able to repair and or replace parts that are defective within the limits of this warranty at no expense to the owner and this includes the cost for replacement parts and or labour Consumable items such as but not limited...
Страница 25: ...at are incurred in the warranty claim for additional expenses such as towing communications accommodation and meals that are incurred due to the breakdown of the product at a remote location are not covered Any expense related to personal injury and or property damage exclusive of the product itself Compensation for loss of time commercial losses or rental costs of a substitute product during the ...
Страница 26: ...00 Rangitikei Street Private Bag 11045 Palmerston North 4412 New Zealand 06 350 1350 Steelfort Auckland 880 Great South Road Penrose Auckland 1061 New Zealand 09 573 1324 lawnmasternz FIND US www lawnmaster co nz ...