background image

Superabrasive 


User Manual  

Original Language 

Lavina® 25-X 


9/2018 

18 

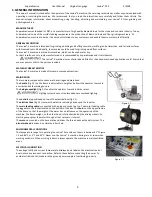
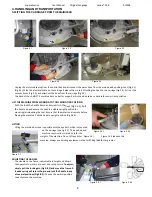
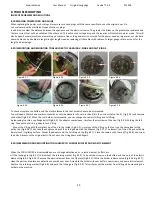
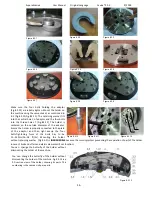
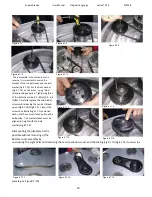
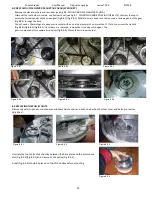
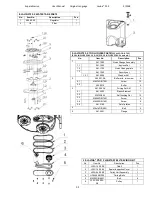
Loosen the two nuts(Fig.8.4.6) and unscrew the two screws of the tensioner (Fig.8.4.5)(Fig.8.5.4)(Fig.8.5.5). Remove the chain 

tensioner(Fig.8.5.6). Pull out the split pin (Fig.8.5.7) and the chain link pin (Fig.8.5.8) (Fig.8.5.9). Remove the chain, and install the new 
chain in the same manner, and then insert the chain link pin and split pin (Fig.8.5.9) (Fig.8.5.8) (Fig.8.5.7). 


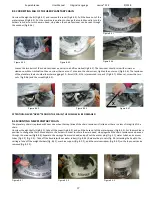
Mount the chain tensioner (Fig.8.4.6). Tighten the two screws (Fig.8.5.4)(Fig.8.4.5). Loosen the bolt of the chain tensioner a quarter to a 
half revolution (Fig.8.4.5). The tensioner should turn with minimum clearance, without inclination. Then unscrew the inner nut.  To 
tension the chain, rotate the outer nut


(Fig.8.4.6) . The tension of the planetary chain should allow chain sagging of 3...5mm (1/8...3/16 

in) measured in span X (Fig.8.4.7).  


When properly tensioned, retighten the two nuts  

(Fig.8.4.6) and the screw(Fig.8.4.5). 


ATTENTION: NEVER “OVER” TENSION THE CHAIN,


THE CHAIN WILL BE DAMAGED 


8.6 REPLACING THE PLANETARY DRIVING CHAIN WHEEL  AND PLANETARY TENSIONER 
                                                                            

Check

 and repeat the instructions in 8.5 MOUNTING NEW 


PLANETARY CHAIN. 


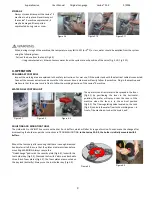
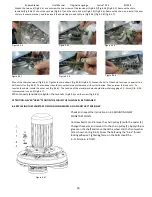
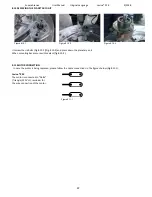
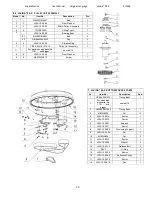
Unscrew bolt (1) and remove the chain pulley (3) with the sealer (5). 
Change the sealer, and mount it to the chain pulley (3). Apply lithium 
grease on the shaft and mount back the wheel and the front washer 
(2) as shown on (Fig.8.6.1). Screw the bolt using the “blue” thread 
locking adhesive. Tightening force on the bolts should be 
9...11N.m(6.6...8 ft∙lbf).


Figure 9.6.1 

Figure 9.5.7 

Figure 9.5.8 

Figure 9.5.9 

Figure 9.5.6 

Figure 9.5.5 

Figure 9.5.4 

Figure 8.6.1 

Содержание 25-X

Страница 1: ...LAVINA 25 X User Manual Tech Support Line 800 987 8403 www superabrasive com info superabrasive us...

Страница 2: ...Superabrasive User Manual Original Language Lavina 25 X 9 2018 2...

Страница 3: ...Superabrasive is not liable for defects arising out of use of non OEM parts The Warranty is void if the purchaser has not followed the maintenance plan stipulated by the machine s manual and warranty...

Страница 4: ...ECTRICAL SCHEMES YASKAWA CONNECTION MAIN CIRCUIT TERMINALS 14 8 TROUBLESHOOTING 15 INDEX OF PROBLEMS AND SOLUTIONS 15 8 1 REPLACING POWER CORD AND PLUGS 15 8 2 DISMOUNTING AND MOUNTING TOOL HOLDER TO...

Страница 5: ...two main component sections MAIN DESIGN The two main component sections are the carriage and main head The handle Fig 1 2 on the frame is adjustable in height and allows the operator to work in a cor...

Страница 6: ...nd and polish concrete terrazzo and natural stone floors It can be used for renovation as well as for polishing The machine is designed for dry or wet use When using it dry use a vacuum of appropriate...

Страница 7: ...ng The tool protector must be working The machine must be clean Never operate the machine in the rain Confirm that there are no missing parts especially after transportation repair or maintenance Befo...

Страница 8: ...ll the handle up and ensure the head is a stable upright position for mounting dismounting the tool Ensure that the water tank is empty before flipping the machine Pull the head in upright position Fi...

Страница 9: ...e operator can direct water to be sprayed in the front Fig 4 1 by positioning the lever in the horizontal position the water will spray under the cover of the machine when the lever is in the vertical...

Страница 10: ...k the potentiometer 8 and ensure that it is set to the working speed If working wet add water to the floor surface If working dry instead switch on the vacuum unit Finally hold the machine firmly and...

Страница 11: ...ressively and will cause the machine to stop The weight can be ordered with item number A08 00 00 00 TOOL HOLDER KEY The tool holder key Fig 5 3 is used for adjusting mounting and dismounting of the f...

Страница 12: ...e 3 inch with included Velcro back attachment NATO polishing discs feature a special resin formula designed for both wet and dry applications and a unique design with wide channels allowing for work o...

Страница 13: ...older will not fly away if the buffers get damaged The QuickChange should also be cleaned CHECK EVERY 200 WORKING HOURS Every 200 working hours the operator should inspect all parts of the machine car...

Страница 14: ...AL SCHEMES WITH YASKAWA INVERTER 200 240 Volt LAVINA 25 X ELECTRICAL SCHEMES YASKAWA CONNECTION MAIN CIRCUIT TERMINALS Figure 7 7 The motor is connected in Delta triangle 230 Volt reminder for the wir...

Страница 15: ...g By loosening four Hex cap flange bolts Fig 8 2 3 the adaptor comes loose Unscrew the six screws of the cap Fig 8 2 4 holding the felt ring Take out the Felt Ring adaptor and V Ring Mount the V Ring...

Страница 16: ...g force of the bolts has to be 22 25N m 16 18 ft lbs Mounting the holder without retaining washer Fig 8 3 2 is INADMISSIBLE because the security system preventing the separation of part of the holder...

Страница 17: ...ER OVER TENSION THE CHAIN THE CHAIN WILL BE DAMAGED 8 5 MOUNTING NEW PLANETARY CHAIN The planetary chain is replaced with new one when the step drive of the chain tensioner is finished or there is a l...

Страница 18: ...To tension the chain rotate the outer nut Fig 8 4 6 The tension of the planetary chain should allow chain sagging of 3 5mm 1 8 3 16 in measured in span X Fig 8 4 7 When properly tensioned retighten t...

Страница 19: ...is NOT permissible at any time as this can damage the high quality low stretch tension cord and other components This damage is often not visible Arrange the belts in pos 6 as per the scheme paying a...

Страница 20: ...read open Fig 8 7 14 Fig 8 7 15 Insert the screws by alternating at 1 5 revolution each until the conical sleeve pulls up the belt pulley The conical sleeve must be aligned in height with the belt was...

Страница 21: ...utside diameter of no more than 11 16 in to unscrew the six bolts Fig 8 8 3 Fig 8 8 4 Fig 8 8 5 Once these are removed remove the two halves of the gear The gear is composed of two symmetrical halves...

Страница 22: ...the planetary unit When mounting back secure with sealant fig 8 10 3 8 11 MOTOR CONNECTION In case the motor is being replaced please follow the cable connections in the figures below Fig 8 11 1 Lavin...

Страница 23: ...erabrasive User Manual Original Language Lavina 25 X 9 2018 23 8 12 FAULT DIAGNOSIS INVERTER YASKAWA V1000 Pages are referring to Yaskawa Electric SIEP C710606 18A YASKAWA AC Drive V1000 Technical Man...

Страница 24: ...Superabrasive User Manual Original Language Lavina 25 X 9 2018 24...

Страница 25: ...l distribut or where a professional disposal complying with the environment laws and directives is guaranteed 10 MANUFACTURER S CONTACTS If you need to contact Superabrasive Inc with technical support...

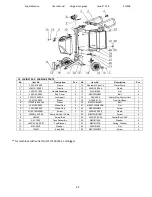
Страница 26: ...X TOP COVER 1 PARTS No Item No Description Pcs 1 L25SPS 07 00 00 02 L Left Fork 1 1 1 L25SPS 07 00 00 02 R Right Fork 1 2 M8X16DIN912 Screw 6 3 M8X20DIN7991 Screw 2 4 L25X 19 00 00 Top Cover Assembly...

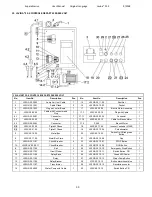
Страница 27: ...1 L25X 19 00 01 Top Cover 1 2 L25GS 19 10 00 Vacuum Port 1 3 L25X 19 20 00 Water Fitting 1 4 M12DIN985 Nut 1 5 M5DIN125A Washer 4 6 M5DIN127B Spring Washer 4 7 M5DIN934 Nut 4 8 L25SPS 04 01 00 00 Vacu...

Страница 28: ...A42 03 00 Adaptor 3 4 1 8 16DIN6921 Bolt 4 5 110X90X8 5 Felt Ring 3 6 TWVA00800 V Ring Type A 3 7 L25LS 14 00 02 Flange 3 8 6 16DIN6921 Bolt 15 9 L25X 14 00 00 Bottom Cover Assembly 1 9 1 L25X 14 00...

Страница 29: ...00 17 Cap 1 9 6013 Roller Assembly 2 10 L25SPS 00 00 00 34 Distance Ring 1 11 A10013943 Retaining Ring 1 12 L25X 11 00 00 Pulley Unit Assembly 3 12 1 M8X35DIN6921 Bolt 4 13 TWVA01200 V Ring Type A 1 1...

Страница 30: ...er see tabl 10 8 8 L25X 10 00 44 Front Washer 1 9 9 M5X12DIN912 Screw 1 7 LAVINA 25 X BOTTOM COVER 2 PARTS No Item No Description Pcs 1 HP645 5MHP15 Timing Belts 1 1 For machines with serial No 17 01...

Страница 31: ...1 12 00 Security set 1 1 3 1 A41 00 05 Washer A41 1 2 A25 00 10 K Buffer with two screw 6 2 1 M8X12DIN7991 Screw 12 2 2 A25 00 10 Buffer 6 3 A41 20 03 K Driving Set A41 1 3 1 A41 20 03 Elastic Element...

Страница 32: ...ocking bit 1 18 A29 40 00 Water Flow Control Unit 1 5 L25G 20 00 04 Wheel 2 19 A29 20 01 01 Flow Unit Base 1 5 IFP250x50 25x60 Wheel 2 20 M5X12DIN6921 Bolt 2 6 L32D 20 00 03 Wheel Cap 2 21 M20X1 5DIN4...

Страница 33: ...5X 30 03 00 Pigtail 3 Phase 1 18 L25S 30 11 09 Inverter Yaskawa V1000 1 4 5 L25X 30 01 00 Pigtail 1 Phase 1 19 L20NS 30 10 04 Potentiometer 1 5 L25X 30 10 00 Metal Box 1 20 L32S 30 10 25 Switch On Off...

Отзывы: