background image

Laurell Technologies  
Quick Start WS-650 Series                                                                                                          10/2011 – 10070193.revL


All information contained in this manual is the property of Laurell Technologies Corporation® and is NOT to be edited, reproduced or 

distributed without express written permission from a corporate officer. 


- 9 - 


INSTALL THE VACUUM TUBING 


Slide the locking nut, the 
gripper with the tapered end 
pointing toward the locking 
nut and the ferrule with the 
tapered end toward the 
vacuum valve, onto the air 
operated vacuum valve. 


Push the tubing into the 
vacuum valve connector. 
Slide the ferrules into the 
vacuum valve and HAND 
tighten nut. 


Connect the other end of the 
tubing to a vacuum source. 


Without seal purge 
pressurization the 
pneumatic vacuum valve 
WILL NOT OPERATE. 

Locking nut 

Gripper 

Ferrule 

Содержание WS-650 lite Series

Страница 1: ...Technologies Corporation and is NOT to be edited reproduced or distributed without express written permission from a corporate officer 1 QUICK START WS 650 LITE INSTALLATION INSTRUCTIONS Open Boxes Remove All Contents If any parts are missing contact the factory immediately Claims for missing parts must be made within 30 days of shipment ...

Страница 2: ...f 9 5mm polyethylene vacuum tubing Spare x 6 35mm vacuum fitting optional 10 of polyethylene tubing for CDA N2 Seal Purge 1 75 45mm Wafer Chuck for 50 150mm substrates 6NPP TFM models only Wafer Fragment Adapter for 7 50mm substrate fragments 6NPP TFM models only Package of Viton O rings for fragment chuck for acids and toluene Package of EPDM O rings for fragment chuck for solvents USB adapter Do...

Страница 3: ...e edited reproduced or distributed without express written permission from a corporate officer 3 REAR VIEW Drain Port Power Cord Plug Cord into the appropriate power source SEE SECTION 2 IN MANUAL FOR COMPLETE INSTALLATION INSTRUCTIONS Seal Purge CDA or N2 60 70 psi 4 1 4 9 bar REQUIRED FOR OPERATION Circuit Breaker with On Off Capability Pneumatic Vacuum Valve and Connection ...

Страница 4: ...nserting the tubing into the Seal Purge push to connect fitting Push in until the tubing seats completely Connect the other end of the tubing to a 60 70 psi CDA or N2 supply THE SEAL PURGE PRESSURE MUST BE PRESENT FOR THE SYSTEM TO OPERATE DO NOT OVERPRESSURIZE THE SYSTEM OR INTERNAL DAMAGE MAY OCCUR Maximum pressure should never exceed 90psi A Need CDA error will appear in the run mode status scr...

Страница 5: ...ologies Corporation and is NOT to be edited reproduced or distributed without express written permission from a corporate officer 5 SEAL PURGE SCHEMATIC This graphic represents the functionality of the seal purge The seal s purpose is to separate the process chamber from the motor and electronics in order to insure long service free operation ...

Страница 6: ...um depending on input air pressure It creates a vacuum by venturi action 2 0 INSTALLATION 1 For best performance use a dedicated CDA or N2 supply regulator for the vacuum generator The generator s flow rate is approximately 1 67cfm at 60psi See figure 2 Note It may be possible to tee the CDA or N2 supply to both the processor and the IVPVG but there must be a sufficient volume of gas to satisfy bo...

Страница 7: ...block the exhaust output lower vacuum values may result 3 0 OPERATION 1 Set the CDA or N2 pressure to 60psi Turn on pressure 2 Place a substrate onto the vacuum chuck Press the vacuum key to apply vacuum to the substrate 3 A vacuum will be applied onto the substrate and a vacuum reading will be displayed in the upper right corner of the LCD 4 When the vacuum key is pressed a hissing sound will be ...

Страница 8: ...ss written permission from a corporate officer 8 Approximate Vacuum Achieved With Different Pressure Settings 3 8 fitting only Pressure psi Vacuum in inches of Hg 10 1 3 15 3 20 4 4 25 6 2 30 8 5 35 11 3 40 14 8 45 18 50 24 55 25 3 60 25 3 NOTE These values are approximations actual values may vary NOTE The processor has a minimum vacuum setting of 15 This is a factory setting The processor must h...

Страница 9: ...STALL THE VACUUM TUBING Slide the locking nut the gripper with the tapered end pointing toward the locking nut and the ferrule with the tapered end toward the vacuum valve onto the air operated vacuum valve Push the tubing into the vacuum valve connector Slide the ferrules into the vacuum valve and HAND tighten nut Connect the other end of the tubing to a vacuum source Without seal purge pressuriz...

Страница 10: ...y of Laurell Technologies Corporation and is NOT to be edited reproduced or distributed without express written permission from a corporate officer 10 INSTALL DRAIN CUP CONNECTOR option Install the drain connector onto the Drain Port Push the connector fully onto the stem Attach 0 5 12 7mm exhaust tubing to an exhaust source ...

Страница 11: ...is NOT to be edited reproduced or distributed without express written permission from a corporate officer 11 INSTALL DRAIN CONNECTOR option Install the drain connector onto the Drain Port Push the connector fully onto the stem Use a 3 16 4 8mm Allen wrench to tighten set screw into the recessed groove DO NOT OVER TIGHTEN SET SCREW OR IT MAY DEFORM THE PORT AND LEAK ...

Страница 12: ... Install the Down Flow drain connector onto the Drain Exhaust Port Push the connector fully onto the stem Use a 3 16 4 8mm Allen wrench to tighten set screw into the recessed groove DO NOT OVER TIGHTEN SET SCREW OR IT MAY DEFORM THE PORT AND LEAK 5 32 3 97mm tubing from Down Flow exhaust to Differential Pressure Gauge Differential Pressure Gauge Exhaust Drain Optional Digihelic Differential Pressu...

Страница 13: ... without express written permission from a corporate officer 13 DIGHELIC INSTALLATION The Digihelic is labeled indicating all physical connections Match the colored wire to the color written on the label Rear view of Digihelic Connect each wire to the designated terminal point Connect the 5 32 tubing from the down flow exhaust to the low pressure input port Leave the high pressure input port open ...

Страница 14: ...uced or distributed without express written permission from a corporate officer 14 DIGIHELIC DIFFERENTIAL PRESSURE SENSOR STATES A indicates the exhaust flow is lower than the minimum set point Low set point is set to 0 50 No A or B indicates the exhaust flow is between the low and high set points B indicates the exhaust flow is higher than the maximum set point High set point is set to 3 00 ...

Страница 15: ...permission from a corporate officer 15 USING THE BULL S EYE LEVEL It is always a good practice to level the system wafer chuck before using A level wafer chuck will help to reduce thickness non uniformities Use the level either on the chuck itself or on a flat substrate do not pull vacuum onto to the substrate when leveling Level the system by leveling the bench or table If this is impractical use...

Страница 16: ...n 3 in manual for installing and removing chuck Installed 1 75 45mm chuck Bottom view of Fragment Adapter With vacuum off place fragment adapter onto the low profile chuck Place fragment on chuck and press the vacuum key on control panel CAUTION SUBSTRATE FRAGMENT MUST ALWAYS COVER THE O RING SEAL TO PREVENT CHEMICAL FROM ENTERING VACUUM PATH AND DAMAGING MOTOR AND SEALS Contact support laurell co...

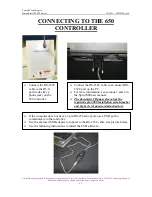
Страница 17: ...S 232C port on the PC For more information see sections 1 and 2 in the Spin 3000 user manual The document CD paper sleeve has the required spin 3000 installation serial number and higher level password attached to it Connect the RS 232C cable to the RJ 11 port looks like a phone jack on the 650 controller If the computer does not have a 9 pin RS 232 serial port use a USB port to communicate to the...

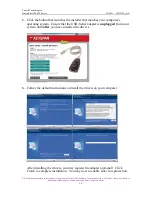
Страница 18: ...ficer 18 USB INSTALLATION INSTRUCTIONS Keyspan USA 19HS USB Serial Adapter Before installing the Keyspan USB Serial Adapter make sure the adapter is unplugged from your system as with most USB device installations Windows 32 bit Instructions 1 Disable any anti virus software you may have running 2 Insert browse to the Driver Installation CD on your computer 3 Launch the driver installation main me...

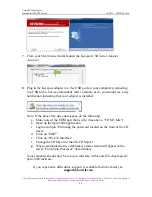
Страница 19: ...rom a corporate officer 19 5 Click the button that launches the installer that matches your computer s operating system Ensure that the USB Serial adapter is unplugged from your system until after you have installed the drivers 6 Follow the default instructions to install the drivers on your computer After installing the drivers you may register the adapter optional Click Finish to complete instal...

Страница 20: ... should see a tray notification indicating that your adapter is installed Note If the above tray does not appear do the following a Make note of the COM port that is idle See above COM 3 Idle b Open up the Spin 3000 application c Login into Spin 3000 using the password located on the front of the CD sleeve d Click on EDIT e Click on RS 232 Interface f Change the COM port to the idle COM port g Whe...

Страница 21: ...ze potential installation problems please follow these best practices installation instructions for this or any software 1 Close all currently running applications 2 Verify computer s color setting is set to 32 bit Use medium to maximum resolution 3 Disable any running anti virus software 4 Complete software installation as per following instructions 5 Re enable anti virus software 6 Restart the s...

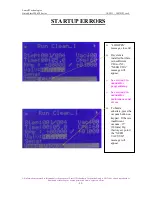
Страница 22: ...ress written permission from a corporate officer 22 STARTUP ERRORS LID OPEN message close lid If system is installed but there is insufficient CDA or N2 NEED CDA message will appear See section 3 in manual for programming See section 4 in manual for maintenance and errors To hold a substrate press the vacuum button on keypad If there is insufficient vacuum 15 381mm Hg factory set point the NEED VA...

Страница 23: ...cer 23 INSTALLTION COMPLETE AND READY FOR PROGRAMMING Drain attached Vacuum tubing installed Seal Purge tubing installed Power Cord plugged in If CDA and vacuum are present at the required pressures the processor is ready for programming With a substrate on the chuck and the vacuum button enabled the amount of vacuum present will be indicated TIPS ALWAYS USE LAURELL CHUCKS ALWAYS PREVENT CHEMICALS...

Страница 24: ...t any chemicals from entering the vacuum path Do not fill up or overflow the process chamber or bowl fluids must not be permitted to flow under the substrate If the chuck face shows signs of chemical residue remove and clean immediately Cleaning the o ring surface will improve the seal See Section 4 in manual VACUUM CHUCK WET TEST Examine and adjust your process to prevent such occurrences Do not ...

Отзывы: