DE/FR/IT/EN/ES/NL/CS/LT/PL/HU/RU/BG
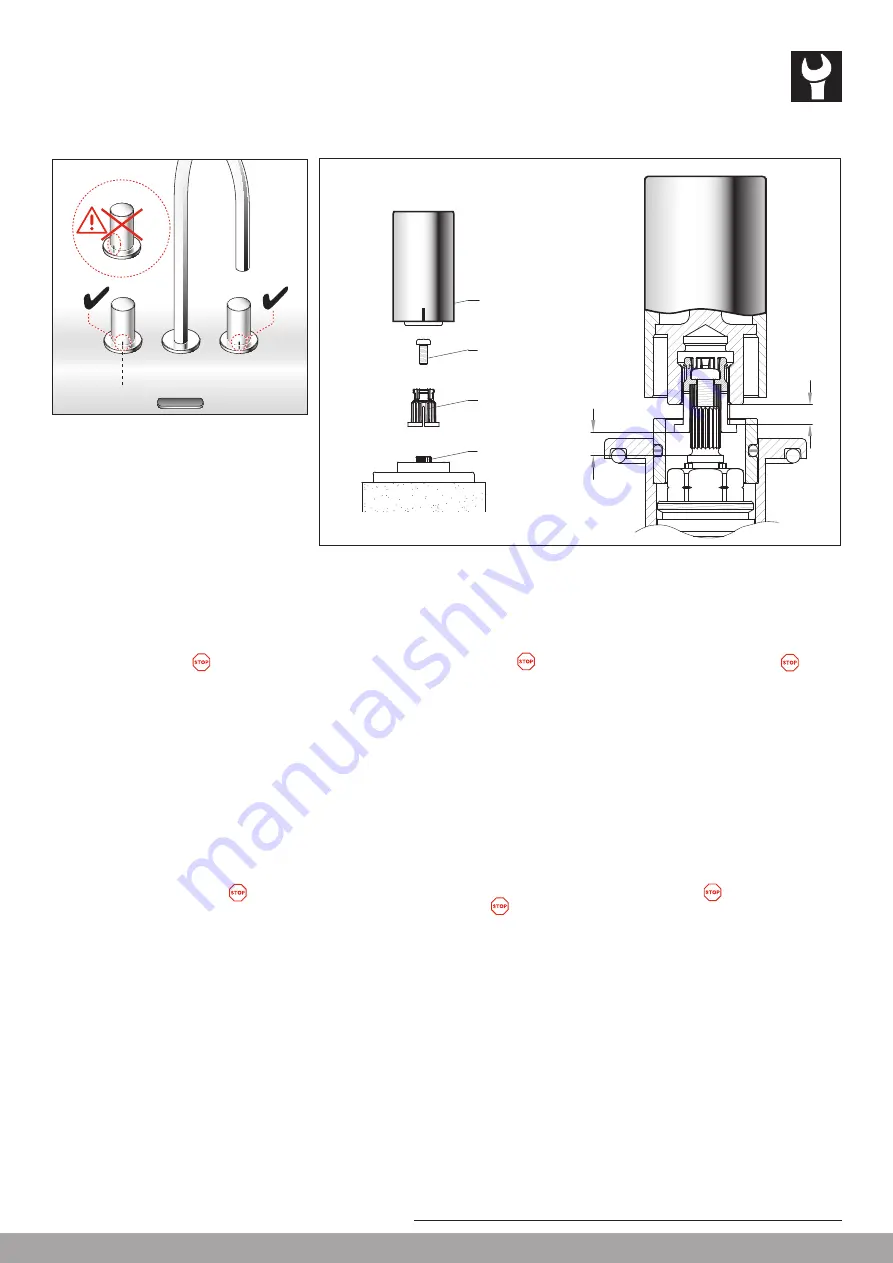
Montage und Ausrichten der Griffe
Montage et alignement des poignées
Montaggio ed allineamento delle manopole
Fitting and alignment of the handles
Montaje y alineación de los volantes
Montage en uitlijnen van de knoppen
Montáž a vyrovnání kohoutků
Rankenėlių montavimas ir išlygiavimas
Montaż i ustawienie uchwytów
A karok összeszerelése és beállítása
Монтаж и выравнивание ручек
Монтаж и центроване на дръжките
DE
Ausrichten der Griffe
1) Geriffelten Einsatz (2) auf das Oberteil (1) setzen
2) Griff (4) ohne einzuklinken (in beliebiger Position)
auf den Einsatz (2) setzen
3) Griff (4) bis zum Anschlag
(in Schliessrichtung)
drehen
- Kaltwassergriff schliesst im Gegenuhrzeigersinn
- Warmwassergriff schliesst im Uhrzeigersinn
4) Griff (4) wegnehmen und wie in der (fig.1) gezeigt
positionieren
5) Sobald der Griff (4) genau ausgerichtet ist, diesen
wegnehmen und die Schraube (3) ganz festziehen
und den Griff (4) definitiv am Einsatz (2) einklinken
IT
Allineamento delle manopole
1) Infilare sul vitone (1) l’inserto scanalato (2)
2) Infilare la manopola (4) sull’inserto (2) senza
innestarla nell’arpionismo (in posizione indifferente)
3) Girare la manopola (4) fino all’arresto
(attenzione al senso di chiusura)
- l’acqua fredda si chiude in senso antiorario
- l’acqua calda si chiude in senso orario
4) Togliere la manopola (4) e posizionarla come
indicato nella fig. 1
5) Una volta che la manopola (4) è perfettamente
allineata, toglierla per serrare a fondo la vite (3)
e poi innestarla definitivamente sull’inserto (2)
EN
Alignment of the handles
1) Place the grooved insert (2) onto the cartridge (1)
2) Place the handle (4) on the insert (2) (in any posi-
tion) without engaging it on the ratchet
3) Turn the handle (4) up to the stop
(in the OFF
direction)
- cold water turns off anticlockwise
- hot water turns off clockwise
4) Remove the handle (4) and position it as in (fig.1)
5) Once the handle (4) is perfectly aligned, remove it
to tighten the screw (3) and finally click it
onto the insert (2)
FR
Alignement des poignées
1) Introduire l’insert cannelé (2) sur le chapeau (1)
2) Introduire la poignée (4) sur l’insert (2) sans l’encli-
queter. (En position indifférente)
3) Tourner la poignée (4) jusqu’en butée
(atten-
tion au sens de fermeture)
- l’eau froide se ferme dans le sens contraire des
aiguilles d’une montre
- l’eau chaude se ferme dans le sens des aiguilles
d’une montre
4) Ôter la poignée (4) et la positionner
comme sur (fig.1)
5) Une fois la poignée (4) parfaitement alignée, l’ôter
pour serrer la vis (3) à fond et l’encliqueter définiti-
vement sur l’insert (2)
ES
Alineación de los volantes
1) Colocar el inserto estriado (2) sobre la parte
superior (1)
2) Colocar el volante (4) sobre el inserto (2) (en
cualquier posición) sin que enganche
3) Girar el volante (4) hasta el tope
(en el sentido de cierre)
- El volante del agua fría cierra en sentido
antihorario
- El volante del agua caliente cierra en
sentido horario
4) Retirar el volante (4) y posicionarlo como se
muestra en la (fig.1)
5) En cuanto el volante (4) esté exactamente
alineado, retirarlo y apretar bien el tornillo (3), y
enganchar el volante (4) definitivamente en el
inserto (2)
NL
Knoppen in de juiste stand brengen
1) Geribbelde insteek (2) op het bovendeel (1) zetten
2) Knop (4) zonder vast te klikken (in willekeurige
positie) op de inzet (2) zetten
3) Knop (4) tot aanslag
(in sluitrichting) draaien
- De koudwaterknop sluit linksom
- De warmwaterknop sluit rechtsom
4) Knop (4) weghalen en positioneren zoals getoond
in (fig.1)
5) Zodra de knop (4) precies is uitgelijnd, deze
weghalen en de schroef (3) helemaal vast draaien
en de knop (4) definitief bij het inzetstuk (2)
vastklikken
1
2
3
4
b)
a)
5


