Laubjerg vinsch LV-O9500-Q Скачать руководство пользователя страница 15

13 

3. 

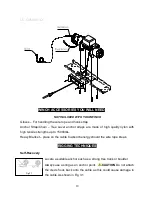
The  gearbox  has  been  lubricated  using  a  high  temperature  lithium  grease 

and is sealed at the factory.  No internal lubrication is required.


TROUBLE SHOOTING 

WARNING  -   

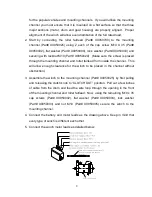
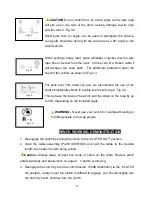
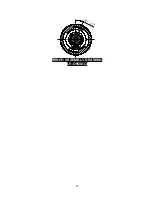
Adjustment  braking  angle  method:  The  spring  according  to  the 

spring  gyrotropic  pre-tight  two  weeks,  then  shows  the  spline  tooth  set  according  to 
following braking cutaway view the adjustment angle for 20°±5°.
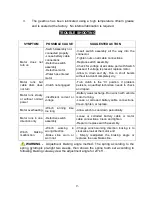
 

SYMPTOM 

POSSIBLE CAUSE  

SUGGESTED ACTION 

Motor  does  not 
turn on 

-Switch Assembly not 
connected properly 

-Loose battery cable 
connections 

-Defective switch 
assembly 

-Defective motor 

-Water has entered 
motor 

-Insert  switch  assembly  all  the  way  into  the 
connector. 

-Tighten nuts on all cable connections. 

-Replace switch assembly. 

-Check for voltage at armature port with Switch 
pressed. If voltage is present, replace motor. 

-Allow  to  drain  and  dry.  Run  in  short  bursts 
without load until completely dry. 

Motor  runs  but 
cable  drum  does 
not turn 

-Clutch not engaged 

-Turn  clutch 

to  the  “In”  position.  If  problem 

persists,  a  qualified  technician  needs  to  check 
and repair. 

Motor  runs  slowly 
or  without  normal 
power 

-Insufficient  current  or 
voltage 

-Battery weak recharge. Run winch with vehicle 
motor running. 

-Loose  or  corroded  battery  cable  connections. 
Clean, tighten, or replace. 

Motor overheating 

-Winch  running  time 
too long 

-Allow winch to cool down periodically. 

Motor  runs  in  one 
direction only 

-Defective switch 
assembly. 

-Loose  or  corroded  battery  cable  or  motor 
cable connections. Clean and tighten. 

-Repair or replace switch assembly. 

Winch 

braking 

malfunction. 

-Winch 

working 

in 

wrong direction. 

-Brake  slice  worn  or 
worn not. 

-Change  winch  working  direction  looking  is  to 
clockwise look at the motor end  

-  Simply  readjusted  the  braking  angle  or 
replaces the new brake slice. 

Содержание LV-O9500-Q

Страница 1: ...SPEED WINCH LV O9500 Q LV O9500S Q Assembly Operating Instructions...

Страница 2: ...AND MOUNTING 7 MOUNTING DRAWING 9 WINCH ACCESSORIES YOU WILL NEED 10 RIGGING TECHNIQUES 1 0 WINCH WORKING DEMONSTRATION 1 1 REPLACING THE WIRE ROPE 1 2 MAINTENANCE 1 2 TROUBLE SHOOTING 1 3 WINCH ASSEM...

Страница 3: ...afely or improperly could result in property damage serious injury or death Throughout this manual you will find the following symbols for caution warning and danger Pay particular attention to the no...

Страница 4: ...lvanized aircraft cable designed specifically for load capacity of 9500lbs The wire rope feeds onto the drum in the under wind position through the roller fairlead and is looped at the end to accept t...

Страница 5: ...natch block that can double the pulling power of the winch or change the pulling direction without damaging the wire rope We recommend you to use double line and snatch block for pulling over 70 of th...

Страница 6: ...e spools in the under wind position with the cable entering the drum from the bottom not the top To spool correctly you should keep a slight load on the cable while pushing the remote button to draw i...

Страница 7: ...d the use of the pulley block snatch block to double the wire rope line This will aid in two ways a reduce the number or rope layers on the drum as well as b reduce the load on the wire rope by as muc...

Страница 8: ...ll balanced especially after you operated the clutch test running winch can make winch in gear WINCHING TECHNIQUES A Z a Take time to asses your situation and plan your pull b Put on gloves to protect...

Страница 9: ...tor cool down for a few minutes and then resume the winching operation r The winching operation is complete once the vehicle is on stable ground and is able to drive under its own power s Secure the v...

Страница 10: ...gh the mounting channel and roller fairlead from inside the channel This will allow enough clearance for the winch to be placed in the channel without obstruction 3 Assemble the winch to the mounting...

Страница 11: ...and re spooling the wire rope Using the hand saver keeps your hands and fingers away from the rotating drum 8 Check for proper drum rotation Pull and turn the clutch knob to the CLUTCH OUT position P...

Страница 12: ...uality nylon with high tensile strengths up to 15000lbs Heavy Blanket place on the cable to absorb energy should the wire rope break RIGGING TECHNIQUES Self Recovery Locate a suitable anchor such as a...

Страница 13: ...o double line the wire rope Fig 3 4 This reduces the load on the winch and the strain on the rope by up to 50 depending on the included angle WARNING Never use your winch for overhead hoisting or for...

Страница 14: ...Note how the existing cable is connected to the drum 3 Remove old cable assembly and attach new one as the old cable connected to the drum InserttheendofthenewropeandsecurethescrewM6x10 Part X0950009...

Страница 15: ...e is present replace motor Allow to drain and dry Run in short bursts without load until completely dry Motor runs but cable drum does not turn Clutch not engaged Turn clutch to the In position If pro...

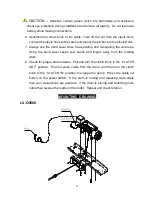
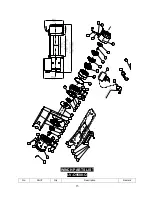
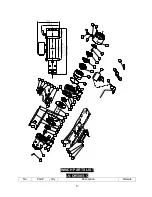
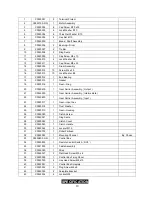
Страница 16: ...14 WINCH ASSEMBLY DRAWING LV O9500 Q...

Страница 17: ...5 34 35 33 6 5 3 2 1 4 26 25 28 29 24 22 23 20 19 18 3 5 6 30 5 32 4 3 16 17 4 31 10 8 15 21 38 37 OUT IN 13 12 10 7 8 9 11 12 13 36 14 27 39 WINCH PARTS LIST LV O9500 Q No Part Qty Description Remark...

Страница 18: ...sket 19 X0950016 1 Gear Ring 20 X0950400 1 Gear Carrier Assembly Output 21 X0950500 1 Gear Carrier Assembly Intermediate 22 X0950600 1 Gear Carrier Assembly Input 23 X0950017 1 Gear Input Sun 24 X0950...

Страница 19: ...6 27 23 21 22 24 28 29 19 18 6 5 42 40 41 10 36 37 38 39 3 16 17 4 15 14 12 11 8 5 7 9 10 13 8 12 13 4 1 2 3 6 20 3 30 5 32 4 31 34 33 OUT IN 35 43 WINCH PARTS LIST LV O9500S Q No Part Qty Description...

Страница 20: ...Assembly Output 21 X0950500 1 Gear Carrier Assembly Intermediate 22 X0950600 1 Gear Carrier Assembly Input 23 X0950017 1 Gear Input Sun 24 X0950018 1 Trust Washer 25 X0950019 1 Gear Housing 26 X09500...

Страница 21: ...24mm 22 7 6 3 10 7 577mm 160 mm 272 mm Net weight Ibs kg 69 7 31 6 70 5 32 0 Pull Speed Amperes Volts First layer Line Pull Line Speed ft min m min Current A Ibs kg 12V DC 24V DC 12V DC 24V DC 0 0 50...

Страница 22: ...20 4 5593 2537 85 3 26 0 NOTES...

Отзывы: