


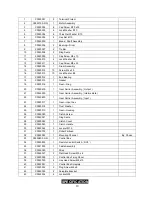


8
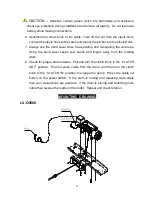
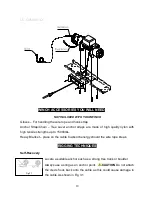
for the popular vehicles and mounting channels. If you will utilize the mounting
channel you must ensure that it is mounted on a flat surface so that the three
major sections (motor, drum and gear housing) are properly aligned. Proper
alignment of the winch will allow even distribution of the full rated load.
2. Start by connecting the roller fairlead (Part# X0950700) to the mounting
channel (Part# X0950025) using 2 each of the cap screw M10 X 35 (Part#
X0950002), flat washer (Part# X0950004), lock washer (Part# X0950003) and
securing with locknut M10 (Part# X0950024) (Make sure the screw is placed
through the mounting channel and roller fairlead from inside the channel. This
will allow enough clearance for the winch to be placed in the channel without
obstruction.)
3. Assemble the winch to the mounting channel (Part# X0950025) by first pulling
and releasing the clutch knob to “CLUTCH OUT” position. Pull out a few inches
of cable from the drum and feed the wire loop through the opening in the front
of the mounting channel and roller fairlead. Now, using the remaining M10 x 35
cap screws (Part# X0950002), flat washer (Part# X0950004), lock washer
(Part# X0950003) and nut M10 (Part# X0950005) secure the winch to the
mounting channel.
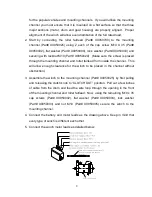
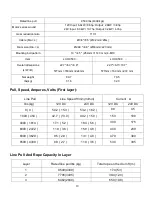
4. Connect the battery and motor leads as the drawing above. Keep in mind that
every type of winch is different each other.
5. Connect the winch motor leads as detailed below:
Содержание LV-O9500-Q
Страница 1: ...SPEED WINCH LV O9500 Q LV O9500S Q Assembly Operating Instructions...
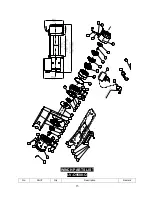
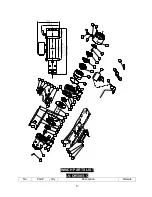
Страница 16: ...14 WINCH ASSEMBLY DRAWING LV O9500 Q...
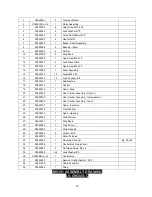
Страница 22: ...20 4 5593 2537 85 3 26 0 NOTES...


