9K998-2306
2-31
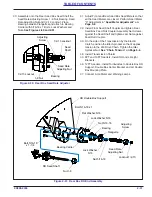
30. Assemble onto the Rear Seed Box Seed Shaft the
Seed Rate Adjusting Screw, 1-8 Nut, Bearing, Seed
Rate Adjusting Nut and 1/2-13 Locknut.
Place
Bearing between Flangettes and attach to Bearing
Carrier with 5/16-18 x 1 Bolts, Lock Washers and
Nuts.
Figure 2-50: Rear Box Seed Rate Adjuster
31. Adjust Front and Rear Seed Box Seed Meters so that
all the Seed Meters are closed. Perform Seed Meter
“0” Adjustment in
32. Install Front Seed Shaft Coupler and tighten Rear
Seed Box Feed Roll Coupler Assembly Set Screws
against the Seed Shaft and tighten Jam Nuts against
Feed Roll Coupler.
33. On the side of the Transmission by the Electric
Clutch, position the Idler Sprocket so that it applies
tension to the #40 Drive Chain. Tighten the Idler
Sprocket Nut.
See
34. Install Transmission Shield.
35. 8FT and 10FT Seeders, Install RH and LH Light
Brackets.
36. 12FT Seeders, Install Turnbuckles to Double Box RH
Support, Double Box Center Bracket and LH Double
Box Mounting Plate.
37. Connect Acre Meter and Warning Lamps.
Figure 2-51: Rear Box RH End Assembly
1/2-13 Locknut
Seed
Shaft
Seed Rate
Adjusting Nut
Bearing
1/2-13 Locknut
1-8 Nut
Adjusting
Screw
Flat Washer,5/16
Lock Washer,
5/16
Nut,5/16-18
Bolt,5/16-18 x 1
Bearing Carrier
Nut,1-8
RH Seed Shaft
Locknut,1/2-13
Seed Rate
Adjusting Nut
Adjusting
Screw
Bolt,5/16-18
x 1-1/4
Bearing
Flangette
RH Double Box Support
Nut,5/16-18
Lock Washer,5/16
Содержание Brillion Turfmaker II Series
Страница 4: ......
Страница 14: ...1 6 9K998 2306 TABLE OF CONTENTS Figure 1 4 Decal Placement Hitch SL2 HitchDecals 14 15 14 15 16...
Страница 18: ...1 10 9K998 2306 TABLE OF CONTENTS Table provided for general use NOTES...
Страница 45: ...9K998 2306 2 27 TABLE OF CONTENTS Table provided for general use NOTES...
Страница 53: ...9K998 2306 2 35 TABLE OF CONTENTS Table provided for general use NOTES...
Страница 61: ...9K998 2306 2 43 TABLE OF CONTENTS Table provided for general use NOTES...
Страница 94: ...4 8 9K998 2306 TABLE OF CONTENTS Table provided for general use NOTES...


