Section 3: Operating Instructions
11/2/18
25
3. Ramp up to 540 power take-off speed for at least 3
seconds. If excessive vibration continues longer than
3 seconds at full 540 power take-off speed,
immediately disengage power take-off, shut down
tractor, remove switch key, and wait for blades to stop
turning before dismounting tractor.
4. Investigate the cause if cutter was shut down due to
excessive vibration. See
on page 22 for detailed instructions.
5. Select a gear range that will allow the cutter to make
a smooth cut without lugging the tractor down.
See
on page 24 for detailed
instructions.
6. If cutter has not been shut down due to excessive
vibration, commence cutting at full power take-off
operating speed.
7.
Make a lower gear selection if tractor is lugging down
or if cutter is making a rough cut.
Disengage Blades
1.
Slowly decrease throttle speed until engine idle
speed is reached.
2. Disengage power take-off.
3. Stay on the tractor until the blades have come to a
complete stop. Always place tractor in park or set
park brake, shut tractor engine off, and remove
switch key before dismounting.
Unhooking The Rotary Cutter
1.
See
cutter for long periods and end of season.
2. Disengage power take-off, park cutter on a level,
solid, hard surface. Place tractor gear selector in
park and set park brake.
3. Wait for blades to come to a complete stop and then
fold wings up to transport position before
dismounting from tractor.
4. Lock wings in transport position with transport lock
bars. See
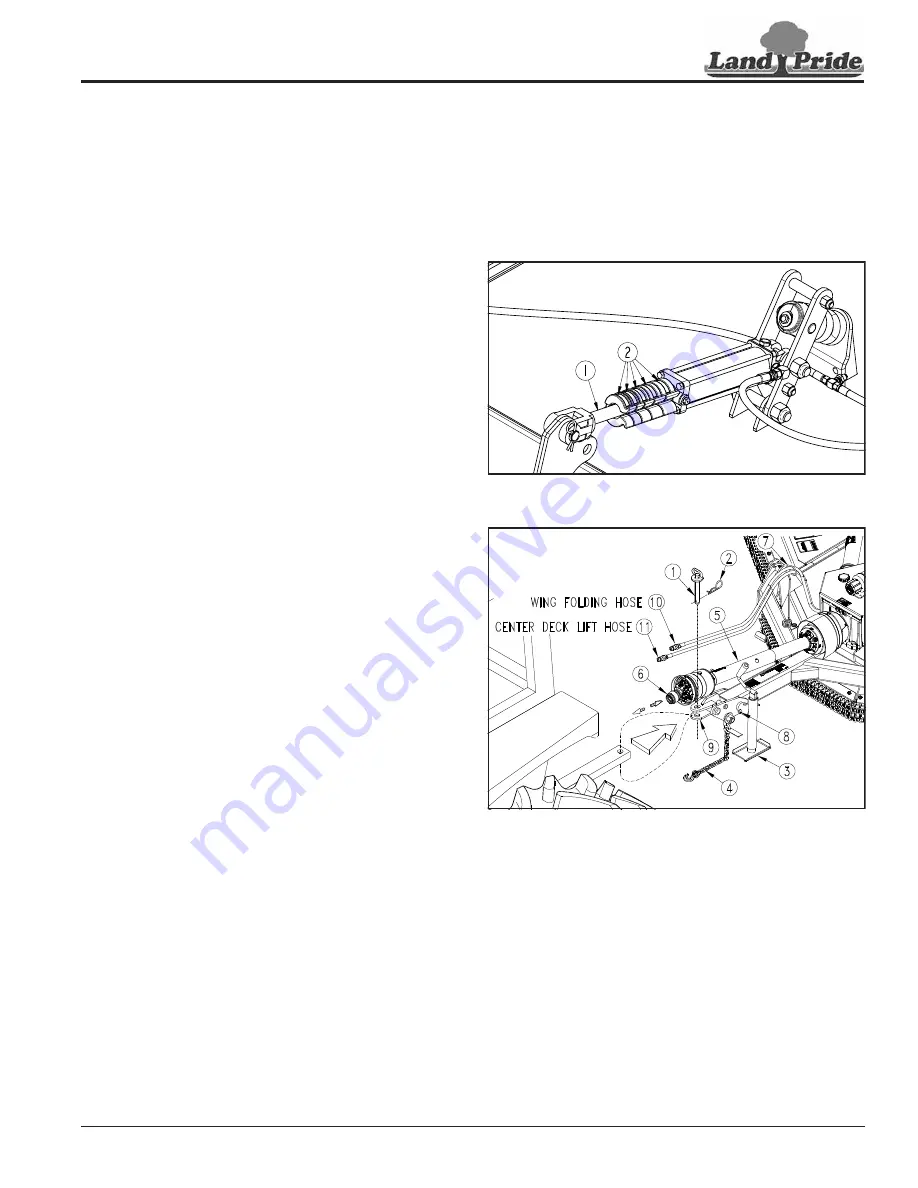
5. Remove all stroke control spacers (#2) from center
hydraulic lift cylinder and lower cutter until front skid
shoes are resting on the ground. Replace stroke
control spacers as needed to support wheels at this
height.
6. With tractor gear selector in park and park brake set,
shut tractor engine off and remove switch key. Move
cylinder lift levers back and forth to release hydraulic
line pressure.
7.
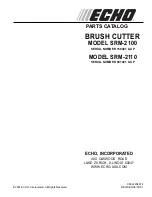
Remove jack stand (#3) from left-hand wing deck and
attach to cutter hitch. Secure jack stand in place with
attached ball detent pin (#8). Make sure ball detent
pin is fully inserted.
8. Unhook hydraulic hoses (#10 & #11), driveline safety
chain (#6), driveline (#5), and hitch safety chain (#4)
from tractor. Store hose ends in hose spring support
loop (#7).
9. Adjust jack stand up or down as needed to remove
hitch pin (#1).
10. Drive tractor away from cutter and lower jack stand to
rest cutter on its front skid shoes.
Remove Stroke Control Spacers
Figure 3-5
Tractor Unhook
Figure 3-6
35134
30622


