18
Installing the Table
Two people are required to mount the table
to the machine.
1.
Remove the lock-down bolt, handle and
the pin from the trunnion.
2.
Position the table on the
trunnion, taking care not to
damage any of the table or
trunnion surfaces.
3.
While one person supports the
table, the other person feeds the bolts and the lock down through the
trunnion slots.
4.
The table can be tilted to a maximum of 45 degrees away from the
column. To angle the table, remove the table insert to allow the blade to
pass through the hole. Loosen the lock-down handle, using the supplied
wrench. Crank the trunnion gear so that the table moves to the required
angle and lock in position. To return the table to the zero position,
reverse the procedure.
Table insert
The machine is supplied with a removable table
insert. The holes of the insert improve the dust
collection near the blade. Adjusting screws at the
bottom of the table allows the insert to be
adjusted vertically so that the level between the
table and the insert are level. It is recommended
that the insert be replaced when the slot becomes
The bandsaw is supplied
with a zero stop that is
adjustable and comes
factory set
Insert
Содержание 16HD Classic
Страница 2: ......
Страница 6: ......
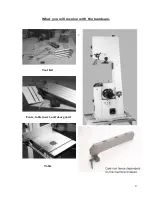
Страница 9: ...9 What you will receive with the bandsaw Tool Kit Fence table insert and door guard Table...
Страница 36: ...36 Fitting cool block guide system Optional not supplied with the machine...
Страница 41: ...41...
Страница 58: ...58 Electrical system drawing with switch ON knob...
Страница 59: ...59 Electrical system drawing with switch ON knob...
Страница 60: ...60 Electrical system drawing with push ON button...
Страница 61: ...61 Electrical system drawing with push ON button...
Страница 63: ......
Страница 64: ......
Страница 65: ......
Страница 66: ...TOP GUIDE BOTTOM GUIDE...
Страница 99: ......


