background image


25 


Before starting the machine 


1.


Read and understand the instruction manual before operating the saw.  

2.


If  you  are  still  not  thoroughly  familiar  with  the  operation  of  the 
bandsaw, get advice from a qualified person.  

3.


Make sure the machine is properly grounded and that the wiring codes 

are followed.  

4.


Do  not  operate  the  bandsaw  while  under  the  influence  of  drugs, 
alcohol, medicine or if tired.  

5.


Always  wear  eye  protection,  safety  glasses  or  a  safety  shield,  and 

hearing protection.  

6.


Wear  dust  mask; long-term exposure  to  the  fine  dust  created  by the 
band saw is not healthy.  

7.


Remove  your  tie,  rings,  watch  and  all  jewelry.  Roll  up  your  sleeves; 
you do not want anything to get caught in the saw.  

8.


Make sure that the guards are in place and use them at all times. The 
guards protect you from coming in contact with the blade.  

9.


Make sure that the saw blade teeth point downward towards the table.  

10.


Adjust  the  upper  blade  guard  so  that  it  is  just  clearing  the  material 

being cut. 

11.


Make sure that the blade has been properly tensioned and tracked.  

12.


Stop the machine before removing the scrap piece from the table.  

13.


Always keep your hands and fingers away from the blade.  

14.


Make sure that you use the proper size and type of blade.  

15.


Hold  the  work  piece  firmly  against  the  table.  Do  not  attempt  to  saw 
stock that does not have a flat surface facing down, unless a suitable 
support is used.  

16.


Use a push stick at the end of a cut. This is the most dangerous time 
because the cut is complete and the blade is exposed. Push sticks are 
commercially available.  

17.


Hold the wood firmly and feed it into the blade at a moderate speed.  

18.


Turn  off  the  machine  if  you  have  to  back  the  material  out  of  an 

uncompleted or jammed cut.


Содержание 16HD Classic

Страница 1: ...37 MANUAL LAGUNA TOOLS 2072 Alton Parkway Irvine California 92606 Ph 800 234 1976 www lagunatools com 2018 Laguna Tools Inc LAGUNA and the LAGUNA Logo are the registered trademarks of Laguna Tools Inc...

Страница 2: ......

Страница 3: ...o locate your bandsaw Pg 13 Chapter 3 Assembling your bandsaw Pg 14 36 Unpacking your machine Pg 14 15 Assembling your bandsaw Pg 16 22 Adjusting the bandsaw Pg 23 36 Chapter 4 Using your bandsaw Pg 3...

Страница 4: ...yourself with the machine Read carefully before operating the band saw 1 Keep the working area clean and be sure adequate lighting is available 2 Do not wear loose clothing gloves bracelets necklaces...

Страница 5: ...empted by others Laguna Tools Inc is not responsible for additional tools or modifications sold or performed other than from by Laguna Tools Inc on any Laguna Tools Inc machine Warranty maybe voided u...

Страница 6: ......

Страница 7: ...7960 annex J NFE 64 209 Measuring system Standard ISO 7960 annex J NFE 64 209 Measurements tolerance 4 dB Working without aspiration L Aeq LW A Lpc 84 7 dB A 97 1 dBw A 5 1 mW A 130 dB A Receiving you...

Страница 8: ...ward the table there is little danger except for special cuts that the wood will be thrown back at the operator which is called a kickback There is always danger of kickback when a circular saw is bei...

Страница 9: ...9 What you will receive with the bandsaw Tool Kit Fence table insert and door guard Table...

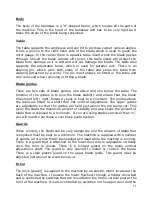
Страница 10: ...covered with rubber called a tire The tire cushions the blade and protects the teeth from coming in contact with the metal of the flywheel The lower wheel is the drive wheel and is attached to the mot...

Страница 11: ...a minimum The guides above the table are fitted to a shaft that has vertical adjustment The upper guides are adjustable so that the guides are held just above the job being cut This gives the blade t...

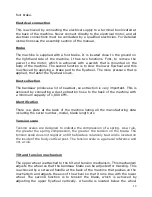
Страница 12: ...cting a dust extraction hose to the back of the machine with a minimum capacity of 1 000 CFM Identification There is a plate at the back of the machine listing all the manufacturing data including the...

Страница 13: ...e blade and also the thickness of the cut Where to locate your bandsaw Before you remove your bandsaw from the pallet select the area where you will use your machine There are no hard and fast rules f...

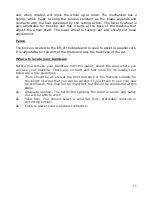
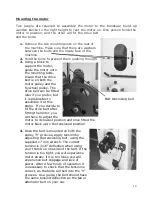
Страница 14: ...bandsaw prior to removing the bandsaw from the pallet see mounting motor If you decide to remove the bandsaw prior to assembling the motor to the bandsaw ensure that there is no tension on the motor w...

Страница 15: ...rocedure that you feel is unsafe or that you do not have the physical capability of achieving With two or more people move the machine so that the base of the bandsaw is over the edge of the pallet Ti...

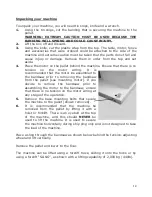
Страница 16: ...efer but it is preferable to assemble it at this stage If you decide to fit the drive belt after fitting the motor you will have to adjust the motor to its lowest position and once fitted the motor ba...

Страница 17: ...e shaft through the base of the bandsaw 3 Fit the wheels washers and split pins as shown on both sides of the base 4 Fit the front bracket as shown Note the number of holes in the bracket may vary dep...

Страница 18: ...low the blade to pass through the hole Loosen the lock down handle using the supplied wrench Crank the trunnion gear so that the table moves to the required angle and lock in position To return the ta...

Страница 19: ...re that the job is supported efficiently and safely When the insert is replaced you will have to sand the sides so that the insert fits correctly in the table hole You will also have to cut the blade...

Страница 20: ...re locking in position with the ratchet handle provided Note The aluminum fence can be fitted so that it can be used in high or low position also covered later in the manual Dust collection The bandsa...

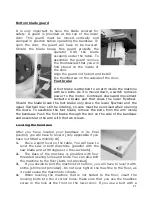
Страница 21: ...be exercised when opening the doors To assemble the foot brake remove the bolts from the arm inside the bandsaw Push the foot brake through the slot on the side of the bandsaw and assemble to the arm...

Страница 22: ...22 head the door will not be able to be opened 5 Adjust the bolts so that the machine is level in both planes and does not rock...

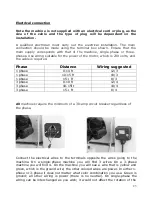
Страница 23: ...e 0 10 ft 12 3 1 phase 10 15 ft 10 3 1 phase 15 ft 8 3 3 phase 0 10 ft 12 4 3 phase 10 15ft 10 4 3 phase 15 ft 8 4 All machines require the minimum of a 30 amp circuit breaker regardless of the phase...

Страница 24: ...phase supply is predetermined during production On a 3 phase machine the lower wheel must rotate in a clockwise rotation If it rotates in a counterclockwise direction you need to swap locations of 2 o...

Страница 25: ...The guards protect you from coming in contact with the blade 9 Make sure that the saw blade teeth point downward towards the table 10 Adjust the upper blade guard so that it is just clearing the mate...

Страница 26: ...the time to check that all the safety switches are functioning correctly before you fit a blade Never complete the following tests with a blade fitted as it could cause injury 10 With the machine runn...

Страница 27: ...ing the blade 1 Uncoil the blade Remember to use gloves and safety glasses The blade may have dirt or oil on it so by using a clean rag clean the blade and pull rearwards so that the cloth does not ho...

Страница 28: ...Looking at the top wheel place your finger at the 9 o clock position Move your finger down 6 and using moderate pressure with your thumb press on the flat of the blade You should get 3 16 to of deflec...

Страница 29: ...29 removed from the machine 10 Plug the machine into the power turn the machine on for a second and switch off Watch how the blade runs If the blade tracks well then run the machine at full power...

Страница 30: ...isadvantage is that the wheel is crowned and the blade is not tensioned in the center of the band which gives the blade a tendency to wobble or flutter The advantage of running large blades on the cen...

Страница 31: ...porting the blade above and below the back blade guide giving the blade unsurpassed stability The Laguna Guide also incorporates patented ceramic as the blade support material The advantage of this ma...

Страница 32: ...lade and the ceramic occurs This action generates a certain amount of sparks This is normal and will reduce with time as the back of the blade guide smoothes out the back of the blade 4 The back blade...

Страница 33: ...r this reason it is recommended that the blocks be adjusted as close to the gullet as possible but the teeth must not come in contact with the blocks as they will become damaged Although the Guide blo...

Страница 34: ...t allow the guide assembly to move forward and back Adjust so that the ceramic blocks are just behind the gullet of the tooth and retighten the clamp screws 4 Gently push one side guide so that it tou...

Страница 35: ...ar bill or piece of paper of similar thickness between the guide blocks and the blade Gently bring both side guides towards the blade so that slight pressure is exerted on the blade Tighten the clamp...

Страница 36: ...36 Fitting cool block guide system Optional not supplied with the machine...

Страница 37: ...Resaw king blade from Laguna The blade has a lot of advantages such as superior surface finish to the cut thin kerf low wood wastage can be re sharpened will cut hard woods and a long life Ripping Ri...

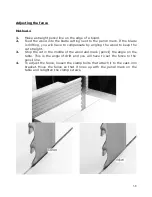
Страница 38: ...sate by angling the wood to keep the cut straight 3 Stop the cut in the middle of the wood and mark pencil the angle on the table This is the angle of drift and you will have to set the fence to the p...

Страница 39: ...s until you become skilled at the procedure Once you have mastered the process it should only take a minute to perform the adjustment Note Each blade has a slightly different drift and each time you c...

Страница 40: ...mall logs has great appeal to the woodworker These capabilities greatly enhance the woodworker s design ability without the need for additional equipment When a board is re sawed and the two pieces ar...

Страница 41: ...41...

Страница 42: ...will need a large selection of blades if you do a lot of varied work and fewer blades if you are concentrating on one section of band sawing such as re sawing Using the wrong blade is the best way to...

Страница 43: ...as ebony and rosewood require blades with a finer pitch than American hardwoods such as oak or maple Soft wood such as pine will quickly clog the blade decreasing its ability to cut Having a variety...

Страница 44: ...r the kerf the larger the amount of wood that is being wasted by the cut Hook or rake The cutting angle or shape of the tooth The greater the angle the more aggressive the tooth and the faster the cut...

Страница 45: ...ted below which is a good general selection and will tackle most jobs As you gain experience you will settle on the blades that suit you 1 6 T P I This is a small aggressive blade that is suitable for...

Страница 46: ...more pressure you put on the back the faster you will remove the metal Be careful that the inside of the machine is free of sawdust because sparks could start a fire On small blades such as a 1 8 blad...

Страница 47: ...too fine too many teeth per inch Certain woods will dull a steel blade very quickly specially tropical hardwoods teak koa etc Other woods with a high silicon content will also dull the blade quickly...

Страница 48: ...t a curve bigger than the dime but not smaller You can use everyday items such as coins or a pencil to determine which blade to use A quarter is the size of the tightest cut that can be made with a bl...

Страница 49: ...check that buildup is not happening especially the lower wheel The tires are made of rubber and wear just like car tires They wear in the middle which causes a concavity in the tire The deformation ma...

Страница 50: ...r wheel and re clamp with the allen screw It is better to replace the drive belt s early than to have a breakdown during an important job Table insert The table insert throat plate is made of plastic...

Страница 51: ...there is excessive play or it is too tight the following adjustment can be made 1 Loosen the 3 allen screws that clamp the vertical adjustment handle to the band saw 2 There is clearance in the holes...

Страница 52: ...bolts Loosen the top vertical bolt turn and tighten the bottom bolt Do not try to do big adjustments but rather complete several small adjustments Turn the wheel by hand and notice the change in posit...

Страница 53: ...el by hand and notice the change in position of the blade on the wheel Repeat the adjustment procedure if required Once the adjustment has been completed tighten the shaft locking screw If the left ha...

Страница 54: ...and back 6 Only if adjustment is needed loosen the two bolts on the guide plate move the guide back forward left right depending on the adjustment needed 7 Tighten the two bolts on the guide plate mov...

Страница 55: ...aker faulty Replace the breaker Motor tries to start but will not turn 1 With the power disconnected from the machine open the doors and try to turn the wheel by hand If the wheel is not turning check...

Страница 56: ...the tires 3 Wheels not co planning Adjust the lower wheel The blade kicks Bad blade Replace the blade The blade makes a clicking noise Bad weld Dress the weld or change the blade Blade overheats 1 Du...

Страница 57: ...ssories are available from Laguna Tools Miter gage Mobility kit Extension tables Work benches Tool cabinet wall mounted Tool cabinet floor standing Tool box Bandsaw blades Cool blocks Cast iron fence...

Страница 58: ...58 Electrical system drawing with switch ON knob...

Страница 59: ...59 Electrical system drawing with switch ON knob...

Страница 60: ...60 Electrical system drawing with push ON button...

Страница 61: ...61 Electrical system drawing with push ON button...

Страница 62: ...hine Model and serial number Part number required taken from the exploded view drawing on the following page Quantity required EXAMPLE TO ORDER LOWER FLY WHEEL FOR LT16HD Model LT16HD Part name Lower...

Страница 63: ......

Страница 64: ......

Страница 65: ......

Страница 66: ...TOP GUIDE BOTTOM GUIDE...

Страница 67: ...11 Rack support blade protection 24 16 16 3402080 Handle locking rack 25 16 16 5120500 Blade protection 26 16 16 5250020 Support of blade protection 27 16 16 Screw TCEI 8 8 UNI5931 M6X16 28 16 16 Scre...

Страница 68: ...n 82 16 16 Screw TCEI 8 8 UNI5931 M6x20 83 16 16 Screw TE 8 8 UNI5739 M12x70 84 16 16 Brake pad Group with 127 85 16 16 Screw TCEI 8 8 UNI5931 M10x25 86 16 16 Washer UNI6592 ZNT M10 10 5x21x2 87 16 16...

Страница 69: ...16 Screw TCEI 8 8 UNI5931 M6x20 145 16 16 5210008 Polycarbonate blade protection 147 16 16 5150200 Foot brake lever 148 16 16 5180001 Foot brake pedal 150 16 16 5210012 Side dust outlet 151 16 16 4505...

Страница 70: ...67 187 16 16 Nut UNI5588 PG ZNT M12 188 16 16 Washer M12 12 5x28x3 189 16 16 1030344 No rotation post plate 190 16 16 Screw TE 8 8 UNI5739 M6x16 191 16 16 5320100 Brake microswitch...

Страница 71: ...03 Rack support blade protection 24 18 18 3402080 Handle locking rack 25 18 18 5120501 Blade protection 26 18 18 5250020 Support of blade protection 27 18 18 Screw TCEI 8 8 UNI5931 M6X16 28 18 18 Scre...

Страница 72: ...n 82 18 18 Screw TCEI 8 8 UNI5931 M6x20 83 18 18 Screw TE 8 8 UNI5739 M12x70 84 18 18 Brake pad Group with 127 85 18 18 Screw TCEI 8 8 UNI5931 M10x25 86 18 18 Washer UNI6592 ZNT M10 10 5x21x2 87 18 18...

Страница 73: ...18 Screw TCEI 8 8 UNI5931 M8x16 145 18 18 5210008 Polycarbonate blade protection 147 18 18 5150200 Foot brake lever 148 18 18 5180001 Foot brake pedal 150 18 18 5210012 Side dust outlet 151 18 18 4505...

Страница 74: ...71 187 18 18 Nut UNI5588 PG ZNT M12 188 18 18 Washer M12 12 5x28x3 189 18 18 1030344 No rotation post plate 190 18 18 Screw TE 8 8 UNI5739 M6x16 191 18 18 5320100 Brake microswitch...

Страница 75: ...aft 23 20 20 5051104 Rack support blade protection 24 20 20 3402080 Handle locking rack 25 20 20 5120502 Blade protection 26 20 20 5250020 Support of blade protection 27 20 20 Screw TCEI 8 8 UNI5931 M...

Страница 76: ...ng 81 20 20 5150103 Doors connection 82 20 20 Screw TCEI 8 8 UNI5931 M6x20 83 20 20 Screw TE 8 8 UNI5739 M12x70 84 20 20 Brake pad Group with 127 85 20 20 Screw TCEI 8 8 UNI5931 M10x25 86 20 20 Washer...

Страница 77: ...Screw TCEI 8 8 UNI5931 M10x20 144 20 20 Screw TCEI 8 8 UNI5931 M8x16 145 20 20 5210008 Polycarbonate blade protection 147 20 20 5150206 Foot brake lever 148 20 20 5180001 Foot brake pedal 150 20 20 5...

Страница 78: ...Washer UNI6592 ZNT M10 10 5x21x2 187 20 20 Nut UNI5588 PG ZNT M12 188 20 20 Washer M12 12 5x28x3 189 20 20 1030344 No rotation post plate 190 20 20 Screw TE 8 8 UNI5739 M6x16 191 20 20 5320100 Brake...

Страница 79: ...Rack support blade protection 24 F50 RSM 3402082 Handle locking rack 25 F50 RSM 5120506 Blade protection 26 F50 RSM 5250020 Support of blade protection 27 F50 RSM Screw TCEI 8 8 UNI5931 M6X16 28 F50...

Страница 80: ...ion 82 F50 RSM Screw TCEI 8 8 UNI5931 M6x20 83 F50 RSM Screw TE 8 8 UNI5739 M12x70 84 F50 RSM Brake pad Group with 127 85 F50 RSM Screw TCEI 8 8 UNI5931 M10x25 86 F50 RSM Washer UNI6592 ZNT M10 10 5x2...

Страница 81: ...SM Screw TE 8 8 UNI5739 M12x35 141 F50 RSM Nut UNI5589 PG ZNT M12 142 F50 RSM Washer UNI6593 ZNT M10 11x40x2 5 143 F50 RSM Screw TCEI 8 8 UNI5931 M10x20 144 F50 RSM Screw TCEI 8 8 UNI5931 M8x16 145 F5...

Страница 82: ...plate 185 F50 RSM Screw TE 8 8 UNI5739 M10x16 186 F50 RSM Washer UNI6592 ZNT M10 10 5x21x2 187 F50 RSM Nut UNI5588 PG ZNT M12 188 F50 RSM Washer M12 12 5x28x3 189 F50 RSM 1030344 No rotation post plat...

Страница 83: ...aft 23 24 24 5151109 Rack support blade protection 24 24 24 3402080 Handle locking rack 25 24 24 5120503 Blade protection 26 24 24 5250020 Support of blade protection 27 24 24 Screw TCEI 8 8 UNI5931 M...

Страница 84: ...ng 81 24 24 5150107 Doors connection 82 24 24 Screw TCEI 8 8 UNI5931 M6x20 83 24 24 Screw TE 8 8 UNI5739 M12x70 84 24 24 Brake pad Group with 127 85 24 24 Screw TCEI 8 8 UNI5931 M10x25 86 24 24 Washer...

Страница 85: ...24 Screw TCEI 8 8 UNI5931 M10x20 144 24 24 Screw TCEI 8 8 UNI5931 M8x25 145 24 24 5210008 Polycarbonate blade protection 147 24 24 5150207 Foot brake lever 148 24 24 5180001 Foot brake pedal 150 24 24...

Страница 86: ...39 M10x16 186 24 24 Washer UNI6592 ZNT M10 10 5x21x2 187 24 24 Nut UNI5588 PG ZNT M12 188 24 24 Washer M12 12 5x28x3 189 24 24 1030344 No rotation post plate 190 24 24 Screw TE 8 8 UNI5739 M6x16 191 2...

Страница 87: ...0 shaft 23 28 5051104 Rack support blade protection 24 28 3402081 Handle locking rack 25 28 5120504 Blade protection 26 28 5250020 Support of blade protection 27 28 Screw TCEI 8 8 UNI5931 M6X16 28 28...

Страница 88: ...40006 Foot brake spring 81 28 5150115 Doors connection 82 28 Screw TCEI 8 8 UNI5931 M6x20 83 28 Screw TE 8 8 UNI5739 M12x70 84 28 Brake pad Group with 127 85 28 Screw TCEI 8 8 UNI5931 M10x25 86 28 Was...

Страница 89: ...x21x2 139 28 Screw TCEI 8 8 UNI5931 M10x20 140 28 Screw TE 8 8 UNI5739 M12x35 141 28 Nut UNI5589 PG ZNT M12 142 28 Washer UNI6593 ZNT M10 11x40x2 5 143 28 Screw TCEI 8 8 UNI5931 M10x20 144 28 Screw TC...

Страница 90: ...253 Table extension 184 28 1030382 Adjustment plate 185 28 Screw TE 8 8 UNI5739 M10x16 186 28 Washer UNI6592 ZNT M10 10 5x21x2 187 28 Nut UNI5588 PG ZNT M12 188 28 Washer M12 12 5x28x3 189 28 1030344...

Страница 91: ...051105 Rack support blade protection 24 32 3402081 Handle locking rack 25 32 5120504 Blade protection 26 32 5250021 Support of blade protection 27 32 Screw TCEI 8 8 UNI5931 M6X16 28 32 Screw TSPEI 10...

Страница 92: ...Nut UNI5588 PG ZNT M12 76 32 Screw TE 8 8 UNI5739 M12x60 77 32 Locknut DIN985 PG ZNT M10 79 32 Washer UNI6593 ZNT M6 6 6x18x2 80 32 5140006 Foot brake spring 81 32 5150119 Doors connection 82 32 Scre...

Страница 93: ...ottom wheel brush Group with 134 136 32 Screw TCEI 8 8 UNI5931 M6x10 137 32 Washer UNI6592 ZNT M6 6 4x12 5x1 6 138 32 Washer UNI6592 ZNT M10 10 5x21x2 139 32 Screw TCEI 8 8 UNI5931 M10x20 140 32 Screw...

Страница 94: ...91 188 32 Washer M12 12 5x28x3 189 32 1030344 No rotation post plate 190 32 Screw TE 8 8 UNI5739 M6x16 191 32 5320102 Brake microswitch...

Страница 95: ...Seeger D 35 shaft 23 37 5051107 Rack support blade protection 24 37 3402082 Handle locking rack 25 37 5120505 Blade protection 26 37 5120059 Support of blade protection 27 37 Screw STEI UNI5923 M8x16...

Страница 96: ...12 All thread Screw M12x80 74 37 Washer UNI6592 ZNT M18 19x34x3 75 37 Nut UNI5589 PF ZNT M18 76 37 Screw TE 8 8 UNI5740 M18x70 77 37 Locknut DIN985 PG ZNT M10 79 37 Washer UNI6593 ZNT M6 6 6x18x2 80 3...

Страница 97: ...C 7505A ZNT 4x20 134 37 Brush support Group with 135 135 37 5400003 Bottom wheel brush Group with 134 136 37 Screw TCEI 8 8 UNI5931 M6x10 137 37 Washer UNI6592 ZNT M6 6 4x12 5x1 6 138 37 Washer UNI659...

Страница 98: ...7 Washer UNI6592 ZNT M10 10 5x21x2 187 37 Nut UNI5589 PF ZNT M18 188 37 Washer UNI6592 ZNT M18 19x34x3 189 37 1030753 No rotation post plate 190 37 Screw TE 8 8 UNI5739 M6x16 191 37 5320102 Brake micr...

Страница 99: ......
Страница 100: ...ations subject to change Machines may be shown with optional accessories 2018 Laguna Tools Inc LAGUNA and the LAGUNA Logo are the registered trademarks of Laguna Tools Inc All rights reserved 2072 Alt...

Отзывы: