


HUMMEL
®
01.12.2012
English / Englisch
7
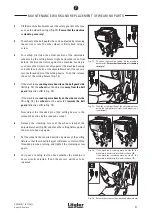
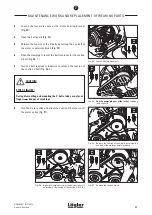
Tighten the screw of the unsprung bearing pedestal side
(Fig. 84, 1.).
8
Turn the screw on the sprung side of the tensioning roller
(Fig. 84, 2.) far enough so that the tensioning roller is
positioned parallel to the upper part of the drive unit (Fig. 85).
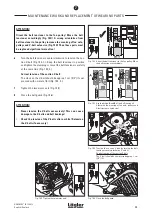
9
Tighten the lock nuts of the fixing screws!
CAUTION!
RISK OF INJURY and RISK OF PROPERTY DAMAGE from rotating
parts of the machine:
If the lock nuts of the fixing screws are not tightened, they will
loosen during operation of the machine and fall on rotating
parts!
ATTENTION!
If the lock nuts of the fixing screws are not tightened, the
tensioning roller can move out of place! This cause negative
effects to the sanding result!
10
Remount the drive unit (
Section 7.1.1, Dismantling and
cleaning of drive unit
)
.
11
Check the sanding belt tracking (
Section 7.3.1, Checking
the sanding belt tracking
)
.
MAINTENANCE WORK AND REPLACEMENT OF WEARING PARTS
7
Fig. 84
Tighten the side without spring (1.) and then the
side with spring (2.), so that …
Fig. 85
… the tensioning roller is positioned parallel to
the top of the drive unit.
40
Содержание HUMMEL
Страница 56: ...HUMMEL 01 12 2012 English Englisch SPARE PARTS 56 11...
Страница 58: ...HUMMEL 01 12 2012 English Englisch SPARE PARTS 58 11...
Страница 60: ...HUMMEL 01 12 2012 English Englisch SPARE PARTS 60 11...
Страница 64: ...HUMMEL 01 12 2012 English Englisch SPARE PARTS 64 11...
Страница 66: ...HUMMEL 01 12 2012 English Englisch SPARE PARTS 66 11...
Страница 68: ...HUMMEL 01 12 2012 English Englisch NOTES 68...
Страница 69: ...HUMMEL 01 12 2012 English Englisch NOTES 69...
Страница 70: ...HUMMEL 01 12 2012 English Englisch NOTES 70...