laerdal SimMan 3G Скачать руководство пользователя страница 4


OVERVIEW


RFID Antennae 

Bleeding ports 

Speakers 

ECG Connectors 

Defib Connectors 

Pulses 

Содержание SimMan 3G

Страница 1: ...Laerdal SimMan 3G Maintenance Guide Tasmanian Simulation Collaborative February 2016...

Страница 2: ...the Patient Simulator and PCs 10 Clean the Skin 10 Cleaning of IV Arm 11 Replacing Crico Tape Neck Skin 11 Replacing Chest Drain Pleura 12 MOTHLY MAINTENANCE 13 Cleaning Fluid System 13 Flush the sys...

Страница 3: ...n this booklet is taken from Laerdal website www laerdal com au and based on our experience Please note TCEN or TSC does not take any responsibility for any damage caused to your manikin It is the sol...

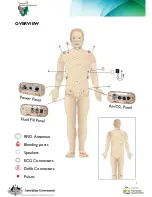
Страница 4: ...4 OVERVIEW RFID Antennae Bleeding ports Speakers ECG Connectors Defib Connectors Pulses...

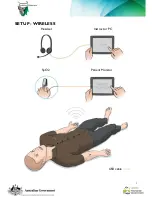
Страница 5: ...5 SETUP WIRELESS Headset Instructor PC SpO2 Patient Monitor USB cable...

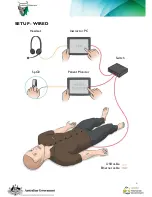
Страница 6: ...6 SETUP WIRED Headset Instructor PC SpO2 Patient Monitor USB cable Ethernet cable Switch...

Страница 7: ...2 B Lift the flap on the right hand side of SimMan 2 C Ensure the power cord is connected and then press the power button 3 A Patient Monitor 3 B To connect manikin wirelessly Select Simman3g uacuf6 3...

Страница 8: ...below 3 B Ensure SimMan s eyes are closed 3 A Press the power button and wait 30 seconds The power cord can remain connected and power supply turned on for charging SimMan Left click the Main Setup b...

Страница 9: ...f the SimMan3G Patient Simulator IV Arm The IV fluid system is an open system on the right arm only IV fluids must be drained as they are administered and we suggest you use a general 2L drainage bag...

Страница 10: ...used drain the internal fluid reservoir See Empty Internal Fluid Reservoir Blood System When the day s sessions are done flush the Blood System with distilled or de ionized water with the wounds conn...

Страница 11: ...syringe filled with Isopropanol 60 70 to the IV catheter and flush the IV Arm System with it 3 Connect a syringe filled with air to the IV catheter and flush the IV Arm until only air exits the overfl...

Страница 12: ...e while ventilating the Patient Simulator Replacing Chest Drain Pleura The chest drain module s pleura skin should be replaced after each use 1 Open the Torso Skin and remove the module from the chest...

Страница 13: ...the filling of air into the internal reservoir will start 5 We recommend covering the simulator s head with a towel as pumping air through the system might cause some squirting 6 With the fill button...

Страница 14: ...ill bottle Cleaning Blood System Empty the system for water 1 Ensure that the simulator s power is ON 2 Ensure that the simulator s internal blood reservoir is drained See Empty Internal Fluid Reservo...

Страница 15: ...fill button will be off 13 Leave the isopropanol fill bottle connected for approx 30 seconds to let the internal reservoir drain completely 14 In LLEAP uncheck all boxes and move the sliders all the w...

Страница 16: ...16 www tcen com au tcen dhhs tas gov au 03 6233 2756...

Отзывы: