


14
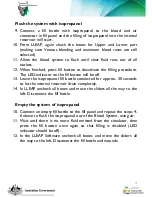
12.
When the system is flushed with isopropanol, press fill the button
again to deactivate the filling of isopropanol to the reservoir. The
LED indicator on the fill button will now be off.
13.
Leave the isopropanol fill bottle connected for approx. 30 seconds
to let the internal reservoir drain completely.
14.
Uncheck all of the secretion boxes in LLEAP and disconnect the fill
bottle.
Empty the system of isopropanol
15.
Connect an empty fill bottle to the fill panel and repeat steps 3-7
above to get the isopropanol out of the fluid system, using air.
16.
Press the fill button once again so that filling is disabled (LED
indicator should be off) and disconnect the empty fill bottle
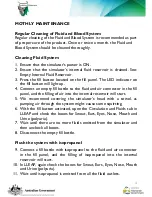
Cleaning Blood System
Empty the system for water
1.
Ensure that the simulator’s power is ON.
2.
Ensure that the simulator’s internal blood reservoir is drained.
See: Empty Internal Fluid Reservoir.
3.
Connect Laerdal Wounds to blood outlets. See Connecting Wound
kits.
4.
Press the fill button located on the fill panel. The LED indicator on
the fill button will light up.
5.
Connect an empty fill bottle to the blood and air connector in the
fill panel, and the filling of air into the internal reservoir will start.
6.
With the fill button activated; open the Circulation and Fluids tab in
LLEAP. Check the boxes for Upper and Lower port, then select
Venous from the adjacent drop-down menus. Move the sliders to
the right to get maximum bleeding rates.
7.
Wait until there is no more blood emitted from the simulator, then
uncheck all boxes.
8.
Disconnect the empty fill bottle.
Содержание SimMan 3G
Страница 1: ...Laerdal SimMan 3G Maintenance Guide Tasmanian Simulation Collaborative February 2016...
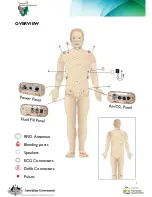
Страница 4: ...4 OVERVIEW RFID Antennae Bleeding ports Speakers ECG Connectors Defib Connectors Pulses...
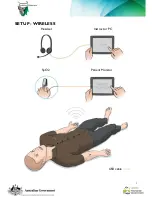
Страница 5: ...5 SETUP WIRELESS Headset Instructor PC SpO2 Patient Monitor USB cable...
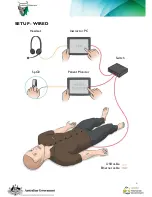
Страница 6: ...6 SETUP WIRED Headset Instructor PC SpO2 Patient Monitor USB cable Ethernet cable Switch...
Страница 16: ...16 www tcen com au tcen dhhs tas gov au 03 6233 2756...


