laerdal SimMan 3G Скачать руководство пользователя страница 4

6

7

FEATURES


FEATURES


General

Main Anatomical Features

Dimensions (Patient Simulator only):
1800mm (l) x 550mm (w) chest (5. 90 ft x 1.80 ft) 
Weight (Patient Simulator only): 38.5kg (85 lbs)
Weight (with clothes): 40 Kg (88 lbs)
Default male body with interchangeable genitalia pads

Configurable Anatomical Features

Genitalia

The Patient Simulator comes with a neutral genitalia pad as default.  
The pad can be changed for a male or female module, both included 
with the SimMan 3G System. 

See Changing the Genitalia Modules


section

.

Teeth

Patient Simulator comes with a set of soft teeth as default. These can 
be exchanged for a hard set of teeth, included with the 

SimMan 3G


System. 

See Changing upper dentures 

section

.

Trauma Modules/Limbs

Left leg - amputation and bleeding module (optional accessory).
Right arm - amputation and bleeding module (optional accessory)
The SimMan 3G arm adaptor kit is used to connect the trauma arm 
modules.

Contact your local Laerdal representative to enquire about other 
trauma modules compatible with 

SimMan 3G

.

Mobility of Joints

Neck: 

Movement can be on a 3-axis movement of head.   


Range of movement can be restricted. 

See Airway  

 Features

 section

.

Shoulders:  

3-axis rotation

Lumbar: 

1-axis

Elbows: 

Fixed, no mobility 

Wrists: 

3-axis rotation 

Thumbs: 

Free mobility

Hip joints: 

3-axis rotation

Knees: 

1-axis rotation

Ankles: 

1-axis rotation 


Note: Do not remove protective bushings at shoulder or lower back. 
These are present to protect users from pinch points.

Laerdal Simulation Software

To run a simulation, LLEAP (Laerdal Learning Application) must be 
started from Laerdal Simulation Home on the Instructor PC.

Laerdal Simulation Home

Laerdal Simulation Home is an application from where LLEAP and 
other Laerdal programs related to patient simulation can be found 
and started. Also the help files can be opened from here. Laerdal 
Simulation Home is located in the Laerdal Medical folder under the 
Windows start menu (Windows 7).

Software used in a simulation session comprises the following main 
applications:

− 

LLEAP (Laerdal Learning Application)

− 

Voice Conference Application

− 

Patient Monitor

− 

SimView Server or Session Viewer

SimDesigner and other applications are also used for designing or 
preparing a simulation.

LLEAP

LLEAP is the instructor’s application from where the simulation 
session is run, controlled and monitored. LLEAP can be operated 
in Automatic or Manual mode. Automatic mode is used for 
pre-programmed scenarios while Manual mode allows the instructor 
full manual control of the simulation session. Running simulations in 
Manual Mode requires some medical expertise to create clinically 
sound simulations.

Voice Conference Application

The VCA software allows the instructor to communicate through 
the simulator during the session. VCA can also be used to 
communicate with other instructors on a network, and create 
separate channels where only members can communicate.

Patient Monitor

The Patient Monitor application emulates a typical hospital patient 
monitor. It is the learner’s console and can be set up and controlled 
by the instructor, as well as by the learner through on-screen touch 
menus.

Session Viewer and SimView Server

Session Viewer and SimView Server are applications that record 
video and patient monitor screen captures during simulation, in 
addition to providing an interface to debrief your session. After a 
session is ended, log files generated in LLEAP are transferred and 
merged with the video files in Session Viewer or SimView Server for 
the debrief.

Session Viewer typically runs locally on the same computer as used 
for LLEAP, SimView Server runs on a dedicated server in the local 
network. During the first start-up of LLEAP, you are prompted to 
select a debriefing system available on your computer or on a local 
network. This can be changed later. 
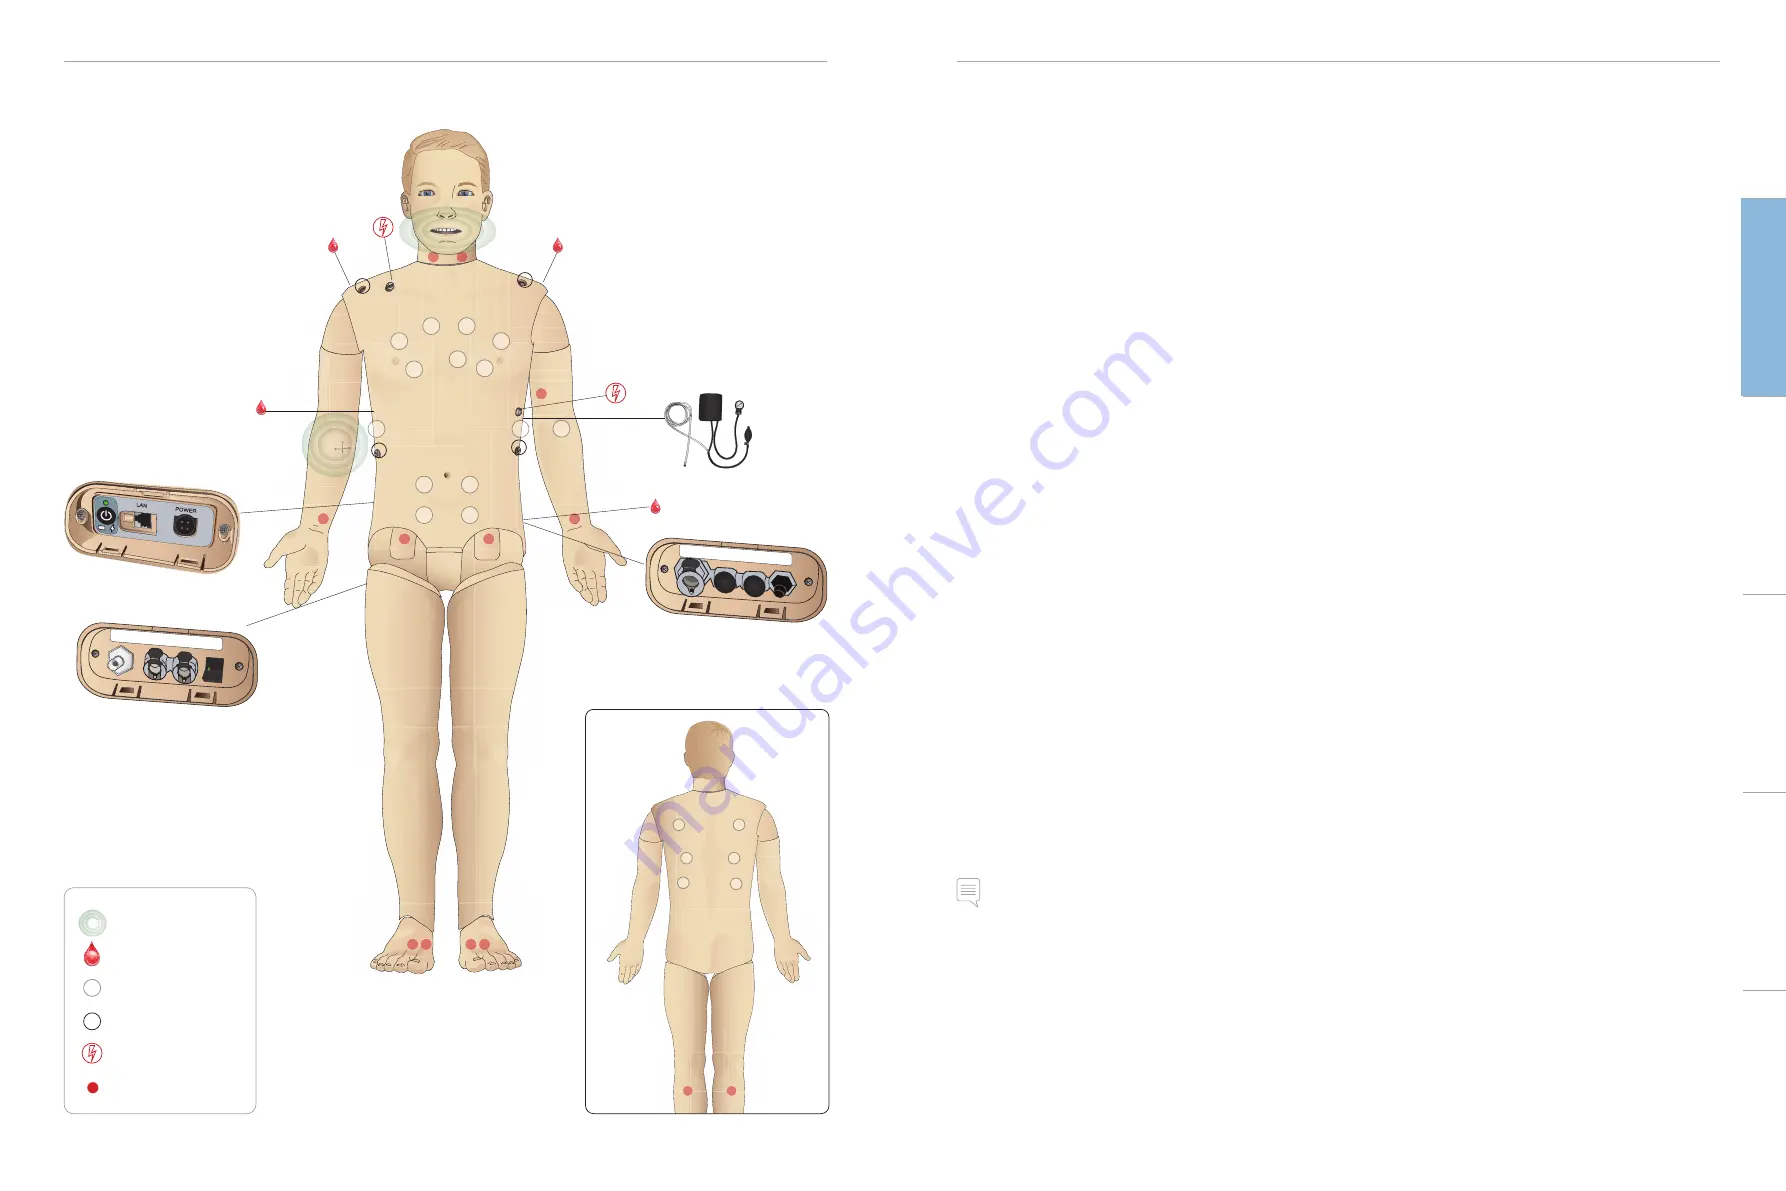
SimMan 3G Overview

Power Panel

Fluid Fill Panel

DC Input 9-24V X, XA

Fluid

Inlet

Air Out

Blood

Inlet

Activate

Filling

RFID Antennae

Bleeding ports

Speakers

ECG Connectors

Defib Connectors

Pulses

Cautions 

and 

W

arnings

Featur

es

Setup

Maintenance

Spar

e Par

ts

Tr

oubleshooting

Air/CO

2

 Panel

Air / CO

2

Inlet

Blood

Outlet

Содержание SimMan 3G

Страница 1: ...SimMan 3G User Guide www laerdal com EN...

Страница 2: ...LLEAP 22 RFIDTag Setup 23 Using RFIDTags 23 Connecting Defibrillation Adapter Plates 24 Connecting the Blood Pressure Cuff 25 Calibrating the Blood Pressure Cuff Using LLEAP 25 Connecting the SpO2 Pro...

Страница 3: ...the internal tubing and cabling is disconnected Never use the Patient Simulator outdoors in wet conditions as this may pose a shock hazard or damage the simulator Never use the Patient Simulator in te...

Страница 4: ...ulation session comprises the following main applications LLEAP Laerdal Learning Application Voice Conference Application Patient Monitor SimView Server or SessionViewer SimDesigner and other applicat...

Страница 5: ...geal swelling Laryngospasm Decreased cervical range of motion Trismus Teeth soft upper dentures may be replaced with a hard set of teeth for enhanced realism while practicing intubations During simula...

Страница 6: ...can be made See LLEAP Help for further information Sounds Two types of sounds can be used in a scenario Body sounds Vocal Sounds The sounds can be triggered by the scenario or controlled by the instr...

Страница 7: ...the clips on either side 2 Insert both batteries into the battery tray 3 Snap the battery clamp back into place over the batteries 4 Connect the corresponding battery cables from the batteries to the...

Страница 8: ...arging time is approximately 3 hours The external battery charger should only be used with SimMan 3G batteries Charger light showing battery sign Light Code Light Color Characteristic Standby Yellow S...

Страница 9: ...Patient Simulator is stationary over extended periods of use If the Patient Simulator is required to exhale CO2 with each ventilation connect external CO2 Connect CO2 only if the Patient Simulator is...

Страница 10: ...he button will light and blood will flow into the Patient Simulator 4 Charge the system for 60 seconds before starting bleeding simulation Warning Connecting a full blood fill unit to a Patient Simula...

Страница 11: ...this process for as many times as is necessary Note If the external fill unit runs empty during a bleeding scenarios air will be introduced to the blood system causing inaccurate reading The IV Cathe...

Страница 12: ...carry an RFID tag RFID tagging Syringes Airway Devices The RFID tags come as part of the SimMan 3G Drug and Airway Tag Kit Tags are pre printed with information to identify drugs drug concentration or...

Страница 13: ...not defibrillate the Patient Simulator without the torso skin Warning Do not defibrillate the Patient Simulator in a flammable or oxygen enriched atmosphere Warning The Patient Simulator torso must a...

Страница 14: ...e soft set may be replaced with a hard set of teeth 1 Remove the teeth from the mouth 2 Align the new set of teeth with the gums and push them back until the teeth engage and lock onto the gums 3 Ensu...

Страница 15: ...default leg OpenTorso Skin and stomach foam as shown in Maintenance 2 Unscrew hip joint connector Remove the leg cables and tubes from the connector 3 Carefully remove the left leg with cables and tub...

Страница 16: ...obility Note The SimMan 3G System exceeds the weight allowance on most commercial airlines Some parts may have to be transported separately For more information on weight restrictions contact the rele...

Страница 17: ...flushed with isopropanol press fill the button again to deactivate the filling of isopropanol to the reservoir The LED indicator on the fill button will now be off 13 Leave the isopropanol fill bottl...

Страница 18: ...a new router attach the power cable to the DC plug and the Ethernet cables back into the router again Opening theTorso Open the Patient Simulator torso for the following procedures Attaching or Repla...

Страница 19: ...5 Tighten the shoulder screw with the Allen wrench LAPULSES BP LACONV P B L BP PULSES L L LA B 6 Connect the arm cables to the corresponding connection points in the torso Left Arm toTorso Cable andT...

Страница 20: ...ns the bladders may need replacement 1 Open theTorso Skin to expose the chest plate Lift the chest plate to reveal the pneumothorax bladders located in slots in the side of the chest plate assembly 2...

Страница 21: ...skins easier To prevent the zippers from separating from the skin make sure to properly position the skin halves and hold them together while zipping them closed Replacing Blood System Filter If reduc...

Страница 22: ...d or are leaking See Opening the Torso In case of fluid leakage power off the Patient Simulator and contact LaerdalTechnical Service Problem Identifying a single Patient Simulator when there are multi...

Страница 23: ...nt Simulator internal pkg 2 212 12350 Thigh joint connector 212 12450 Battery clip Patient Simulator internal 212 12550 Panel cover left and right 381107 SoftTeeth 212 14250 Arm Adaptor SimMan SimMan...

Страница 24: ...20 07890 Rev D 2016 Laerdal Medical AS All rights reserved Manufacturer Laerdal Medical AS P O Box 377 Tanke Svilandsgate 30 4002 Stavanger Norway T 47 51 51 17 00 www laerdal com...

Отзывы: