background image

Rugged RAID User Manual

10

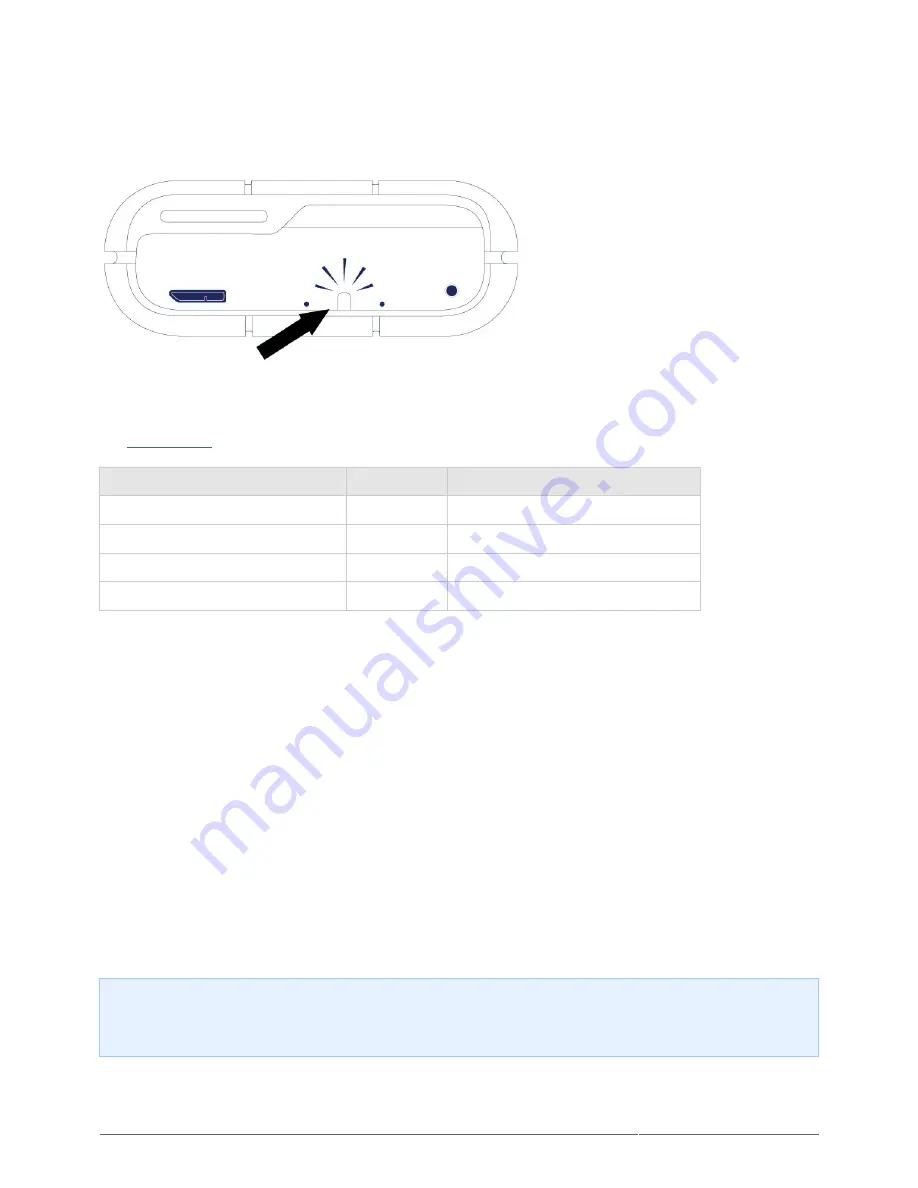
RAID LED

Use a thin, pointed object to push the RAID select and RAID confirm buttons. For example, use the pointed end
of a paperclip to access and push the buttons.
See 

Manage RAID

 for instructions on how to check or change the RAID level.

Action

Behavior

State

Push once on the RAID select button Solid white

The device is set to RAID 0.

Push once on the RAID select button Blinking white The device is set to RAID 1.

Push twice on the RAID select button Solid white

The device will be changed to RAID 0.

Push twice on the RAID select button Blinking white The device will be changed to RAID 1.

RECEIVING POWER

Thunderbolt connection

The LaCie Rugged RAID powers on automatically when it is connected to a computer that supports Thunderbolt
technology. Use the embedded Thunderbolt technology cable when connecting the Rugged RAID to a computer.

USB 3.0

The power cable must be connected to an active outlet when using the Rugged RAID’s USB 3.0 port.

Note on the USB 3.0 connection: The Rugged RAID can be connected to a USB 2.0 port on your computer.
To take advantage of SuperSpeed USB 3.0 transfer rates, you must connect the Rugged RAID to a computer
with a USB 3.0 port.


Содержание RUGGED RAID

Страница 1: ...Manual 1 RUGGED RAID USER MANUAL Click here to access an up to date online version of this document You will also find the most recent content as well as expandable illustrations easier navigation and search capability ...

Страница 2: ...Rugged RAID User Manual 2 ...

Страница 3: ... connecting your LaCie product If you have questions consult the Getting Help page BOX CONTENT LaCie Rugged RAID with integrated Thunderbolt cable USB 3 0 cable USB 2 0 compatible Removable cover and spare Power supply see note below Quick Install Guide Complete software suite Important info Save your packaging In the event that the drive should need to be repaired or serviced it must be returned ...

Страница 4: ...orted by equipment and devices Users should review the IP two digit code to understand the conditions that the device can withstand The two digits are independent with each number representing a different level of protection Your LaCie Rugged RAID is rated IP 54 5 Protection against dust from entering the device s internal mechanism 4 Protection against splashing water from any angle The LaCie Rug...

Страница 5: ...ROTECTOR The removable cover on the LaCie Rugged RAID offers enhanced protection for the device s ports To remove the cover place your index finger on its left edge and gently pry it open The Thunderbolt cable remains attached to the cable fastener on the cap ...

Страница 6: ...nsport 1 Protects the Thunderbolt cable end and the USB 3 0 port 2 It is highly recommended to attach the cover when Transporting the LaCie Rugged RAID The integrated Thunderbolt cable is in use The removable cover cannot be fastened to the LaCie Rugged RAID when using the USB 3 0 port ...

Страница 7: ...d RAID User Manual 7 INTERFACES USB 3 0 1 Power 2 Thunderbolt cable 3 Important info regarding USB 3 0 The power cable must be connected to an active outlet when using the USB 3 0 port LEDS Activity 1 RAID 2 ...

Страница 8: ... 1 RAID confirm 2 To maintain your Rugged RAID s IP54 rating the RAID select and confirm buttons are located within small recesses When checking or changing the RAID level use the pointed end of a paperclip to push a button For details see Manage RAID ...

Страница 9: ...er experiencing system failure or experiencing electronic board failure Contact LaCie technical support if The LED remains off but the device is connected to a power supply and to your computer Confirm that the Rugged RAID is not in sleep mode before contacting LaCie technical support The LED continues to blink red One or both of your hard drives may have failed Do not swap one or both hard drives...

Страница 10: ...device will be changed to RAID 0 Push twice on the RAID select button Blinking white The device will be changed to RAID 1 RECEIVING POWER Thunderbolt connection The LaCie Rugged RAID powers on automatically when it is connected to a computer that supports Thunderbolt technology Use the embedded Thunderbolt technology cable when connecting the Rugged RAID to a computer USB 3 0 The power cable must ...
Страница 11: ...tions Choose a power plan Change advanced power settings Click on Hard disk and Turn off the hard disk after Choose the time to spin down USB hard drives To exit power saving mode review the table below Entering power saving mode Exiting power saving mode The host computer placed the product into power saving mode due to inactivity Access the Rugged RAID s volume on the host computer For example c...

Страница 12: ... a storage peripheral or a display to a Thunderbolt port However it s not possible to use a mini DisplayPort cable to connect a storage peripheral to a Thunderbolt port You must use a Thunderbolt cable For more information see www lacie com Connector Face to computer Cable End to computer Integrated cable For ease of access the Thunderbolt cable is integrated on your LaCie Rugged RAID Remove the i...

Страница 13: ...redecessor Your LaCie drive is shipped with a SuperSpeed USB 3 0 cable to ensure maximum data transfer performance when connected to a compatible USB 3 0 port The cable will also work when connected to a USB 2 0 or 1 1 port but drive performance will be limited to their respective transfer rates Connector Face to Computer Cable End to Computer Cable End to Hard Drive Connector Face to Hard Drive N...

Страница 14: ...UNDERBOLT AND WINDOWS Important info Thunderbolt technology is compatible with Windows 7 and Windows 8 Windows requires a driver to use the Thunderbolt port For the initial setup connect the product to a host computer via USB and run LaCie Setup Assistant see Step 2 Launch LaCie Setup Assistant You can connect via the Thunderbolt interface once LaCie Setup Assistant has successfully formatted your...

Страница 15: ...hunderbolt driver when prompted by LaCie Setup Assistant Once the driver is installed you can connect the Rugged RAID to your PC via Thunderbolt Important info on USB 3 0 The power cable must be connected to an active outlet when using the Rugged RAID s USB 3 0 port Thunderbolt Remove the cover by placing your index finger on its left edge and gently prying it open Use caution since 1 the Thunderb...

Страница 16: ...rive mounts on your desktop Mac 4 Replace the cover on the LaCie Rugged Doing so maintains the LaCie Rugged s IP 54 rating 5 If the Rugged RAID s Setup volume does not mount on your computer see troubleshooting topics at Getting Help ...

Страница 17: ...edge and gently prying it open Use caution since 1 the Thunderbolt cable is held by a fastener on the removable cover Connect the included power cable in the following order 2 The Rugged RAID 1 An active outlet 2 Use the included USB 3 0 cable to connect the Rugged RAID in the following order 3 ...

Страница 18: ... on your computer 1 The USB port on the Rugged RAID 2 The drive mounts in Computer Windows Vista Windows 7 and Windows 8 or on your desktop Mac 4 If the Rugged RAID s Setup volume does not mount on your computer see troubleshooting topics at Getting Help ...

Страница 19: ...B 3 0 connections The power cable must be connected to an active outlet when using the Rugged RAID s USB 3 0 port Since the cover cannot be replaced when using the USB 3 0 connection the Rugged RAID s IP 54 rating is not in effect ...

Страница 20: ...e device according to your needs Copy the user manual to your computer Install software for added features Register your LaCie device Important info If you do not launch LaCie Setup Assistant or if you quit it after the formatting has begun your drive will not be ready to use and will require manual formatting In such a case the user manual and utilities must be downloaded from the LaCie website w...

Страница 21: ...Rugged RAID User Manual 21 Manual access Open the LACIE SETUP volume in Computer and double click LaCie Setup Mac users Open the LACIE SETUP volume on your desktop and then double click LaCie Setup ...

Страница 22: ...rs While running LaCie Setup Assistant you may see a User Account Control dialogue asking if you wish to change your computer s settings This is a normal request when formatting a disk or installing certain software such as Genie Timeline To successfully complete LaCie Setup Assistant LaCie recommends that you agree to change the settings Important info for Mac users You may be prompted to enter y...

Страница 23: ...nt position or adjust it to the left Doing so creates two partitions one for use with your operating system only and the other for use with Windows and Mac The first partition s format is NTFS for Windows or HFS for Mac The second partition s format is FAT32 Note on FAT32 While FAT32 partitions can be used on Windows and Mac it has a file size limitations of 4GB Further FAT32 is not optimized for ...

Страница 24: ...Rugged RAID User Manual 24 Mac A prompt alerts you that the disk will be formatted Select Yes to continue 5 Windows Mac Register your LaCie device Choose Next to continue 6 New Account ...

Страница 25: ...h to close the program 9 LaCie software utilities can be installed at any time Once the format is complete the LaCie Setup Assistant application is available on one of the following partitions LaCie If you created one partition Compatible If you created two partitions To install the software utilities launch LaCie Setup Assistant and follow the steps listed above Note on RAID level The default RAI...

Страница 26: ...y Protection Speed Factory default RAID 0 100 None Excellent Yes RAID 1 50 Excellent Good No RAID 0 RAID 0 is the fastest RAID mode In a RAID 0 array the available capacities of each hard drive are added together so that one logical volume mounts on the computer It offers the best performance but no data protection should a hard drive fail ...

Страница 27: ...le hard drive failure data remains available on the other hard drive Due to the time it takes to write the data twice performance is reduced when compared to RAID 0 RAID 1 is a good choice when safety is more important than speed However RAID 1 also reduces the available drive space by 50 due to the need to write every bit of data to each hard drive ...

Страница 28: ...hat the Rugged RAID is connected to a computer and powered on Locate a thin pointed object such as the end of a paperclip Follow the steps below Use the pointed end of the paperclip to push the RAID select button The RAID select button is located within 1 a small recess The RAID LED 2 Turns solid if the device is set to RAID 0 Blinks if the device is set to RAID 1 The RAID LED provides the current...

Страница 29: ...sitive Unmount the LaCie Rugged RAID s volumes from your computer see Unmounting Your Hard Drive 1 Use the pointed end of the paperclip to push the RAID select button two times Make certain that the second 2 push is applied immediately after the first push The RAID LED 3 Turns solid if the device will be changed to RAID 0 Blinks if the device will be changed to RAID 1 Use the pointed end of the pa...

Страница 30: ... use with your computer see Optional Formatting and Partitioning Important info If the RAID mode has not been changed you can try the steps again When following the steps make certain to push the RAID confirm button as soon as the LED indicates your preferred RAID mode ...

Страница 31: ...click the Rugged RAID s volume in Computer Windows or on the Desktop Mac 1 Open the LaCie Software folder 2 Launch the installer located in the folder for your operating system 3 When setup is complete launch LaCie Desktop Manager from the system tray Windows or the menu bar Mac Windows Mac LaCie Desktop Manager provides a list of all compatible LaCie devices in the left hand column If you have mo...

Страница 32: ... Available capacity REFORMAT From the Info tab you can reformat the hard drives Caution Choosing Reformat launches your operating system s disk utility see Optional Formatting and Partitioning for details Formatting erases all data stored on your hard drives To protect files back up your hard drives before selecting Reformat ...

Страница 33: ...US TAB Review the health of the Hardware RAID configuration You can also enable alerts to receive status updates Important info Activating alerts may affect the transfer rates of your device For optimal transfer rates disable alerts ...

Страница 34: ... EMAIL TAB You can enter up to five email addresses to receive messages regarding changes to the status of your LaCie device You can also enter an email subject line Check the boxes to select the events that trigger email alerts ...

Страница 35: ... storage device as one large Mac OS Extended volume Mac OS Extended HFS Mac OS Extended refers to the file system used by Mac OS X HFS represents an optimization of the older HFS file system by using hard disk space more efficiently With HFS you are no longer limited by block size FAT32 FAT32 is an older format with a maximum single file size limited to 4GB Performance is far from optimal when usi...

Страница 36: ...s several features that are not available with FAT32 file compression encryption permissions auditing and mirroring drives The minimum supported volume size for NTFS is 10MB with a maximum of 2TB when initialized in the MBR format For greater flexibility use the GPT format with NTFS to remove limits on file and partition sizes Volumes created in NTFS are native read and write for Windows 7 and Win...

Страница 37: ...responsible for any data lost due to formatting partitioning or using a LaCie storage device Important Info Formatting the LaCie partition deletes the included user manual and utilities Copy all data including documentation and software from the LaCie partition before formatting your storage device User manuals and select software can also be downloaded from LaCie technical support Note Refer to y...

Страница 38: ...a format from the drop down window See About File System Formats for more information on 6 choosing a file format Give the volume a name 7 Click Erase and confirm your selection in the popup window 8 Windows Make sure the storage device is connected to the PC 1 Right click on Computer and choose Manage From the Manage window select Disk Management 2 From the list of storage devices in the middle o...

Страница 39: ...connected while the computer is running To prevent failures however it is important to follow these steps when disconnecting your device MAC Drag the storage device icon to the Trash The icon pictured below is a generic USB device icon Your LaCie storage may be represented by an icon that looks like the device itself When the icon disappears from the desktop the storage device can be disconnected ...

Страница 40: ...wer right hand side of your screen click on the plug icon note the white check mark inside a green circle A message will appear detailing the devices that may be safely unmounted Select Eject for the device you wish to unmount A message will appear notifying you that it is safe to remove it ...

Страница 41: ...port select your product then click the Troubleshooting tab 3 User Manual Includes common troubleshooting topics See Troubleshooting Topics below 4 Customer Support Create an account on lacie com register your product and fill out a support ticket Create an account here www lacie com us mystuff login htm logout rtn mystuff Note LaCie is dedicated to providing high quality products that enrich the ...

Страница 42: ...upport web page at LaCie technical support to check the minimum system requirements Q Is your computer s internal hard drive limiting transfer speeds A If your computer has a low performance internal hard drive typically a notebook or netbook computer it can limit the LaCie device s transfer speed Problem I m receiving file transfer error messages and or Time Machine does not work Q Did you get an...

Страница 43: ...rom my Thunderbolt hard drive Why isn t this reflected in the displayed available space A Disk space will not be reclaimed until the file is completely erased To remove the files forever empty your trash recycle bin Q Why is the volume capacity less than advertised on the Thunderbolt storage hard drives only A After formatting the available capacity of a drive will show less than advertised on the...

Страница 44: ...lease note that legacy Macs with Mini DisplayPorts do not support Thunderbolt technology peripherals such as the LaCie Thunderbolt storage Q Why doesn t my Thunderbolt product mount on my computer A Thunderbolt storage devices require cables specifically constructed for Thunderbolt technology Go to www lacie com for more information on cables that support Thunderbolt technology Q Did you follow th...

Страница 45: ...in Device Manager To access Device Manager click on Start and select Run from the menu In Windows Vista the Run option doesn t appear by default so press Windows button and R on your keyboard Enter the command devmgmt msc Click OK and the Device Manager program will open For troubleshooting look in the Disk Drives section It might be necessary to click on on the left side If you re not sure if you...

Страница 46: ...te or in the field Doing so will void the LaCie Rugged RAID s warranty Contact LaCie technical support to learn how best to repair the device Q The LED continues to blink red and I cannot access my data What should I do A A constant blinking red LED can mean that one or both hard drives have failed Unfortunately all data is lost if a hard drive fails in a RAID 0 configuration Do not swap one or bo...

Страница 47: ...000 000 Bytes Total accessible capacity varies depending upon operating environment typically up to 10 less per TB HEALTH AND SAFETY PRECAUTIONS Only qualified persons are authorized to carry out maintenance on this device Read this User Manual carefully and follow the correct procedure when setting up the device Do not open a disk drive or attempt to disassemble or modify it Never insert any meta...

Страница 48: ...as televisions radios or speakers Doing so may cause interference which will adversely affect the operation of the other products Do not place the LaCie hard drive near sources of magnetic interference such as computer displays televisions or speakers Magnetic interference can affect the operation and stability of your LaCie hard drive Never use excessive force on your LaCie hard drive If you dete...

Страница 49: ...n the equipment is used normally and is properly serviced when needed If you discover a defect covered by the warranty set forth above your sole and exclusive remedy will be for LaCie in its sole discretion to i repair or replace the product at no charge to you or if a repaired unit or replacement product is not available ii to refund the current market value of your product You acknowledge and ag...

Страница 50: ...l causes e to damage caused by operating the product outside the permitted or intended uses described by LaCie f to damage caused by service including upgrades and expansions performed by anyone who is not a representative of LaCie or a LaCie Authorized Service Provider g to a product or part that has been modified to alter functionality or capability without the written permission of LaCie or h i...

Страница 51: ...ie for repair LaCie cannot under any circumstances guarantee the integrity of data remaining on a returned drive We make no provisions for data recovery and cannot be held liable for any data loss on drives or media returned to LaCie All products returned to LaCie must be securely packaged in their original box and shipped with postage prepaid except for Products registered under the Advance Care ...

Страница 52: ...communications However there is no guarantee that interference will not occur in a particular installation If this equipment does cause harmful interference to radio or television reception which can be determined by turning the equipment off and on the user is encouraged to try to correct the interference by one of the following measures Reorient or relocate the receiving antenna 1 Increase the s...

Страница 53: ...or the shop where you purchased the product MANUFACTURER S DECLARATION FOR CE CERTIFICATION We LaCie solemnly declare that this product conforms to the following European standards Electromagnetic Compatibility Directive 2004 108 EC Low Voltage Directive 2006 95 EC TRADEMARKS Apple Mac Time Machine and Macintosh are registered trademarks of Apple Computer Inc Microsoft Windows XP Windows Vista and...

Отзывы: