background image

LaCie 4big Quadra 

• D

esign


by

 N

eil

 P

oulton


RAID

User Manual 

page 26

3.5.  Partitioning the Disks

You must partition the drives after changing the 4big configu-
ration  mode  (SAFE,  FAST,  BIG,  etc).  During  this  process,  you 
will  format  the  drives.  For  more  information  about  file  system 
formats, see section 

3.4.1. File System Formats

IMPORTANT INFO:

 The disks shipped with the 4big Quadra 

are formatted HFS+. To use the drives with Windows operating 
systems  or  for  cross-platform  use  between  Mac  and  PC,  the 
drives must be reformatted. For more information, see section 

3.4.1. File System Formats

.

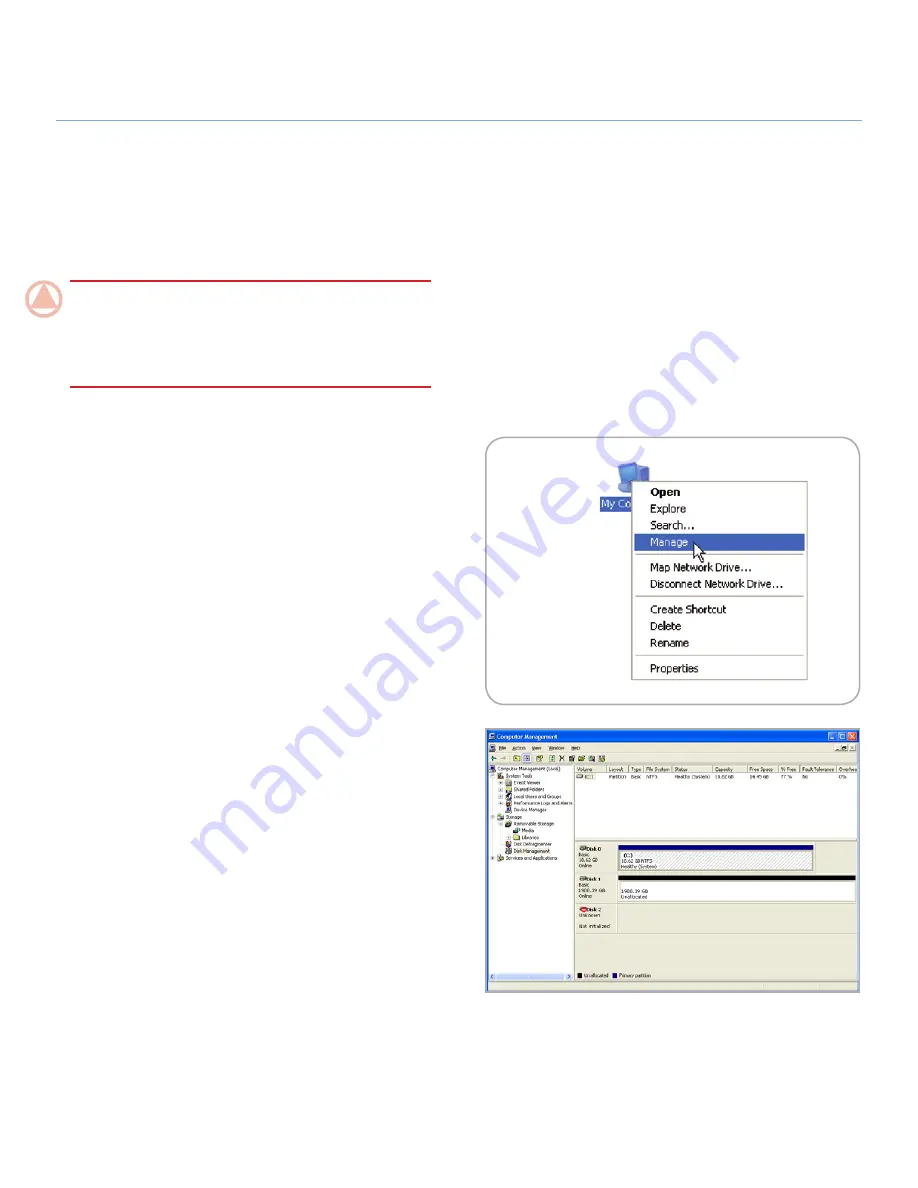
3.5.1.  Windows Users

This example illustrates the Fast storage policy, which optimizes 
the LaCie 4big for performance.

1.  Right  click  the 

My  Computer

  icon  on  your  desk-

top  and  select 

Manage

  from  the  pop-up  window  

(Fig. 3.5.1-A).

2.  Select 

Disk  Management

  under 

Storage

  to  open  the 

Windows Disk Manager

 (Fig. 3.5.1-B).

continued on next page...

Fig. 3.5.1-A

Fig. 3.5.1-B

Содержание 4big Spare Drive

Страница 1: ...10 16 3 1 3 Concatenation 16 3 1 4 RAID 3 and RAID 3 Spare 17 3 1 5 RAID 5 and RAID 5 Spare 18 3 2 Changing the RAID Mode 19 3 3 Removing and Installing Drives 20 3 4 Formatting 21 3 4 1 File System...

Страница 2: ...his equipment generates uses and can radiate radio frequency energy and if not installed and used in accordance with the instructions may cause harmful interference to radio communications However the...

Страница 3: ...ity beyond 10 90 non condensing Doing so may damage the LaCie 4big or disfigure its casing Avoid placing your LaCie 4big near a source of heat or exposing it to sunlight even through a window Inverse...

Страница 4: ...highly recommends that you keep TWO copies of your data one copy on your external hard disk for instance and a second copy either on your internal hard disk another external hard disk or some other fo...

Страница 5: ...he ability to provide single error detection and redundant information to recover the original if a disk fails a RAID system is an ideal means to safe guard valu able data while also stream lining per...

Страница 6: ...PCI Express card to be able to connect your LaCie 4big via FireWire 800 interface LaCie offers a wide selection of PCI cards Visit the LaCie website at www lacie com accessories Windows Users Windows...

Страница 7: ...5 eSATA cable 6 External power supply 7 LaCie Utilities CD ROM 8 Quick Install Guide 9 2 in 1 RAID mode change and drive removal tool IMPORTANT INFO Please save your packaging In the event that the dr...

Страница 8: ...ive Front View The blue button on the front of the LaCie 4big serves as a LED drive status indicator and the LaCie Shortcut Button See the LaCie Shortcut Button User Manual on the Shortcut But ton CD...

Страница 9: ...switch 8 Drive tray handle 9 Drive lock 10 Drive status LED CAUTION To avoid overheating the LaCie 4big should be installed in a well ventilated area and in such a way as to main tain sufficient airf...

Страница 10: ...gh speed serial input output technology for connecting peripheral devices to a computer or to each other and FireWire 800 is the implementa tion of the new IEEE 1394b standard FireWire 800 offers incr...

Страница 11: ...ATA connectors do not have the L shaped design of other SATA connectors In addition the guide features are vertically offset and reduced in size to prevent the use of unshielded inter nal cables in ex...

Страница 12: ...ur LaCie 4big Follow the steps below to power on and configure your LaCie 4big Step 1 2 1 Connect the Interface Cable Step 2 2 2 Turn the 4big On Step 3 3 4 Formatting Format the drives to suit your s...

Страница 13: ...able USB FireWire or eSA TA into the corresponding port on your host computer 2 Connect the other end of the cable to the matching port on the 4big TECHNICAL NOTE If two interfaces are connected at th...

Страница 14: ...e a power supply from another LaCie device or another manufacturer Using any other power cable or power supply may cause damage to the device and void your warranty Always remove the AC adapter before...

Страница 15: ...ccessible because parts of the data have been written to all disks A1 B1 C1 D1 A2 B2 C2 D2 A3 B3 C3 D3 A4 B4 C4 D4 RAID 0 Disk 1 Disk 2 Disk 3 Disk 4 RAID Number RAID Mode Capacity Protection Speed 0...

Страница 16: ...primary disk in the array until is it full and then to successive disks Concatenation provides no perfor mance advantage or added measure of data safety It is simply a method of combining more than on...

Страница 17: ...ta can be rebuilt to a replacement drive all data in the array will be lost In RAID 3 Spare one disk in the array is left empty If a drive in the array fails the data from the failed disk is automatic...

Страница 18: ...Spare one disk in the array is left empty If a drive in the array fails the data from the failed disk is automatically rebuilt to the empty or spare disk RAID 5 Spare Disk 1 Disk 2 Disk 3 Disk 4 Spar...

Страница 19: ...selector until the desired RAID number appears See Fig 3 2 NOTE 0 RAID 0 1 RAID 10 2 Concatenation 3 RAID 3 4 RAID 3 Spare 5 RAID 5 6 RAID 5 Spare 7 N A NOTE Although the number 7 appears in the RAID...

Страница 20: ...ID 10 3 3 5 or 5 mode you can leave it turned on and continue to step 2 2 Carefully insert the drive tray into an empty drive bay When the drive tray is most of the way in and you feel resistance pres...

Страница 21: ...s XP and Windows Vista though volume size is limited to 32GB by the Windows partition utility i e Disk Manager and the individual file size is limited to 4GB NTFS This acronym stands for New Technolog...

Страница 22: ...r optimal perfor mance in Mac OS environments format and partition the drive as one large Mac OS Extended volume Mac OS Extended HFS Mac OS Extended refers to the file system used by Mac OS X HFS repr...

Страница 23: ...TB in size but the disks must be converted to the GPT file system before partitions greater than 2TB can be created 1 Connect the drive to the computer via the interface port 2 Right click My Computer...

Страница 24: ...Click Next 14 Click Finish to begin the formatting process 15 Windows Disk Management will format and partition the disk according to your settings Fig 3 4 2 D and your drive will appear in My Compute...

Страница 25: ...Volume Scheme area 7 In the Volume Information section enter a name for each volume partition choose the volume format 8 Once you have finalized the volume options click Parti tion Click Partition aga...

Страница 26: ...g Quadra are formatted HFS To use the drives with Windows operating systems or for cross platform use between Mac and PC the drives must be reformatted For more information see section 3 4 1 File Syst...

Страница 27: ...unallocated space and se lect New Partition If the New Partition option is not avail able select the disk and initialize it first Fig 3 5 1 C 4 Click Next to start the Partition Wizard Fig 3 5 1 D 5...

Страница 28: ...6 Specify the partition size By default the partition occupies the entire volume Click Next Fig 3 5 1 F 7 Assign a drive letter or mount path and click Next Fig 3 5 1 G 8 Name and format the partitio...

Страница 29: ...LaCie 4big Quadra Design by Neil Poulton RAID User Manual page 29 Fig 3 5 1 I 9 Review the settings and click Finish to create the logical partition Fig 3 5 1 I...

Страница 30: ...enu choose the number of partitions you want to divide the drive into 16 maximum You can adjust the size of each partition using the slide bar between the partitions in the Volume Scheme area 6 In the...

Страница 31: ...on You can also visit the drivers pages where the most recent software updates will be available If you need further assistance please contact your LaCie reseller or LaCie Technical Support see sectio...

Страница 32: ...and short red Three disks are blinking blue while one disk is blinking 3 blue 1 red RAID 10 RAID is rebuilding RAID 3 RAID 5 RAID 3 5 Solid red failed disks and solid blue functional disks RAID 10 One...

Страница 33: ...tional Dimmed LED stays on for 30 minutes Dimming red 5s Off All Temperature critical LaCie recommends that following this event you leave the 4big in standby for at least an hour before restart ing t...

Страница 34: ...tem Requirements for more informa tion Make sure the power supply is properly connected see section 2 2 Turn the 4big On that the drive has been turned on by pressing the On Off Auto button the back o...

Страница 35: ...in front of your computer and that you have the following information on hand Information Where to Find Information 1 LaCie hard drive serial number Located on a sticker at the back of drive or on the...

Страница 36: ...ie com fr contact LaCie Germany Contact us at http www lacie com de contact LaCie Italy Contact us at http www lacie com it contact LaCie Japan Contact us at http www lacie com jp contact LaCie Nether...

Страница 37: ...ks have been removed and re placed by any hard disk other than a drive provided by LaCie For drive removal replacement process see section 3 3 Removing and Installing Drives LaCie and its suppliers ac...

Отзывы: