


Page
50
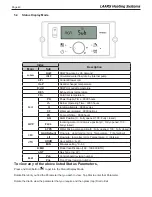
Set Point Change Modes
The display shows the following information when
changing water heating temperature set points.
• DHW 100-120°F (38 - 49°C) LOW range (Default)
- To change LOW range,
press the Button. The shower icon and current set point will flash (a
flashing value means it can be changed).
- Turn dial clockwise to increase and counterclockwise to decrease until desired temperature is reached.
- Press dial to save set point changes.
• DHW 125 - 140°F (51.5 - 60°C) HIGH range
- To change HIGH range,
press and
HOLD
the button for more than 5 seconds. The shower
icon and current set point will flash (a flashing value means it can be changed).
- Turn dial clockwise to increase and counterclockwise to decrease until desired temperature is reached.
- Press dial to save set point changes and to Exit.
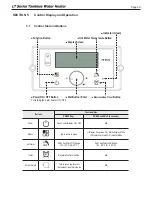
Indicate
Example
Target DHW Temperature
When changing set point, the DHW icon will flash
When set-point range is high : from 125°F (51.5°C) to 140°F (60.0°C)
Temperature sign Celsius or Fahrenheit letter
Communication state indicate
Current Time
CAUTION
Scalding Risk: The use of an anti-scald mixing valve at the hot water outlet
(water heater location) can reduce potential for scalding. Contact Manufacturer for
recommended models. Check with local codes.
* Default set-point is 120°F (49°C)
To change between Celsius and Fahrenheit, refer to section 5.4 status display mode, and change I:FC from
Gal to LIt.
5.5 DHW Set Point Change Mode
The LT Series has a built in water flow limiter and will
automatically adjust the flow rate up or down based on
outlet temperature at the inlet side of the water heater. If
the temperature drops below the set point, and the water
heater is at full fire, the inlet flow to the heat exchanger will
be reduced. Therefore, the outlet temperature will begin to
rise to the desired set point. If the temperature begins to
rise above the set point the flow will increase until full flow
is reached. This feature ensures that the outlet water is
always the ideal temperature for the user.
If this feature is not desired, then the ‘over-ride’ to this
feature must be turned
OFF
.
1. Turn off the power to the Control Display.
2. Move DIP switch 4 to the OFF Position.
Содержание LT Series
Страница 42: ...Page 42 4 20 Wiring Diagram...
Страница 43: ...Page 43 4 21 Ladder Diagram...


