background image

2J5

1-6-2

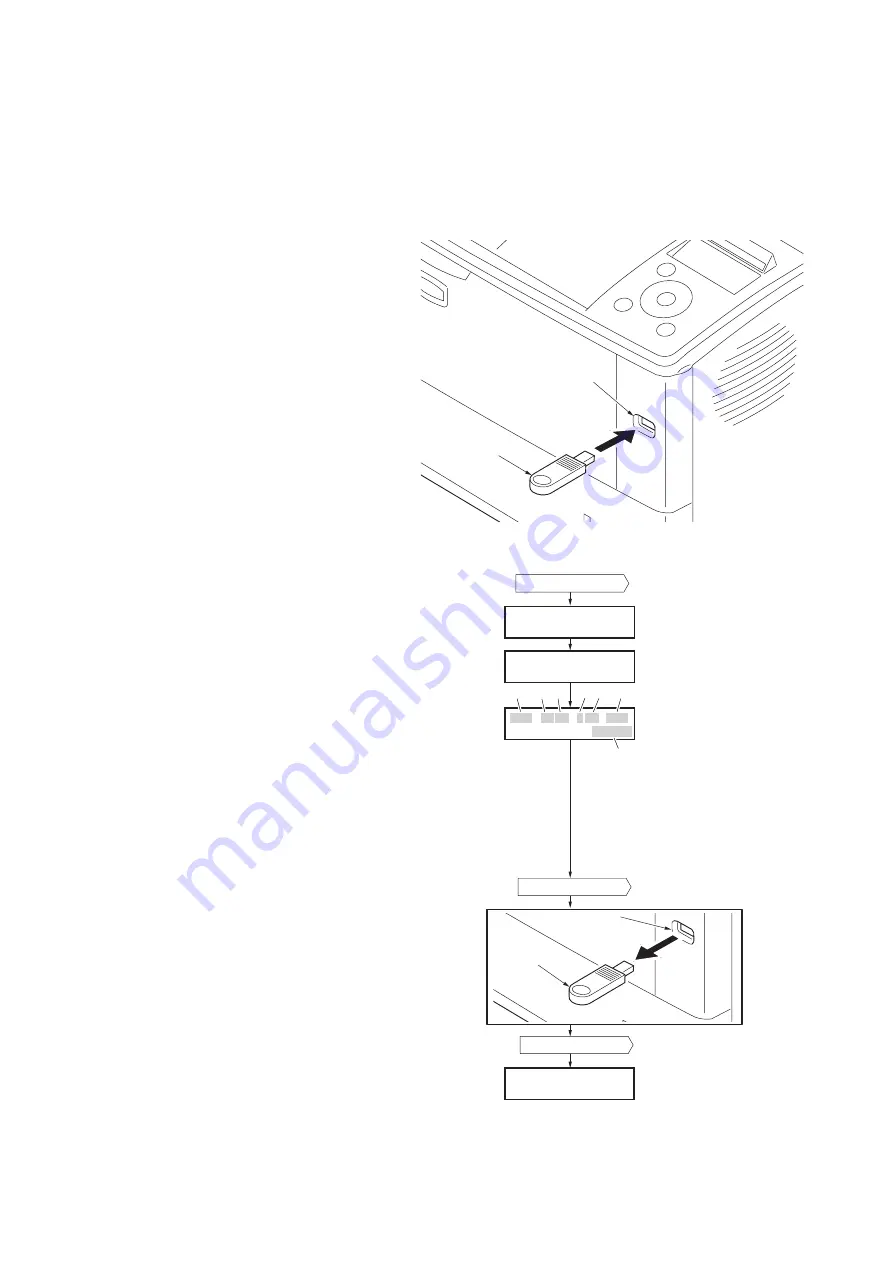
(1) Downloading the firmware from the USB memory

To download data written in a USB memory to the printer, proceed as explained in this section.

CAUTION

Downloading firmware takes several minutes. Do not turn power off during downloading. If downloading is interrupted by 
an accidental power failure, etc., the main PWB may have to be replaced.

1. Turn printer power off.
2. Connect the USB memory to the PC.
3. Copy the firmware file to the root directory of 

the USB memory.

4. Remove the USB memory from the PC and 

then insert the USB memory into the 
printer's USB memory slot.

Figure 1-6-2

5. Turn printer power on.
6. When message display (1) is displayed to 

detect firmware in the USB memory.

7. Message display (2) is displayed during 

downloading.

8. When message display (3) is displayed to 

indicate downloading is finished.

9. Turn printer power off.
10. Remove the USB memory from USB mem-

ory slot.

11. Turn printer power on.
12. Confirm that message display (4) is dis-

played after warm-up.

13. Print the status page. Print the status page 

to check that the firmware version has been 
updated.

Figure 1-6-3

USB memory slot

USB memory

(2)

(1)

(4)

Ready

Supervisor mode

USB data reading

Supervisor mode

(3)

2J5_3000.001.021

[E1F9]

��� ��� ���

��� ��� ���

���

Message display

���

���
���

���

���

���

���

Supplement
(Normally: 00)

Classification
(Normally: 0)

Product code
2J5: This machine

Checksum

Update history
Build number

Firmware category
10: Engine
30: System (Main)
31: System (BROM)

Power switch: On

Power switch: On

Power switch: Off

USB memory

USB
memory
slot

Содержание Ecosys FS-6970DN

Страница 1: ...SERVICE MANUAL Published in March 2009 842J5110 2J5SM060 First Edition FS 6970DN...

Страница 2: ...icials for details in your area for proper disposal ATTENTION IL Y A UN RISQUE D EXPLOSION SI LA BATTERIE EST REMPLACEE PAR UN MODELE DE TYPE INCORRECT METTRE AU REBUT LES BATTERIES UTILISEES SELON LE...

Страница 3: ...Revision history Revision Date Replaced pages Remarks...

Страница 4: ...This page is intentionally left blank...

Страница 5: ...sonnel to ensure the safety of their customers their machines as well as themselves during maintenance activities Service personnel are advised to read this booklet carefully to familiarize themselves...

Страница 6: ...this symbol CAUTION Bodily injury or damage to property may result from insufficient attention to or incorrect compliance with warning messages using this symbol Symbols The triangle symbol indicates...

Страница 7: ...or dusty place This may cause fire or electric shock Do not install the copier near a radiator heater other heat source or near flammable material This may cause fire Allow sufficient space around the...

Страница 8: ...carefully Always check that the copier is correctly connected to an outlet with a ground connection Check that the power cable covering is free of damage Check that the power plug is dust free If it i...

Страница 9: ...trapped wire and missing screws Check that all the caution labels that should be present on the machine according to the instruction handbook are clean and not peeling Replace with new ones if necess...

Страница 10: ...This page is intentionally left blank...

Страница 11: ...ots 1 4 11 5 Black horizontal streaks 1 4 12 6 Black vertical streaks 1 4 12 7 Unsharpness 1 4 12 8 Gray background 1 4 13 9 Dirt on the top edge or back of the paper 1 4 13 10 Undulated printing at t...

Страница 12: ...1 5 36 1 6 Firmware 1 6 1 Downloading firmware 1 6 1 1 Downloading the firmware from the USB memory 1 6 2 2 Downloading the firmware from the memory card 1 6 3 2 1 Mechanical Construction 2 1 1 Paper...

Страница 13: ...1200 Fast 1200 mode 600 dpi 300 dpi Warm up time 22 C 71 6 F 60 RH Power on 15 seconds or less Sleep 15 seconds or less First print out A4 9 seconds or less when EcoFuser is Off and the printer is in...

Страница 14: ...m Dimensions W D H 469 395 285 mm 18 7 16 15 9 16 11 1 4 Weight without toner container 19 5 kg 43 lbs Power source 220 240 V 50 Hz 60 Hz max 3 9 A European countries Max Allowable voltage fluctuation...

Страница 15: ...side cover 5 Operation panel 6 USB memory slot 7 Paper cassette 8 MP Multi Purpose tray 9 Left side cover 10 Toner container 11 Power switch 12 Waste toner box 13 USB interface connector 14 Network i...

Страница 16: ...2J5 1 1 4 2 Operation panel Figure 1 1 2 1 2 3 4 5 6 7 1 Indicators 2 Message display 3 Cursor keys 4 GO Key 5 Cancel Key 6 OK Key 7 MENU Key...

Страница 17: ...MP tray paper feed unit 3 Toner container 4 Developer unit 5 Main charger unit 6 Drum unit 7 Laser scanner unit 8 Paper exit section 9 Rear unit 10 Fuser unit 11 Transfer separation section 12 Duplex...

Страница 18: ...2J5 1 1 6 This page is intentionally left blank...

Страница 19: ...50 Hz 0 3 60 Hz 0 3 5 Installation location Avoid direct sunlight or bright lighting Ensure that the photoconductor will not be exposed to direct sunlight or other strong light when removing paper jam...

Страница 20: ...Figure 1 2 2 Unpacking 1 Printer 2 Outer case 3 Bottom pad L 4 Bottom pad R 5 Machine cover 6 Top pad L 7 Top pad R 8 Accessory spacer 9 Plastic bag 10 Installation guide etc 11 Plastic bag 12 Toner...

Страница 21: ...dule with the matching keys of the socket care fully plug the memory module into the mem ory socket until it clicks in place 5 Then push down the memory module to secure 6 Close and secure the inner c...

Страница 22: ...ect the power cord and printer cable 2 Remove two screws and then open the option interface slot cover 3 Install the memory card into the option inter face slot 4 Refit the option interface slot cover...

Страница 23: ...and disconnect the power cord and printer cable 2 Remove two screws and then open the option interface slot cover 3 Install the hard disk into the option interface slot 4 Refit the optional interface...

Страница 24: ...2J5 1 2 6 This page is intentionally left blank...

Страница 25: ...ose To print a network status page Prints a test page which contains halftone To write data into a USB memory To reset counter for the maintenance kit To initialize the developing unit toner install m...

Страница 26: ...will be printed Completion Figure 1 3 1Service status page 1 Print Status Page Firmware Version 2J5_2000 000 000 1 Memory Status Standard Size Option Slot Total Size Controller Information 2009 01 27...

Страница 27: ...00 00000000 00000000 00000000 00000000 00000000 00000000 00000000 00000000 00000000 00000000 00000000 00000000 00000000 00000000 00000000 00000000 00000000 00000000 00000000 00000000 00000000 00000000...

Страница 28: ...present software version and the ME firmware ver sion _ underscore OK Asterisk NG e ME firmware version f The oldest time stamp of the ME database version Normal if a and d are underscored and b and e...

Страница 29: ...ngle counts 3 Folio Single count Less the 330 mm length Billing counting timing Temperature machine out side Relative temperature machine outside Absolute temperature machine outside XLI calibration i...

Страница 30: ...e sheets of network status page will be printed Completion Maintenance items Description No Items Description Drum status Drum surface potential Drum sensitivity Quantity of light DRT parameter coeffi...

Страница 31: ...te data USB memory data write Description To write data into a USB memory Procedure Install the USB memory before attempting to write data 1 Enter the maintenance mode Write Data 2 Press the OK key Wr...

Страница 32: ...ervice status page or event log in number of pages at which the maintenance kit was replaced See page P 1 3 2 or P 1 3 10 This may be used to determine the possibility that the counter was errorneousl...

Страница 33: ...yed 3 Press the OK key 4 Press the T key or S key and select the desire mode from 00 to 02 5 Press the OK key The new value is set Completion Drum surface refreshing Description Rotates the drum appro...

Страница 34: ...replacements Procedure 1 Connect the USB or network cable between printer and PC network 2 Connect the power cord Figure 1 3 4 3 Turn printer power on Make sure the printer is ready 4 Send the follow...

Страница 35: ...3 T00 M01 10 20 Counter Log Event Descriptions 10 01 88 01 01 10 01 88 01 01 10 01 88 01 01 10 01 88 01 01 10 01 88 01 01 10 01 88 01 01 10 01 88 01 01 10 01 88 01 01 10 01 88 01 01 10 01 88 01 01 10...

Страница 36: ...feeder 1 s PF paper sensor 32 32 Paper remains at the paper feeder 1 s PF paper feed sensor when power is turned on 32 40 Paper does not arrive at the paper feeder 2 s PF paper feed sensor 33 Paper fe...

Страница 37: ...inting Detail of jam location Hexadecimal Paper feeder 1 Paper feeder 2 Paper feeder 3 Paper feeder 4 Face up tray Cassette 1 Cassette 2 Cassette 3 Cassette 4 Cassette 5 Printer 42 31 32 49 47 48 33 3...

Страница 38: ...A8 16K E 32 Statement R B2 Statement E 33 Folio 34 Western type 2 35 Western type 4 d Detail of paper type Hexadecimal 01 Plain 02 Transparency 03 Preprint 04 Labels 05 Bond 06 Recycle 07 Vellum 08 Ro...

Страница 39: ...us unknown toner detection is less than 5 all of the unknown toner detection are logged The total page count at the time of the Toner Empty error with using an unknown toner container Unknown toner lo...

Страница 40: ...2J5 1 3 16 This page is intentionally left blank...

Страница 41: ...4 1 2 Paper misfeed detection Figure 1 4 2 Paper Jam MP tray Paper misfeed location Paper misfeed message Paper Paper exit sensor exit sensor Paper exit sensor Face down tray paper full sensor Paper...

Страница 42: ...ain PWB See page P 1 5 27 Defective main PWB Replace main PWB See page P 1 5 27 0110 Backup memory data error Defective flash memory Replace main PWB See page P 1 5 27 Defective main PWB Replace main...

Страница 43: ...and engine PWB YC501 or improper connec tor insertion Reinsert the connector Also check for conti nuity within the connector harness If none remedy or replace the harness Defective main motor drive tr...

Страница 44: ...put pin photo sensor error The pin photo signal PDN is not output within a specified time after the polygon motor ready signal POLRDYN becomes ready L level Defective harness between PD PWB YC1 and ma...

Страница 45: ...fuser thermistor S See page P 1 5 21 Defective engine PWB Replace the engine PWB See page P 1 5 23 6030 Broken fuser thermistor S wire The detected temperature of fuser ther mistor S is 50 C 122 F or...

Страница 46: ...page P 1 5 17 6400 Zero cross signal error The ZCROSS signal does not reach the engine PWB for more than 2 s Defective harness between connect L PWB YC8 and engine PWB YC503 or improper connec tor ins...

Страница 47: ...resolved replace main PWB See page P 1 5 27 Defective expanded memory DIMM Replace the expanded memory DIMM See page P 1 2 3 F030 General failure Defective main PWB Turn the power switch off on to re...

Страница 48: ...lack horizontal streaks P 1 4 9 P 1 4 10 P 1 4 11 P 1 4 11 P 1 4 12 6 Black vertical streaks 7 Unsharpness 8 Gray background 9 Dirt on the top edge or back of the paper 10 Undulated print ing at the l...

Страница 49: ...PWB Refer to figure1 4 3 above and P 1 5 23 Poor contact of engine PWB s developing bias output terminal and devel oper unit s contact Check the installation of the developer unit Refer to figure 1 4...

Страница 50: ...charger unit Refer to figure 1 4 5 below and P 1 5 12 Figure 1 4 5 Poor contact of engine PWB s main charger out put terminal and printer s contact spring Check the installation position of the engine...

Страница 51: ...2 4 2 the problem may be the dam aged heat roller or press roller in the fuser unit Replace fuser unit heat roller or press roller If a fuser unit which is known to work normally is available for chec...

Страница 52: ...in the printer with the nor mal one If the symptom disappears replace the drum unit with a new one See page P 1 5 12 Defective developing roller developer unit If a developer unit which is known to wo...

Страница 53: ...ailable for check replace the current developer unit in the printer with the normal one If the symptom disappears replace the devel oper unit with a new one See page P 1 5 11 Print example Causes Chec...

Страница 54: ...tray paper full sensor does not operate smoothly Repair or replace A piece of paper torn from a sheet is caught around actuator of registration sen sor paper exit sensor duplex sensor duplex jam senso...

Страница 55: ...to closing the rear unit Defective fuser unit s drawer connector If a fuser unit which is known to work normally is available for check replace the current fuser unit in the printer with the normal on...

Страница 56: ...feed drive unit paper feed clutch MP tray paper feed clutch and middle feed clutch or MP tray paper feed solenoid Defective installation position of paper feed motor Check the installation position o...

Страница 57: ...ly damaged When removing the hook of the connector be sure to release the hook 2 Drum Note the following when handling or storing the drum When removing the drum unit never expose the drum surface to...

Страница 58: ...black colored band when seen through the left side window A shiny or gold colored band when seen through the right side window The above will reveal that the toner container is a genuine Kyocera Mita...

Страница 59: ...1 5 2 Outer covers 1 Detaching and refitting the top cover Procedure 1 Open the top cover 2 Remove two screws 3 Remove the connector and then remove the top cover Figure 1 5 3 Screw Screw Connector T...

Страница 60: ...MP tray 3 Open the rear unit 4 Remove the top cover See page P 1 5 3 5 Unlatch three latches and then remove the right cover Figure 1 5 4 6 Remove the screw 7 Unlatch six latches and then remove the l...

Страница 61: ...Procedure 1 Remove the paper cassette 2 Slide the paper feed roller pin 3 While pressing the lever and then remove the paper feed roller assembly 4 Check or replace the paper feed assembly and refit...

Страница 62: ...ntil it locks 3 Unlatch two latches and then remove the retard guide Figure 1 5 7 4 Remove the retard holder roller from the retard guide 5 Check or replace the retard roller and refit all the removed...

Страница 63: ...e page P 1 5 11 2 Remove the spring 3 Pull the registration upper roller Figure 1 5 9 4 Remove the registration upper roller from the bush 5 Remove the gear and bush from the regis tration upper rolle...

Страница 64: ...roller 9 Remove the gear and three bushes from the registration lower roller 10 Check or replace the registration upper and lower roller and refit all the removed parts Figure 1 5 12 Bush Registration...

Страница 65: ...feed roller Procedure 1 Remove the paper cassette 2 Open the top cover 3 Remove two holders from the main unit frame Figure 1 5 13 MP tray back side MP tray back side Holder Holder Main unit frame Ma...

Страница 66: ...7 Slide the MP tray paper feed roller holder 8 Remove the MP tray paper feed roller 9 Check or replace the MP tray paper feed roller and refit all the removed parts Figure 1 5 15 Holder Main unit fra...

Страница 67: ...Detaching and refitting the developer unit Procedure 1 Open the top cover 2 Open the MP tray 3 Remove the developer unit 4 Check or replace the developer unit and refit all the removed parts Figure 1...

Страница 68: ...emove the developer unit See page P 1 5 11 2 Open the left side cover and then remove the waste toner box 3 Unlock the drum unit lock and then remove the drum unit 4 Check or replace the drum unit and...

Страница 69: ...edure 1 Remove the drum unit See page P 1 5 12 2 Unlock the lock lever and then remove the main charger unit 3 Check or replace the main charger unit and refit all the removed parts Figure 1 5 18 Main...

Страница 70: ...veloper unit See page P 1 5 11 2 Remove the drum unit See page P 1 5 12 3 Slide the paper chute guide and unhook the hooks 4 Remove the paper chute guide Figure 1 5 19 5 Remove the shaft transfer roll...

Страница 71: ...brush unit is inserted into the four projections of the frame and does not run on to the projec tions B The separation charger brush unit is firmly in contact with the separation charger plate of the...

Страница 72: ...he rear unit rails Do it both ends of the rear unit 3 Check or replace the fuser unit and refit all the removed parts Place the fuser unit on the rear unit rails and push the fuser lock so that the fu...

Страница 73: ...wo screws and then open the fuser unit NOTE When fixing the screw again be careful not to tighten the screw too much because the fuser lower frame is made of resin Figure 1 5 23 3 Remove two screws fr...

Страница 74: ...d S and refit all the removed parts Seat the fuser heater lamp M and S aligning its wattage mark and welding mark faced with the correct direction and side Figure 1 5 25 Fuser heater lamp M Fuser heat...

Страница 75: ...emove the heat roller from the fuser upper frame 3 Remove the heat R bush heat L bush heat gear Z46 and heat roller ground plate from the heat roller 4 Check or replace the heat roller and refit all t...

Страница 76: ...e fuser unit See page P 1 5 16 2 Open the fuser unit See page P 1 5 17 3 Remove the press roller from the fuser lower frame 4 Remove two bearings 5 Check or replace the press roller and refit all the...

Страница 77: ...3 Unlatch two latches and then remove the cord cover 4 Unlatch four latches and then remove the fuser drawer connector 5 Remove two connectors Figure 1 5 28 6 Remove the heat roller See page P 1 5 19...

Страница 78: ...ding on the fuser unit Figure 1 5 30 9 Remove two screws nuts and then remove the terminal and cord plate 10 Remove the thermal cutout 11 Check or replace the fuser thermistor S and M and thermal cuto...

Страница 79: ...e P 1 5 4 5 Remove the PSU fan motor See page P 1 5 29 6 Stand the printer front side up 7 Remove five screws and then remove the bottom plate 1 8 Remove four screws and then remove the bottom plate 2...

Страница 80: ...eight screws and then remove the DU base Figure 1 5 34 13 Remove four snaps 14 Remove the tab 15 Remove five connectors Figure 1 5 35 Screw DU base Screw Screw Screw Screw Screw Screw Screw Joint Tab...

Страница 81: ...16 Remove four screws Figure 1 5 36 17 Detach the engine PWB assembly 18 Remove four connectors 19 Remove the engine PWB assembly Figure 1 5 37 Screw Screw Screw Screw Connectors Engine PWB assembly...

Страница 82: ...ngine L ground plate and shield plate 23 Check or replace the engine PWB and refit all the removed parts To replace the engine PWB remove the EEPROM from the old engine PWB and mount it to the new eng...

Страница 83: ...ve six connectors from the main PWB 4 Remove thirteen connectors from the con nect R WPB 5 Remove the wires from the clamp 6 Remove the screw and then remove the connect R PWB Figure 1 5 39 Screw Clam...

Страница 84: ...main PWB Figure 1 5 40 9 Remove five screws and then remove the main PWB from the controller box 10 Check or replace the main PWB and refit all the removed parts Figure 1 5 41 Controller box Screw Re...

Страница 85: ...cover See page P 1 5 4 3 Remove the drum unit See page P 1 5 12 4 Remove the connector YC11 from the con nect L PWB 5 Remove the wires from the drum grounding plate and clamp 6 Remove two hooks and th...

Страница 86: ...C inlet Figure 1 5 43 10 Remove the connector 11 Remove the PWB connector between con nect L PWB and then remove the power source unit 12 Remove the power source unit Figure 1 5 44 Grounding terminals...

Страница 87: ...Remove seven screws and then remove the power source PWB 15 Check or replace the power source unit and refit all the removed parts Figure 1 5 45 Screw Screws Power source plate Heat sink plate Screws...

Страница 88: ...5 Remove five connectors from the connect R PWB 6 Remove wires from the clamp 7 While opening the four hooks and then remove the wires 8 Remove the right fan motor When detaching or refitting the righ...

Страница 89: ...he paper feed drive unit 10 Check or replace the paper feed drive unit and refit all the removed parts 11 To refit the paper feed drive unit make sure mesh of gears Figure 1 5 47 Gear Gear Screw Screw...

Страница 90: ...ve the right cover See page P 1 5 4 3 Remove the controller box See page P 1 5 27 4 Remove two connectors 5 Remove five screws and then remove the main drive unit 6 Check or replace the main drive uni...

Страница 91: ...cover See page P 1 5 4 3 Remove two connectors from the main PWB Figure 1 5 49 4 Remove four screws and then remove the laser scanner unit 5 Check or replace the laser scanner unit and refit all the...

Страница 92: ...principal fan motors When detaching or refitting the left fan motor or right fan motor be careful of the airflow direction intake or exhaust Figure 1 5 51 Intake Intake Right fan motor Rating label I...

Страница 93: ...sification Normally 0 Supplement Normally 00 Firmware category 30 System Main 31 System BROM Extention Extention Product code 2J5 This machine Product code 2J5 This machine Pause underscore Software I...

Страница 94: ...y 1 is displayed to detect firmware in the USB memory 7 Message display 2 is displayed during downloading 8 When message display 3 is displayed to indicate downloading is finished 9 Turn printer power...

Страница 95: ...e printer s operation panel and carry out the memory card for matting procedure 1 6 When formatting is complete turn printer power off Figure 1 6 5 7 Remove the formatted memory card from the memory c...

Страница 96: ...slot 19 Refit the option interface slot cover by two screws 20 Turn printer power on 21 Confirm that message display 4 is dis played after warm up 22 Print the status page Print the status page to che...

Страница 97: ...ion is then sent in between the feed roller and the retard roller Function of the built in torque limiter in the retard roller gives weak resistance force against the rota tion Normally when only a pa...

Страница 98: ...vents papers from multiple feeding Figure 2 1 3 MP tray paper feed section Figure 2 1 4MP tray paper feed section block diagram 1 MP tray paper feed roller 2 Bottom plate 3 MP tray frame 4 MP tray sep...

Страница 99: ...on and then sent to the transfer separation sec tion by the upper registration roller and lower registration roller Figure 2 1 5Paper feed conveying section Figure 2 1 6Paper feed conveying section bl...

Страница 100: ...with the main charger unit Figure 2 1 7 Drum section Figure 2 1 8Drum section block diagram 1 Drum 2 Main charger case 3 Charger roller cleaning roller 4 Main charger roller Main high voltage output D...

Страница 101: ...am is dis persed as the polygon motor revolves to reflect the laser beam over the drum Various lenses and mirror are housed in the laser scanner unit adjust the diameter of the laser beam and focalize...

Страница 102: ...Engine PWB Main PWB APC PWB Polygon motor PD PWB Pin photo sensor Laser diode Laser beam Laser scanner unit Drum YC12 1 YC11 5 YC16 2 YC11 10 YC11 8 YC11 7 YC11 12 YC12 2 YC12 3 POLRDYN POLONN OUTPEN...

Страница 103: ...r not toner remains in the developer unit Figure 2 1 11Developer unit Figure 2 1 12Developing section block diagram 1 Developing blade 2 Blade magnet 3 Developing roller 4 Developer case 5 Agitator A...

Страница 104: ...the transfer roller The transfer roller is negatively biased so that the positively charged toner is attracted onto the paper while it is pinched by the drum and the transfer roller Figure 2 1 13Tran...

Страница 105: ...cleaned to the electrically neutral state This is necessary to erase any residual positive charge ready to accept the uniform charge for the next print process The residual charge is canceled by expos...

Страница 106: ...he fuser thermistor detects the temperature of the surface on the heat roller heated by the fuser heater lamp and this temperature is controlled by the engine PWB If the fuser section shows extremely...

Страница 107: ...user unit Thermal cutout Fuser heater lamp M Fuser heater lamp S Heat roller Paper exit sensor Fuser thermistor S Fuser thermistor M Power source PWB Engine PWB YC102 1 YC506 6 YC506 4 YC102 3 YC102 5...

Страница 108: ...he guide comprised of the rear cover and the frame finally reaching the face down upper roller The paper is delivered to the top tray by the rotation of the face down upper roller Figure 2 1 19Paper e...

Страница 109: ...ect L PWB Face down tray paper full sensor Fuser unit Rear unit Paper exit section Face up down solenoid Duplex sensor Engine PWB Switch back motor YC9 11 YC9 10 YC9 9 YC9 8 OUTA1 OUTA3 OUTB1 OUTB3 YC...

Страница 110: ...gure 2 1 22Duplex conveying section block diagram 1 DU roller 2 DU feed pulley 3 DU base 4 DU lower guide 5 DU roller 6 DU feed pulley 7 Duplex jam sensor actuator 8 DU roller 9 DU feed pulley 10 Feed...

Страница 111: ...ftware such as the print data processing and provides theinterface with computers 2 Engine PWB Controls printer hardware such as high voltage bias output control paper conveying system control and fus...

Страница 112: ...the fuser unit 24 Duplex sensor Detects paper jam in the rear unit 25 Temperature humidity sensor Detects the ambient temperature and absolute humidity 26 Toner sensor Detects the toner in the toner c...

Страница 113: ...ng regulator circuit Zero cross signal circuit MP tray paper feed sensor Power source unit AC input Interlock switch Power switch Fuser heater lamp M control circuit Fuser heater lamp S control circui...

Страница 114: ...ected to the con nect L PWB 2 5V1 O 5 V DC 5 V DC power source 3 5V1 O 5 V DC 5 V DC power source 4 24V1 O 24 V DC 24 V DC power source 5 N C Not used 6 HANDSN O 0 5 V DC MP tray paper feed sensor On...

Страница 115: ...Engine PWB Registration sensor Duplex jam sensor Paper gauge sensor 1 Paper gauge sensor 2 Duplex sensor Connect L PWB Paper feeder Drum PWB Waste toner sensor PWB Eraser lamp PWB Photo transistor Was...

Страница 116: ...2J5 2 3 4 Figure 2 3 4Engine PWB silk screen diagram YC12 YC10 20 19 2 1 1 5 YC4 YC6 YC1 1 13 14 1 2 7 1 14 YC15 U7 1 2 13 1 1 13 8 1 1 12 5 YC11 YC9 YC8 YC5 YC3...

Страница 117: ...ff 8 EXITFAN O 0 24 V DC Exit fan motor On Off YC503 1 HEATONN2 O 0 5 V DC Fuser heater lamp S On Off Connected to the con nect L PWB YC8 2 HEATONN1 O 0 5 V DC Fuser heater lamp M On Off 3 ZCROSS I 0...

Страница 118: ...Off 8 OUTB3 O 0 24 V DC pulse Switchback motor drive pulse 9 OUTB1 O 0 24 V DC pulse Switchback motor drive pulse 10 OUTA3 O 0 24 V DC pulse Switchback motor drive pulse 11 OUTA1 O 0 24 V DC pulse Swi...

Страница 119: ...2J5 2 3 7 YC15 1 5V1 O 5 V DC 5 V DC power source Connected to the feed fan motor 2 FFANDRN O 0 2 5 5 V DC Feed fan motor Full speed Half speed Off Connector Pin Signal I O Voltage Description...

Страница 120: ...2J5 2 3 8 This page is intentionally left blank...

Страница 121: ...2 3 4 5 6 7 8 9 10 11 12 1 2 3 4 5 6 7 8 9 10 11 12 12 11 10 9 8 7 6 5 4 3 2 1 12 11 10 9 8 7 6 5 4 3 2 1 YC6 YC504 WTNFUL LFANDRN EECLK EEDIO ERASER WTNLEDN OPSCLK OPRDYN OPSEL0 OPSEL1 OPSEL2 OPSDI...

Страница 122: ...of defect 39 mm 1 9 16 Developing roller 38 5 mm 1 1 2 Main charger roller 94 mm 3 11 16 Drum 36 mm 1 7 16 Upper registration roller 52 mm 2 1 16 Lower registration roller 93 mm 3 11 16 Heat roller 8...

Страница 123: ...fer roller ROLLER TRANSFER ASSY SP Paper feed assembly FEED HOLDER ASSY Retard roller RETARD ROLLER ASSY Transfer roller DK 450 Developer unit DV 450 E Fuser unit FK 450 E Maintenance kit MK 450 MK 45...

Страница 124: ...2J5 2 4 4 This page is intentionally left blank...

Страница 125: ......

Страница 126: ......

Отзывы: