background image

9-44

Printing Images Fully to the Edges (All-Image Area)

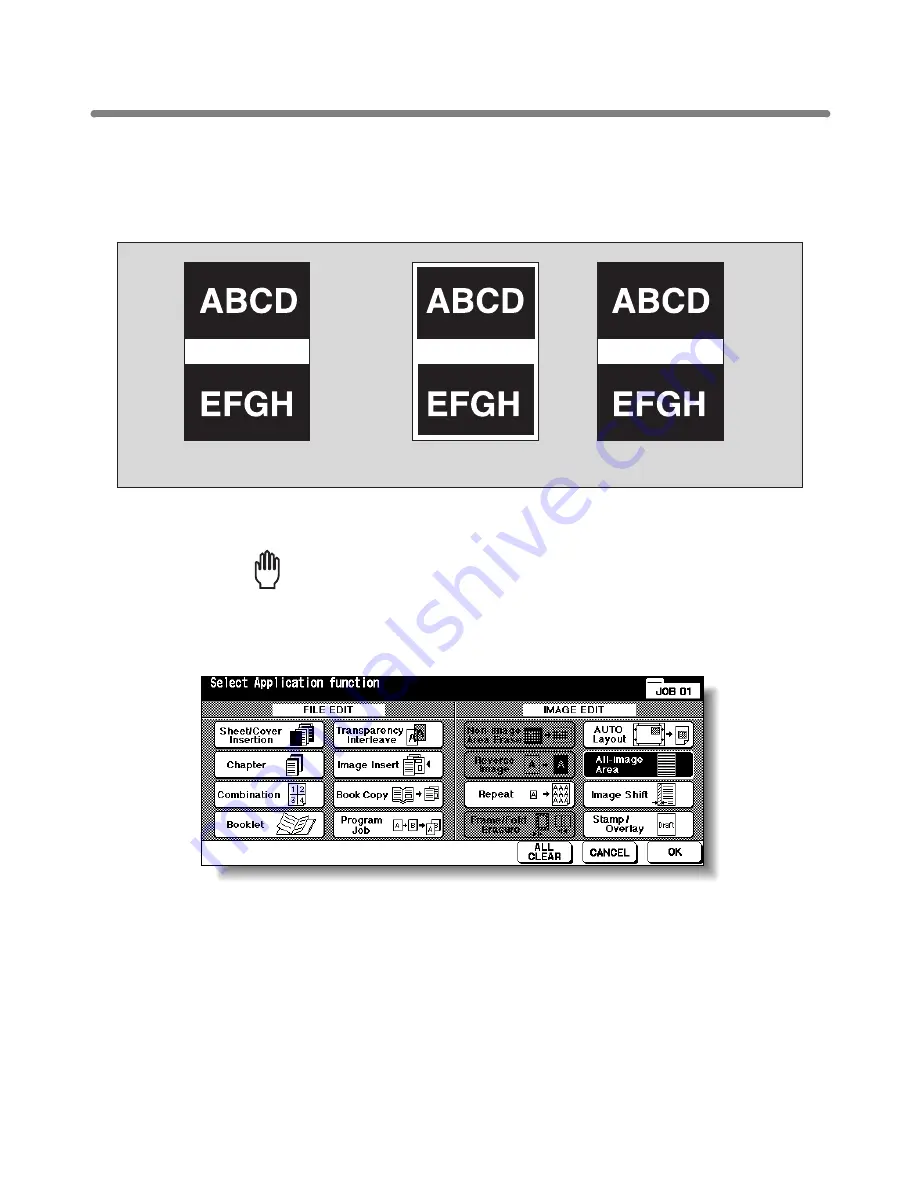
Use this function to make copies printed completely to the edges.

>>>Specifications for All-Image Area<<<

Incompatible Conditions: Rotation Sort, Rotation Group, Non-Image Area Erase,

Reverse Image, Frame/Fold Erasure

1.

Touch 

APPLI.

 on the Basic Screen.

 Reminder!

When starting a new copying job, be sure to close the RADF securely,
then press [

AUTO RESET

].

2.

Touch 

All-image Area

 on the Application Selection Screen.

The incompatible function keys will be dimmed to show inactivity.

3.

Touch 

OK

 on the Application Selection Screen.

The Basic Screen will be restored.

4.

Select additional copy conditions, as desired.

Original

Normal copy

Full-Image Area copy

Содержание KM-8530

Страница 1: ...OPERATION GUIDE Please read the Operation Guide before using the copier Keep it in the designated location for easy reference KM 8530...

Страница 2: ...be set for 5 minutes 10 minutes 15 minutes 30 minutes 60 minutes 90 minutes 120 minutes or 240 minutes See p 2 20 for details Automatic Shut Off This function achieves further energy conservation by...

Страница 3: ...Standard Optional Equipment 2 5 DF 630 DF 635 Finisher 2 6 PI 108 Cover Sheet Feeder 2 8 LT 402 LT 412 Large Capacity Tray 2 9 TU 108 Trimmer Unit 2 10 PU 108 Punching Unit 2 12 PZ 108 Punching Z Fold...

Страница 4: ...E 3 16 To Copy in Zoom Mode 3 17 Selecting Density Level 3 19 To Select Copy Density 3 19 Density Shift 3 21 Making Double Sided Copies 1a2 2a2 3 22 Using RADF 3 22 Using Platen Glass 3 25 Making Sing...

Страница 5: ...er Key Or Arrow Key Flashes 5 8 When ADD PAPER Appears on Folder Key Or Arrow Key Flashes 5 10 When Memory Full Message Is Displayed Memory Overflow 5 11 Memory Overflow in Current Job 5 11 Memory Ove...

Страница 6: ...4 Copying Mixed Size Originals Mixed Original 8 6 Copying Z Folded Originals Z Folded Original 8 8 Feeding Single Original from RADF SDF 8 10 Copying Non Standard Size Originals Original Form 8 12 Se...

Страница 7: ...HDD Overlay Memory 9 64 Section 10 Network Function To Use Server Functions 10 2 Storing Deleting Image Data in HDD Image Store Delete 10 4 To Store Image Data in HDD 10 4 To Delete Image Data from H...

Страница 8: ...Scanning Section 12 15 Cleaning the Document Glass 12 15 Cleaning the Left Partition Glass 12 15 Cleaning the RADF Platen Guide Cover 12 16 Checking Copy Count 12 17 To Display the Counter List Scree...

Страница 9: ...13 32 4 Lunch Hour Off Setting 13 34 5 Timer Interrupt Password Setting 13 35 10 Control Panel Adjustment 13 36 11 Tray Auto Select Setting 13 37 12 Power Save Setting 13 38 13 Memory Switch Setting 1...

Страница 10: ...in progress Auto Layout The original image on the platen glass or in the document feeder is copied and centered on a sheet Auto Low Power Automatically lowers the power after a specified period of co...

Страница 11: ...levels in four density modes Auto Text Photo Increase Contrast to three levels lighter or three levels darker Frame Fold Erasure Erases border and or fold image area using Frame 1 300mm Fold 1 99mm or...

Страница 12: ...image data transmitting it to a PC over a network and manages the stored data using Web Utilities Non Image Area Erase When copying from the platen glass when the document cover is open copies only t...

Страница 13: ...y and a 100 sheet Multi sheet bypass tray Total 6 600 sheets including 4 000 sheet optional large capacity tray Platen Memory Scans documents into memory from the platen glass and or the document feed...

Страница 14: ...n Exit alternately switches the horizontal and vertical orientation of each sorted set as it outputs to the exit tray Be sure to load both 8 5 x11 and 8 5 x11 R in separate trays including the Multi s...

Страница 15: ...t Installed Trim the end of folded or stapled folded booklets Userset Density USERSET 1 USERSET 2 Outputs up to 16 density samples on a total of 4 pages that display 4 samples per page then programs t...

Страница 16: ......

Страница 17: ...Basic 2 1 3 4 5 6 Safety Information Machine Information Copying Operations Job Memory Help Mode Trouble shooting Machine Specifications...

Страница 18: ......

Страница 19: ...1 1 Safety Information Safety Information Precautions for Installation and Use Caution Labels and Indicators 1 2 Regulations 1 5 Requirements for Safe Use 1 6...

Страница 20: ...UCION CUIDADO This internal area is very hot To avoid getting burned DO NOT TOUCH Alta temperatura N O TOQUE nesta rea interior pois h risco de queimadura Cette zone interne est tr s chaude Pour viter...

Страница 21: ...your hand into it otherwise you may be injured Use care after opening the paper exit outlet DO NOT put your hand into it otherwise you may be injured CAUTION CAUTION DF 635 Finisher DF 635 only DF 630...

Страница 22: ...r replacement labels The following indicators are used on the caution labels or in this manual to categorize the level of safety cautions DANGER Action highly liable to cause death or serious injury W...

Страница 23: ...ence at their own expense Canadian Department of Communications Regulations Le pr sent appareil n met pas de bruits radio lectriques d passant les limites applicables aux de Classe A prescrites dans l...

Страница 24: ...the socket even after it has been positively inserted disconnect the plug and contact your electrical contractor For plug cable equipment the socket outlet shall be installed near the equipment and s...

Страница 25: ...humidity CAUTION Ventilation Maintain the installation place well ventilated Keep away from dust or corrosive gases These materials may cause poor image quality During the use of machine the machine g...

Страница 26: ...behind the machine to let hot air out from the rear fan 45 7 1160 61 4 1560 18 7 475 34 9 887 69 4 1762 72 6 1845 30 5 775 37 4 950 4 7 120 Unit inches mm KM 8530 15 7 400 15 75 400 1 2 3 1 1 2 3 4 92...

Страница 27: ...O NOT allow any object to interfere with the operation of the tray on the left side of the finisher as any interference may cause damage to the finisher 141 8 3601 111 35 2828 30 45 773 KM 8530 DF 635...

Страница 28: ...he inside of the machine for any other purpose than removing jammed paper or adding toner If machine repair is necessary be sure to contact your service representative Never attempt to repair it by yo...

Страница 29: ...children The toner is nontoxic however if you inhale or contact with eyes by accident flush with water and seek medical advice Do not throw the empty toner cartridge into a fire If it is thrown into a...

Страница 30: ...your service representative who can arrange for its safe disposal If you change the place of installation please contact your service representative CAUTION Paper Capacity for the Exit Tray The exit t...

Страница 31: ...inted materials are removed from the primary main tray of the Finisher the tray goes up automatically To avoid injury DO NOT put your hand on top of the printed sheets Be sure to hold both sides of th...

Страница 32: ......

Страница 33: ...ion Machine Configuration Turn On Off the Power Loading Paper Machine Information Machine Configuration Turning On the Power and Loading Paper Machine Configuration 2 2 Turning On the Power Switch 2 1...

Страница 34: ...ulti sheet bypass tray 4 Tray 4 Large capacity tray LT 402 option 4 Tray 4 Large capacity tray LT 412 option 5 Right side door not shown 6 Tray 3 7 Tray 2 8 Tray 1 9 Left door 14 Cover sheet feeder PI...

Страница 35: ...heets from 11 x17 to 5 5 x8 5 9 Left side door opens together with the front door to allow removal of mishandled paper 10 Front door opens to allow removal of mishandled paper 11 PU 108 Punching unit...

Страница 36: ...onto the copy paper and is to be withdrawn for removal of mishandled paper 4 Lever A can be moved to withdraw the conveyance fixing unit for removal of mishandled paper 5 Drum unit forms the copy ima...

Страница 37: ...oard TU 108 Trimmer unit MB 4A 4B Memory unit UG 2 Video interface kit PI 108 Cover sheet feeder PU 108 Punching unit or PZ 108 Punching Z Folding unit DF 630 Finisher DF 635 Finisher KM 8530 main bod...

Страница 38: ...Folding mode or Stapling Folding mode 4 Primary Main tray holds sets output in Non sort mode Sort mode offset Staple sort mode or Group mode offset 5 Secondary Sub tray holds sets output in Non sort...

Страница 39: ...r and replacement of staple cartridge 7 Lower lever opens to remove mishandled paper 8 Knob can be turned to ease removal of mishandled paper 9 Cartridge housing holds staple cartridge and is to be re...

Страница 40: ...tion panel controls cover sheet feeder operations 2 Cover sheet feeder holds cover sheets for use in cover sheet output mode 3 Cover sheet feeder guide plates hold cover sheets to fix the position 1 M...

Страница 41: ...loading paper 6 LCT bottom plate goes up automatically when paper supply becomes low and goes down when the paper loading button is pressed 7 Rear stopper fixes the rear end of copy paper 1 LCT top d...

Страница 42: ...slides to the left side each time a trimmed booklet is delivered 5 Trimmer stacker cover opens to allow you to take out the finished sets Reminder DO NOT place heavy objects on the trimmer stacker or...

Страница 43: ...ndled paper 2 Trash basket holds waste paper cut off from the booklets 3 Trimmer pressure release lever opens to allow removal of mishandled paper 2 Trash basket 1 Trimmer unit knob 3 Trimmer pressure...

Страница 44: ...ever opens to allow removal of mishandled paper 3 Upper lever opens to allow removal of mishandled paper 4 Knob can be turned to ease removal of mishandled paper 5 Left lever opens to allow removal of...

Страница 45: ...ndled paper 3 Knob can be turned to ease removal of mishandled paper 4 Handle can be withdrawn to allow removal of mishandled paper 5 Left lever opens to allow removal of mishandled paper 6 Trash bask...

Страница 46: ...mes low PM CALL icon is displayed when preventive maintenance is due 3 Message area displays the machine status and procedure required at that time 4 Reserve job counts the reserve jobs already specif...

Страница 47: ...e for the next operation 10 STATUS key is touched to view the current job status to change the printing order of reserve jobs or to cancel printing a reserve job 11 SPECIAL ORIGINAL key is touched to...

Страница 48: ...ER lights when the timer function is set 9 POWER SAVER ON OFF activates power saving mode for times when the copier is inactive or activates Timer Interrupt mode when Weekly Timer function is active 1...

Страница 49: ...ain body then check that the internal reset switch of the copier is ON See p 2 4 Be sure not to use the reset switch in usual operation 2 The Wake up Screen and Warm up Screens will be displayed A few...

Страница 50: ...e Ready to copy reserve is displayed on the Basic Screen See p 3 8 to p 3 9 3 The Basic Screen will be displayed The message on the Basic Screen will inform you that copying job is now available DETAI...

Страница 51: ...in body The touch screen and all the LEDs on the control panel will go out Reminder Be sure not to use the reset switch in usual operation DETAILS When the machine is under control of the Weekly Timer...

Страница 52: ...AILS If the Auto Shut Off function activates at the same time the power will be turned off without the LCD screen becoming dark The LCD screen will not be come dark during a duplex copying job or when...

Страница 53: ...ng POWER SAVER ON OFF 2 The Shut Off mode will be activated The POWER SAVER ON OFF LED will be lit and all other LEDs and the LCD screen will be turned off DETAILS Be sure to press POWER SAVER ON OFF...

Страница 54: ...13 21 1 Enter ECM password Enter your 8 digit ECM password using the keypad HINT For setting an ECM password see p 13 17 to p 13 19 DETAILS If an invalid ECM password is entered continue by entering t...

Страница 55: ...THIN is displayed on the tray key of the Basic Screen be sure to load the specified paper otherwise mishandled paper may occur For details see p 13 23 to p 13 24 When TAB is displayed see p 2 28 for...

Страница 56: ...e plate Reminder Be sure that the rear guide plate is securely aligned to the paper otherwise machine trouble may occur Be sure that the green levers are securely aligned to the paper otherwise the ma...

Страница 57: ...Without the power turned on the LCT bottom plate will not function 3 Load the paper into the LCT with the paper curl turning downward making sure it is the same size as the tray has been set to Remind...

Страница 58: ...om plate will not go down any more Reminder Do not load above the red line on the side guide plates Be sure that the rear stopper is correctly positioned according to the paper size to be loaded other...

Страница 59: ...s tray to extend it 2 Load copy paper and adjust the paper guides to the paper size The loaded paper size will be indicated on the bypass tray key of the Basic Screen Reminder Load transparency film o...

Страница 60: ...can be specified in the Key Operator setting For details see p 13 23 to p 13 24 Reminder The tab extension width should be 12 5mm or less 1 Withdraw tray 1 2 or 3 2 Open the paper feed roller 3 Place...

Страница 61: ...into LCT contact your service representative to position the rear stopper for the paper size to be loaded 1 Open the LCT top door 2 Press the paper loading button to lower the LCT bottom plate 3 Load...

Страница 62: ...5mm or less 1 Open the Multi sheet bypass tray located on the right side of the copier 2 Load tabbed sheets as illustrated above 3 Adjust the paper guides to the paper size 4 Specify the paper type as...

Страница 63: ...Quantity 3 7 Setting Job During Warm up 3 8 To Stop Scanning Printing 3 10 Selecting Copy Size 3 11 Selecting Magnification Ratio Lens Mode 3 15 Selecting Density Level 3 19 Making Double Sided Copies...

Страница 64: ...en the document feeder otherwise the selected copy conditions may be altered automatically Be sure not to use unsuitable RADF originals See p 11 8 for details 2 Position original s FACE UP in the docu...

Страница 65: ...omatically Be sure not to use unsuitable RADF originals See p 11 8 for details HINT See p 11 9 for available combinations of mixed originals 2 Position mixed originals FACE UP aligned with the left re...

Страница 66: ...Arrange originals in order 2 Position original s FACE UP in the document feeder tray Place two sided originals with page one FACE UP Up to 100 originals can be set at a time Reminder Before placing or...

Страница 67: ...ted correctly otherwise the SDF mode may not function properly Be sure not to use unsuitable RADF originals See p 11 8 for details 2 Insert an original FACE UP in the document feeder tray Insert two s...

Страница 68: ...WN in the right rear corner aligning the edge with the right measuring guide 2 Gently close the document feeder to prevent the original from shifting on the glass Reminder When selecting Dual Page Non...

Страница 69: ...dure below to change the print quantity that has been already entered 1 Press C CLEAR QTY The quantity displayed on the touch panel will return to 1 2 Enter the correct quantity Entered quantity will...

Страница 70: ...the LCD touch panel seven types of Warm up Screen display in succession for approx 6 minutes 2 Touch the LCD panel to change the Warm up Screen to the Basic Screen Check that the message Ready to cop...

Страница 71: ...ys at the right side of the folder keys to scroll Copying on the reserve job will start automatically after completing the warm up HINTS To stop printing press STOP See p 3 10 for details The Job Stat...

Страница 72: ...to be suspended 2 Press STOP The current machine operation of the selected job will be suspended and the popup menu will display on the Basic Screen to ask you to continue or cancel the job 3 Touch EX...

Страница 73: ...APS at lower right corner of the Basic Screen APS is already highlighted when the initial settings are restored 2 Select additional copy conditions as desired 3 Enter the desired print quantity from t...

Страница 74: ...p 7 4 See the table below for the relation of original size magnification ratio and copy paper size Original size 11x17 8 5x14 8 5x14 5 5x8 5 5 5x8 5 5 5x8 5 8 5x11 11x17 11x17 8 5x11R 5 5x8 5R 5 5x8...

Страница 75: ...lect the desired copy size Selected tray key will be highlighted and under the LENS MODE AMS indication will also be highlighted 2 Select additional copy conditions as desired 3 Enter the desired prin...

Страница 76: ...8 5 x11 R 5 5 x8 5 5 5 x8 5 R A4 1 00 0 65 0 77 0 50 0 50 0 65 0 65 0 33 0 50 0 50 0 33 0 49 0 69 1 21 1 00 0 61 0 79 0 79 0 39 0 61 0 61 0 39 0 59 0 84 1 00 0 77 1 00 0 77 1 00 0 65 0 50 0 65 0 97 0...

Страница 77: ...ed by the Key Operator See p 13 10 to p 13 11 2 Select additional copy conditions as desired DETAILS Specifying copy size will release 1 00 magnification and set AMS automatically In this case touch 1...

Страница 78: ...e displayed Reminder When starting a new copying job be sure to close the RADF securely then press AUTO RESET 2 Select the desired magnification DETAILS Touching any key on the popup menu will momenta...

Страница 79: ...on the popup menu to enter the desired magnification ratio in 3 digits or use arrows c d to scroll to the desired ratio If an incorrect ratio is entered continue by entering the correct 3 digit ratio...

Страница 80: ...Selecting Magnification Ratio Lens Mode continued 3 18 6 Position original s HINT See p 3 2 to p 3 6 for details on positioning originals 7 Press START...

Страница 81: ...pying job be sure to close the RADF securely then press AUTO RESET DETAILS Touch NORMAL to select the middle density level To select the user set density USER1 or USER2 touch to highlight the desired...

Страница 82: ...desired HINT See p 13 12 to p 13 13 to set the user set density 3 Enter the desired print quantity from the control panel keypad HINT See p 3 7 for details on setting print quantity 4 Position origina...

Страница 83: ...e following message will be displayed Density Shift Text 2 0 5 4 Press any key from 0 to 5 using the keypad to determine the Density shift Entering 6 or above will be ignored 5 Touch OK on the Special...

Страница 84: ...py mode according to the original type single sided or double sided 1 Touch 1a2 or 2a2 on the Basic Screen to highlight it Reminder When starting a new copying job be sure to close the RADF securely t...

Страница 85: ...ch the desired binding mode key to highlight it DETAILS Selecting UP BINDING will make copies upside down on the reverse side while RIGHT LEFT BINDING copies normally Touch OK to return to the Basic S...

Страница 86: ...antity 6 Position originals FACE UP in the document feeder according to the original direction specified in step 2 HINTS See p 3 2 to p 3 6 for details on positioning originals Use RADF store mode p 3...

Страница 87: ...ay the Special Original popup menu then touch the desired original direction key to highlight it Touch OK to return to the Basic Screen 2 Select the binding mode Touch OUTPUT APPLI on the Basic Screen...

Страница 88: ...on specified in step 1 Be sure to start from the first page HINTS See p 11 8 for paper sizes detectable on the platen glass See p 3 6 for details on positioning originals 4 Touch 1a2 on the Basic Scre...

Страница 89: ...upper right of the Basic Screen allows you to check the remaining memory To delete the scanned data without printing press STOP then touch CANCEL on the popup menu to be sure the data is deleted 9 To...

Страница 90: ...ing job be sure to close the RADF securely then press AUTO RESET 2 Select the original set direction Touch SPECIAL ORIGINAL on the Basic Screen to display the Special Original popup menu then touch th...

Страница 91: ...etails on positioning originals Use RADF store mode p 3 34 to p 3 35 when the original count exceeds 100 6 Press START The machine starts to scan originals then prints simplex copies when ready for ou...

Страница 92: ...ulti sheet bypass tray and load the copy paper HINT See p 2 27 for further details 2 Touch the Bypass key to highlight it The TYPE SIZE key will appear above the Bypass key APS will be deselected and...

Страница 93: ...ertical size key to highlight it then use the keypad on the popup menu to enter the vertical size or use arrows to scroll to that number To set the horizontal size touch the horizontal size key to hig...

Страница 94: ...size corresponding to the selected wide size to a maximum of 314mm 3 Similarly touch the horizontal size key to highlight it then use the keypad on the popup menu to enter the horizontal size or use...

Страница 95: ...cument feeder or FACE DOWN on the platen glass HINT See p 3 2 to p 3 6 for details on positioning originals 10 Press START 3 Copying Operations Positioning Originals Setting Print Quantity Set Job Dur...

Страница 96: ...or condition DETAILS RADF tray capacity is 100 however more than 100 originals can be scanned into memory using RADF store mode Specification for Store Mode Incompatible with RADF store mode Image In...

Страница 97: ...canned data without printing press STOP then touch EXIT on the confirmation screen to be sure the data is deleted HINT Should memory overflow occur frequently it is recommended that you contact your s...

Страница 98: ...nt job Incompatible Conditions Interrupt copying Scanning in Store mode Proof copy Storing image in Overlay Memory 1 Press START to start scanning printing for the current job FREE JOB will become act...

Страница 99: ...FREE JOB key at the far right to scroll to the next reserve setting screen Another three reserve job settings 04 06 will be available When setting the seventh copying job touch the active FREE JOB ke...

Страница 100: ...When trouble occurs on a reserve job which is not currently displayed on the screen the arrow key to scroll to that job will blink See p 5 8 to p 5 10 6 Copying of the reserve job will start automati...

Страница 101: ...job Touch to highlight the desired reserve job key then touch JOB PRIORITY The highlighted reserve job is advanced by one in printing order unless the job preceding the selected one is already in prog...

Страница 102: ...Touch OK on the Job Status Screen The Basic Screen will be restored Contents of Job Status Screen NO Displays the No 01 99 for each job assigned to the machine MODE Displays the machine s current mod...

Страница 103: ...l be displayed on the bar when the reserved job does not exist RESERVED JOB DOES NOT EXIST 3 Copying Operations Positioning Originals Setting Print Quantity Set Job During Warmup Stop Scan Print Copy...

Страница 104: ...and A4R 3 Group mode copies each original page in amounts determined by the print quantity setting then outputs grouped sets normally 4 Rotation group mode rotates every other grouped set by 90 upon...

Страница 105: ...highlighted on the Basic Screen To select Rotation sort mode Confirm that OUTPUT APPLI is not highlighted then touch SORT to highlight it To select Group Rotation group or Face up mode 1 Touch OUTPUT...

Страница 106: ...the exit tray capacity is not exceeded See p 3 7 for details on setting print quantity 5 Position original s FACE UP in the document feeder or FACE DOWN on the platen glass HINT See p 3 2 to p 3 6 for...

Страница 107: ...each sorted set Up to 50 sheets or within 5mm thick can be stapled 4 Group mode groups together multiple copies of each original and offsets the sets by 30mm upon exit 4 1 2 3 4 3 2 1 4 3 2 1 4 3 2 1...

Страница 108: ...output to Primary main tray in Sort mode Follow the procedure on the next page to change the output mode as desired HINT See Section 7 for the output modes using Finisher options Specification for Out...

Страница 109: ...ly selected Key Operator can change the initial output mode See p 13 10 2 Select the desired output mode To set Non sort or Sort mode using Primary main tray proceed to the next step To set Staple sor...

Страница 110: ...e selected staple position icon displayed DETAILS When making double sided copies select the desired binding mode on the Output Mode popup menu See p 3 51 for detail 4 Touch SPECIAL ORIGINAL on the Ba...

Страница 111: ...ch OK to restore the Basic Screen OUTPUT APPLI will be highlighted and the output icon of the selected output mode will be displayed in the output icon area 6 Select additional copy conditions as desi...

Страница 112: ...inued 3 50 9 Press START Press STOP to suspend the scanning or printing job CAUTION When the finisher exit tray capacity is exceeded due to the print quantity selected remove the copied sets as they e...

Страница 113: ...to display the Output Mode popup menu 2 Touch to highlight the desired binding mode key 3 Touch OK to return to the Basic Screen 3 1 2 3 1 2 1 2 3 1 2 3 Copies Binding mode 3 Copying Operations Posit...

Страница 114: ...een made last The previous job settings can be recalled even after the machine power is turned off then on 1 Press JOB MEMORY on the control panel The Job No Selection Screen will be displayed 2 Touch...

Страница 115: ...opy cannot be used for testing the Userset density Proof copy is unavailable with Group output mode 1 Select the desired copy conditions and enter the desired print quantity Reminder When starting a n...

Страница 116: ...Screen Selecting Enhance Mode Special Orig or Original key will display the Special Original popup menu Selecting an application function key will display the Change Application Selection Screen When...

Страница 117: ...n this case the scanned image data will not be deleted from memory You cannot change or release selections that appeared dimmed after proof copying When the copy result is satisfactory proceed to the...

Страница 118: ...that the print quantity amount on the Check Screen does not change If required change the print quantity on the Basic Screen 8 Press START If the print quantity is not changed the copier will output...

Страница 119: ...conditions The Basic Screen is not displayed Overlay Memory is in use The Call for Service message displays or a paper misfeed occurs Incompatible Reserve Storing image in Overlay Memory 1 Press INTER...

Страница 120: ...ying DETAILS When CHECK is pressed during Interrupt copying the information displayed reflects the initial copy job settings Check mode will not display Interrupt copy job information 5 When Interrupt...

Страница 121: ...ced in the document feeder Then the LED remains steady for the temporary job performed in Interrupt mode Scanning originals into memory while printing in Reserve mode The LED blinks until the copier c...

Страница 122: ......

Страница 123: ...ob Memory Help Mode Job Memory Help Mode How to Use Helpful Functions Storing Job Conditions Job Memory Job Store 4 2 Recalling Stored Job Settings Job Memory Job Recall 4 5 Displaying Screen for Oper...

Страница 124: ...an be selected Interrupt mode cannot be used while in Job Memory 1 Make job selections from the Basic Screen and or Application Selection Screen Reminder When starting a new copying job be sure to clo...

Страница 125: ...6 press AUTO RESET Job Memory mode will be cancelled and the Basic Screen will return from any screen 6 Touch to highlight one of the keys numbered from 1 30 to store the job under that number The sc...

Страница 126: ...the touch screen alphabet keypad To correct an entry touch 1 CHARACTER DELETE repeatedly to delete each character entered then enter the correct job name DETAILS If you do not wish to enter a name si...

Страница 127: ...screen displays 15 job number keys If required scroll to the next page with the arrow key to reach the desired job number key 16 30 3 If desired touch JOB CHECK The Job Recall Check Screen displays t...

Страница 128: ...ress HELP The Help Screen will be displayed 2 Touch the desired key to display specific information STAPLE SUPPLY provides information on replacing staple cartridge PUNCH provides information on empty...

Страница 129: ...splay subsequent Help Screens Touch on the Help Screen if provided to scroll to the next page Touch to return to the previous page Touch MENU on the subsequent Help Screen to return to the Help Menu S...

Страница 130: ...in any screen other than the Basic Screen press HELP The Help Screen displays to provide the information about the current screen mode and setting procedures 2 Touch EXIT The screen that was displaye...

Страница 131: ...to Handle Machine Troubles When Call for Service Message Is Displayed 5 2 Preventive Maintenance 5 4 Clearing Mishandled Paper 5 6 When JAM Appears on Folder Key Or Arrow Key Flashes 5 8 When ADD PAP...

Страница 132: ...of your service representative CAUTION When the Call for Service Screen is displayed be sure to contact your service representative immediately by following the procedure below 1 Make note of the Repo...

Страница 133: ...r machine repair immediately 1 If the limited use of the copier is available the following message is displayed in the message area instead of the Report code ex Tray 2 failure Press AUTO to select ex...

Страница 134: ...ge and an icon will prompt you to contact your service representative for maintenance To Check the PM Counter Follow the procedure below to check the PM counter to estimate the time when Preventive Ma...

Страница 135: ...r on the screen HINT To print the Counter list including the PM counter see p 12 18 3 Touch EXIT The Basic Screen will be restored 5 Trouble shooting Call for Service Preventive Maintenance Clearing M...

Страница 136: ...screen illustrating the method for the disposal action will be displayed Reminder Before performing the clearing procedure see p 1 2 for the caution label locations inside the machine 2 Follow the pro...

Страница 137: ...drum unit generates high voltage To avoid bodily electrical shock NEVER TOUCH the area CAUTION The internal fixing unit is very hot To avoid getting burned DO NOT TOUCH CAUTION Be careful of removing...

Страница 138: ...the folder key of the print scan job in trouble is not currently displayed on the screen the arrow key to scroll to that job will flash Follow the procedure below to remove mishandled paper 1 Display...

Страница 139: ...are displayed on the screen 4 Press START The scan print job will resume 5 Touch FREE JOB to continue the reserve job setting WARNING The drum unit generates high voltage To avoid electrical shock NE...

Страница 140: ...h Follow the procedure below to continue the copying operation 1 Display the Basic Screen for the print job in progress Touch ADD PAPER The Basic Screen for the print job will be displayed When the ar...

Страница 141: ...ended that you contact your service representative to extend the memory capacity in your machine Memory Overflow in Current Job When memory overflow occurs while scanning the first job the machine sto...

Страница 142: ...all the jobs on standby for printing are completed DETAILS If the job settings include Booklet mode SCAN STOP will disappear To delete the scanned data and discontinue the last reserve job touch JOB S...

Страница 143: ...reen will be displayed Follow the procedure below to turn the machine power off then on 1 Turn OFF the power switch 2 Wait about 10 seconds 3 Turn ON the power switch 5 Trouble shooting Call for Servi...

Страница 144: ...laten glass and inner surface of document cover clean Call for service if Call for service is displayed in the message area Check density indicator and lighten if required COPY PAPER MISHANDLES DURING...

Страница 145: ...heck for a paper misfeed and remove it as required Properly close finisher door RADF INDICATOR WILL NOT LIGHT AFTER AUTO RESET IS PRESSED Fully close RADF RADF LIGHT IS FLASHING The document feeder is...

Страница 146: ...hat chapter sheets in 1 2 mode always appear on the right hand side in the finished set insertion sheets must be designated on the page setting screen with odd numbers not even If required make an eve...

Страница 147: ...6 Machine Specifications Main Body Option Specifications Main Body Specifications 6 2 Option Specifications 6 5 6 Machine Specifications...

Страница 148: ...pies Voltage 208 240V AC14 to 10 6 Current 17 6A Dedicated line recommended Frequency 60Hz Grounding Isolation recommended Power Consumption Max 3 840 VA full option Noise Level full system Approx 78...

Страница 149: ...eets 20 lb Paper Weight 20 lb 24 lb bond recommended Max range 16 lb 53 lb 200g m2 thick paper OHP sheet Transparency Labels Tab 3 hole Main Body Safety Standard UL 1950 CSA 22 2 No 950 95 Radio Inter...

Страница 150: ...t Feeder PI 108 Width 13 0 in 330 mm Depth 18 0 in 456 mm Height 4 7 in 120 mm Trimmer Unit TU 108 Width 44 0 in 1117 mm Depth 23 8 in 604 mm Height 22 1 in 562 mm Punching Unit PU 108 Width 6 7 in 16...

Страница 151: ...Sheet Feeder PI 108 Power source Finisher Paper size 11 x17 8 5 x14 8 5 x11 8 5 x11 R 5 5 x11 5 5 x11 R A4 A4R 8 27 x11 69 210 mm x 297 mm Paper weight in cover sheet mode 13 110 lb 200 g m2 thick pap...

Страница 152: ...folding for 11 x17 double folding for 8 5 x14 Folded width 215 mm or less for 11 x17 261 6 mm or less for 8 5 x14 Weight 83 6 lb 38 kg Power source supply from outlet Large Capacity Tray LT 402 Paper...

Страница 153: ...Advanced 7 8 9 10 11 13 12 Advanced Information Applications Maintenance Supplies Paper Original Info Server Function KeyOperator Mode Special Original...

Страница 154: ......

Страница 155: ...ced Information How to Use Advanced Functions Programmed Shut Off Weekly Timer 7 2 Rotation 7 4 Vertical Horizontal Zoom Mode 7 5 Making Folded Booklet Folding Stapling Folding 7 8 Punching File Holes...

Страница 156: ...R indicator light is on and other indicators are off copying is unavailable due to the Weekly Timer function However copying can be available by using the following procedure 1 Press POWER SAVER ON OF...

Страница 157: ...ng message will be displayed on the Basic Screen Input copy time 0 hour s 05 minute s 4 Set the hour for the interrupt use Enter a 1 digit hour ex 3 hours is 3 using the keypad on the control panel 0...

Страница 158: ...o release resume this function 1 Touch ROTATION OFF on the Basic Screen to highlight it When Rotation is released the Rotation icon on the Basic Screen will disappear to indicate that this function is...

Страница 159: ...displayed Reminder When starting a new copying job be sure to close the RADF securely then press AUTO RESET Length 1 00 Width 1 00 Length 0 50 Width 1 00 Length 4 00 Width 1 00 Length 2 00 Width 1 00...

Страница 160: ...imilarly touch Horiz to highlight it then set the horizontal zoom ratio 3 Touch OK The popup menu disappears automatically and the specified zoom ratio will be displayed on the Basic Screen 4 Select a...

Страница 161: ...with an original placed slantwise on the platen glass Length 0 50 Width 2 00 Length 2 00 Width 0 50 Length 0 50 Width 2 00 Length 2 00 Width 0 50 30 30 7 Advanced Information Using Finisher Manually...

Страница 162: ...Folding Stapling Folding Mode Max number of folded sheets 20 lb paper in both modes Folding 3 sheets less than in Stapling Folding mode because they are not clinched first Stapling Folding 20 sheets...

Страница 163: ...ecting FOLDING or STAPLING FOLDING will automatically switch the output tray to Booklet tray Notice that the arrow pointing from the MAIN TRAY shifts to the Booklet tray 3 sheets max 16 sheets max 15...

Страница 164: ...ce to display the Booklet Mode Selection Screen to make another selection or to release the setting 6 Enter the desired print quantity from the control panel keypad HINT See p 3 7 for details on setti...

Страница 165: ...type such as transparent films labels tabbed sheets etc Otherwise machine trouble may occur in Punching unit Be sure that the side guide plates of the paper tray are securely aligned to the paper othe...

Страница 166: ...PUNCH The Punch Position popup menu will be displayed 4 Touch the desired punch position key on the screen to highlight it 5 Touch OK on the Punch Position popup menu to restore the Output Mode popup...

Страница 167: ...ty from the control panel keypad HINT See p 3 7 for details on setting print quantity 10 Position originals in the document feeder HINT See p 3 2 to p 3 5 for details on positioning originals 11 Press...

Страница 168: ...1 x17 and 8 5 x14 originals should not be mixed otherwise the Z Folding mode may not function properly Special paper type Thick 2 OHP film labels tabbed sheets and non standard size STD size special N...

Страница 169: ...ight it 4 Touch OK on the Output Mode popup menu to complete the setting and return to the Basic Screen The Z Folding icon will be displayed in the OUTPUT icon area Z Folding Z Folding Staple sort APS...

Страница 170: ...he control panel keypad HINT See p 3 7 for details on setting print quantity 7 Position originals HINT See p 3 2 to p 3 6 for details on positioning originals 8 Press START CAUTION When the finisher e...

Страница 171: ...and Trimming 100 sets max of 3 sheet folded booklet 100 x 3 300 sheets max Stapling Folding and Trimming 100 sets max of 2 5 sheet folded booklet 100 x 5 500 sheets max 50 sets max of 6 10 sheet folde...

Страница 172: ...he trimmer unit installed selects TRIM automatically DETAILS When copying two sided signature originals using the Folding or Sta pling Folding mode release the automatically selected Booklet mode on t...

Страница 173: ...details on positioning originals DETAILS When loading originals heed the following limits on capacity Folding mode 12 pages or less for simplex copying 6 pages or less for duplex copying Stapling Fol...

Страница 174: ...incompatible with cover sheet mode COVER WITH COPY SHEET and COVER WITH BLANK SHEET in Booklet and cover mode in Sheet Cover Insertion Specifications for Cover Sheet Feeding Cover paper size 11 x17 8...

Страница 175: ...or BACK to highlight it 5 Touch OK to restore the Output Mode popup menu 6 Touch OK on the Output Mode popup menu The Basic Screen will be restored 7 Select additional copying features as required 7 A...

Страница 176: ...e correct size is loaded Please load cover sheet in cover sheet feeder Adapt paper size between cover sheet and selected paper 9 Enter the desired print quantity from the control panel keypad HINT See...

Страница 177: ...staples Stapling Folding and Trimming 2 staples in the center Folding Trimming Specifications for Manual Staple 1 oblique staple and 2 parallel staples Paper size 11 x17 8 5 x14 8 5 x11 8 5 x11 R 5 5...

Страница 178: ...he indicator light of Start Stop button will turn green HINT Refer to the specifications for available paper size and capacity in each mode 2 Press Staple Mode Selection button to select the desired m...

Страница 179: ...al Finishing operation press the Start Stop button again The Finisher will cease operating When using Stapling Folding mode the unfinished set will be left in the stacker unit inside the Finisher MANU...

Страница 180: ...e secondary copier to accommodate the job Auto low power Auto shut off may function while tandem mode is selected If the tandem mode is selected while the secondary copier is in Auto low power mode th...

Страница 181: ...displayed 2 Touch OUTPUT APPLI on the Basic Screen of either copier The Output Mode popup menu will be displayed 3 Touch TANDEM to highlight it then touch OK The copier with TANDEM highlighted will b...

Страница 182: ...ed if 10 reserve jobs not in tandem mode are entered on the secondary copier Wait until the reserve jobs are completed on the secondary copier Selected tandem mode will be released automatically when...

Страница 183: ...the tandem mode copying that job will also be performed in the tandem mode Up to 10 jobs including the present job can be reserved Interrupt mode during Tandem mode copying Interrupt copying is availa...

Страница 184: ...n immediately and the popup menu appears on the Basic Screen of the secondary copier to ask you whether to continue or cease the operation At this time the tandem mode is not released DETAILS If tempo...

Страница 185: ...and the tandem copying job will be suspended on both copiers At this time the tandem mode is not released Take the same measure to be applied for single copier referring to p 5 11 p 5 12 On the second...

Страница 186: ......

Страница 187: ...w to Make a Copy of Special Original Specifying Original Direction 8 2 Making Copy Quality Closer to Originals Text Photo Enhance 8 4 Copying Mixed Size Originals Mixed Original 8 6 Copying Z Folded O...

Страница 188: ...with binding position specified or when staple position is specified 1 Touch SPECIAL ORIGINAL on the Basic Screen The Special Original popup menu will be displayed Reminder When starting a new copyin...

Страница 189: ...on setting print quantity 6 Position originals FACE UP in the document feeder or FACE DOWN on the platen glass according to the original direction specified in step 2 HINT See the illustration on prev...

Страница 190: ...to darken lightly printed images e g pencil without changing background exposure In cases where the image is light and background is dark the background will not be changed DETAILS In each enhance mo...

Страница 191: ...osition original s FACE UP in the document feeder or FACE DOWN on the platen glass HINTS See p 3 2 to p 3 6 for details on positioning originals Use RADF store mode p 3 34 to p 3 35 when the original...

Страница 192: ...ions Staple Sort with APS Rotation Sort Folding Stapling Folding Trimming Punch B6R mixed Z Folded Original Non STD Size Tab Paper Sheet Cover Insertion Chapter Combination Booklet Transparency Inter...

Страница 193: ...he control panel keypad HINT See p 3 7 for details on setting print quantity 6 Position mixed original s FACE UP in the document feeder HINTS See p 3 3 for details on positioning originals Use RADF st...

Страница 194: ...F Incompatible Conditions Using platen glass Folding Stapling Folding Trim ming Mixed Original Non STD Size Tab Paper Non Image Area Erase Repeat AUTO Layout Storing image in Overlay Memory 1 Touch SP...

Страница 195: ...feeder HINTS See p 3 4 for details on positioning originals Use RADF store mode p 3 34 to p 3 35 when the original count exceeds 100 7 Press START CAUTION When the finisher paper exit tray capacity i...

Страница 196: ...3 110 lb Duplex original paper weight 13 45 lb Incompatible Conditions Using platen glass Folding Staple sort Group Rotation sort Rotation group Mixed Original Z Folded Original WHOLE AREA in Non STD...

Страница 197: ...ment feeder The set original will be automatically fed and scanned Never set more than one original otherwise machine trouble may be caused When scanning is completed touch STORE to exit the RADF stor...

Страница 198: ...n STD Size Mixed Original Z Folded Original Tab Paper Storing image in Overlay Memory Incompatible with WHOLE AREA Combination Booklet Book Copy Non Image Area Erase Image Shift Incompatible with Tab...

Страница 199: ...her tray specify the paper type as Tab paper in the Key Operator mode See p 13 23 to p 13 24 For the procedure of tabbed copy paper supply see p 2 28 to p 2 30 7 Enter the desired print quantity from...

Страница 200: ......

Страница 201: ...viding an Image into Right and Left Pages Book Copy 9 22 Programming Different Settings for an Output Job Program Job 9 26 Erasing Outside of the Original Non Image Area Erase 9 29 Reversing Color in...

Страница 202: ...K MARK in the message area of the subsequent screen if desired so that the screen may be directly accessed from the Check Screen to change the setting you made If one function on the menu is incompati...

Страница 203: ...7 8 9 10 1 2 3 4 5 6 7 8 9 10 SURVEYOR S REPORT SURVEYOR S REPORT 1 2 3 4 5 6 7 8 9 10 1 2 3 4 5 6 7 8 9 10 SURVEYOR S REPORT SURVEYOR S REPORT 1 2 3 4 5 6 7 8 9 10 1 2 3 4 5 6 7 8 9 10 SURVEYOR S REP...

Страница 204: ...bypass tray unless previously specified and loaded in any other tray Be sure that the trays for copy paper front back covers and insertions have the same paper size loaded 2 Touch APPLI on the Basic S...

Страница 205: ...ill be deleted HINT See p 9 6 for details on entering page numbers 7 Touch CHANGE OF THE INSERTION TRAY to select the insertion tray source The tray source for covers currently selected is displayed o...

Страница 206: ...isplayed on the screen to designate each insertion location When setting more than 15 locations touch the arrow key to move to the next page The first upper left key displays the Front Cover icon if s...

Страница 207: ...o p 9 60 Incompatible Conditions 1a1 2a2 2a1 Group Rotation Sort Rotation Group Face Up Mixed Original Tab Paper Combination Transparency Interleave Image Insert Program Job Non Image Area Erase Repea...

Страница 208: ...quence even if original page numbers are entered out of sequence When a page number is larger than the total original page count insertion occurs as the last page of the document OPTION Touch Booklet...

Страница 209: ...when the original count exceeds 100 8 Press START CAUTION When the finisher trimmer unit paper exit tray capacity is exceeded due to the print quantity selected remove the copied sets as they exit oth...

Страница 210: ...S Group Rotation Sort Rotation Group Folding Stapling Folding Trimming with Booklet selected Mixed Original Sheet Cover Insertion Chapter Booklet Transparency Interleave Image Insert Book copy Program...

Страница 211: ...other than the one that is set and displayed on the Basic Screen touch the desired tray key 6 Select the desired original direction Touch SPECIAL ORIGINAL on the Basic Screen to display the Special O...

Страница 212: ...the original count exceeds 100 9 Press START CAUTION When the finisher paper exit tray capacity is exceeded due to the print quantity selected remove the copied sets as they exit otherwise mishandled...

Страница 213: ...d Original Tab Paper Sheet Cover Insertion Combination Transparency Interleave Program Job Non Image Area Erase Repeat Storing Image in Overlay Memory 1 Load Copy Paper Load the desired copy paper siz...

Страница 214: ...order 5 Touch OK The Application Selection Screen will be restored Select additional Applications as desired HINT Key Operator can set the machine to position the page numbers automatically on the out...

Страница 215: ...duplex copying Stapling Folding mode 80 pages or less for simplex copying 40 pages or less for duplex copying Exeeding the above limits on capacity may cause misfeeds in the finisher 11 Press START CA...

Страница 216: ...popup menu then touch MAIN TRAY to highlight it 2 Touch STAPLING FOLDING or FOLDING as desired NOTE Selecting FOLDING or STAPLING FOLDING will automatically switch the output tray to Booklet tray Noti...

Страница 217: ...Sort Rotation Group Folding Stapling Folding Trimming Cover sheet feeding Punch Mixed Original Tab Paper Sheet Cover Insertion Chapter Combination Booklet Image Insert Program Job Repeat Overlay Stori...

Страница 218: ...6 Touch OK on the Application Selection Screen The Basic Screen will be restored DETAILS AMS is selected automatically To release AMS select the desired magnification Print quantity is already set to...

Страница 219: ...Interleave Book Copy Program Job Non image Area Erase Repeat AUTO Layout Overlay Storing Image in Overlay Memory 1 Touch APPLI on the Basic Screen Reminder When starting a new copying job be sure to...

Страница 220: ...re made touch OK The Application Selection Screen will be restored 5 Touch OK on the Application Selection Screen The Basic Screen will be restored The STORE key on the Basic Screen appears highlighte...

Страница 221: ...the copied sets as they exit otherwise mishandled paper will occur DETAILS Entering Page Numbers For example if insertion locations are 2 2 6 scanned platen images will be inserted as follows The firs...

Страница 222: ...after the first scan copies normally Front Back Cover Full Scan mode Image division starts from the third scan after the first and second scan copy normally Specifications for Book Copy Store mode is...

Страница 223: ...use this function 5 Touch OK The Application Selection Screen will be restored 6 Touch OK on the Application Selection Screen The Basic Screen will be restored APS and AMS are automatically released...

Страница 224: ...the first page FACE DOWN with document feeder kept open When using document feeder position original s FACE UP For details on scanning originals in Front cover Full scan and Front Back Cover Full sca...

Страница 225: ...g scanning See p 5 11 to p 5 12 When using platen glass Non Image Area Erase and AUTO Layout are automatically selected DO NOT CLOSE the document feeder throughout the scanning job Front cover Full sc...

Страница 226: ...B Output mode and print quantity setting cannot be specified for each JOB The last setting made will be applied to all JOBs Program Job settings cannot be stored in Job Memory Incompatible Conditions...

Страница 227: ...mber of document feeder originals exceeds 100 divide them into blocks not exceeding 100 sheets and load them from the block with the first page 6 Press START The copy size determined at this time will...

Страница 228: ...low occur frequently it is recommended that you contact your service representative to extend the memory capacity in your machine 9 Select the desired output mode and enter the print quantity from the...

Страница 229: ...er Insertion Chapter Combination Booklet Image Insert Book Copy in RADF Store mode Reverse Image All image Area Reduce Shift in Image Shift Storing Image in Overlay Memory 1 Touch APPLI on the Basic S...

Страница 230: ...OSE THE DOCUMENT FEEDER Original size should be larger than 10mm x 10mm 7 Press START DETAILS Oblique Erase and Rectangle Erase Modes The Non image area erase has two modes Rectangle erase mode and Ob...

Страница 231: ...er When starting a new copying job be sure to close the RADF securely then press AUTO RESET 2 Touch Reverse Image on the Application Selection Screen The incompatible function keys will be dimmed to s...

Страница 232: ...s on setting print quantity 5 Position original s FACE UP in the document feeder or FACE DOWN on the platen glass HINT For details on positioning originals see p 3 2 to p 3 6 6 Press START CAUTION Whe...

Страница 233: ...Transparency Interleave Image Insert Book Copy Non Image Area Erase Frame Fold Erasure AUTO Layout Reduce Shift in Image Shift Stamp Overlay 1 Touch APPLI on the Basic Screen Reminder When starting a...

Страница 234: ...value from the touch screen keypad Touch Vert Horiz on the popup menu each time to shift it from one to another Enter the value then touch OK to restore the Repeat Mode Selection Screen 4 Touch OK Th...

Страница 235: ...ss START CAUTION When the finisher trimmer unit paper exit tray capacity is exceeded due to the print quantity selected remove the copied sets as they exit otherwise mishandled paper will occur 9 Appl...

Страница 236: ...Conditions with Auto Detection Mode Using RADF 2a2 2a1 APS AMS Rotation Group Rotation Sort Rotation Group Mixed Original Z Folded Original Sheet Cover Insertion Chapter Combination Booklet Transparen...

Страница 237: ...ed Repeat mode 4 Touch OK The Application Selection Screen will be restored DETAILS Non Image Area Erase is automatically selected on the Application Selection Screen when AUTO mode is selected HINT W...

Страница 238: ...print quantity from the control panel keypad HINT See p 3 7 for details on setting print quantity 8 Position original For AUTO mode original open the document feeder then position the original FACE DO...

Страница 239: ...UTO RESET 2 Touch Frame Fold Erasure on the Application Selection Screen The Frame Fold Erasure Selection Screen will be displayed Set original General copying Frame Erasure copying Fold Erasure copyi...

Страница 240: ...in the selected mode To specify Frame Erasure All sides amount Touch to highlight FRAME if not highlighted then use the touch screen keypad or up down arrow key to enter the desired erasure amount of...

Страница 241: ...tails on setting print quantity 8 Position original s FACE UP in the document feeder or FACE DOWN on the platen glass HINT For details on positioning originals see p 3 2 to p 3 6 DETAILS When lowering...

Страница 242: ...PS AMS Rotation Rotation Sort Rotation Group Mixed Original Z Folded Original Sheet Cover Insertion Chapter avail able when Non Image Area Erase is released manually Combination Booklet Image Insert R...

Страница 243: ...print quantity 6 Position original s FACE UP in the document feeder or FACE DOWN on the platen glass HINT For details on positioning originals see p 3 2 to p 3 6 Reminder DO NOT close the RADF when No...

Страница 244: ...rame Fold Erasure 1 Touch APPLI on the Basic Screen Reminder When starting a new copying job be sure to close the RADF securely then press AUTO RESET 2 Touch All image Area on the Application Selectio...

Страница 245: ...see p 3 2 to p 3 6 7 Press START CAUTION When the finisher trimmer unit paper exit tray capacity is exceeded due to the print quantity selected remove the copied sets as they exit otherwise mishandled...

Страница 246: ...p 9 48 for details If image loss is likely select the Reduce Shift mode instead of regular Image shift See p 9 49 Specifications for Image Shift Shift amount 0 to 250mm in 1mm increments Setting in 0...

Страница 247: ...hift amount from 0 to 250mm in 1mm increments The image display on the screen allows you to view the shift direction and amount to be created on the printed sheets When Booklet or 2 Repeat mode of Rep...

Страница 248: ...ils on setting print quantity 8 Position original s FACE UP in the document feeder or FACE DOWN on the platen glass HINT For details on positioning originals see p 3 2 to p 3 6 9 Press START CAUTION W...

Страница 249: ...tions Change magnification V H zoom APS Mixed Original Book Copy Non Image Area Erase Repeat AUTO Layout Overlay Storing Image in Overlay Memory Originals Right Front Back Up Down Left Right Left Down...

Страница 250: ...ey appears dimmed to show inactivity Touch to highlight the desired shift direction key then use the touch screen keypad or up down arrow key to enter the desired shift amount from 0 to 250mm in 1mm i...

Страница 251: ...FACE DOWN on the platen glass HINT For details on positioning originals see p 3 2 to p 3 6 9 Press START CAUTION When the finisher trimmer unit paper exit tray capacity is exceeded due to the print qu...

Страница 252: ...used individually or in multiple combinations Specification for STAMP SET NUMBERING PAGE NUMBERING DATE TIME Incompatible Conditions Reverse Image Repeat except 2 4 8 Repeat Overlay with STAMP and SET...

Страница 253: ...desired stamp key and printing position key on the screen If fine adjustment is required touch FINE ADJ OF POSITION to display the Fine Adjustment Setting Screen See p 9 56 for details Touch CHARACTE...

Страница 254: ...G No to designate the starting number if required See p 9 56 for details When selecting PAGE NUMBERING Specify the page numbering type printing position character size printed page and starting No Tou...

Страница 255: ...ill be restored Touch to select another stamp function key to use in combination if desired 6 Touch OK on the Stamp Overlay Selection Screen The Application Selection Screen will be restored 7 Touch O...

Страница 256: ...ouch screen keypad or up down arrow key to enter the desired amount from 0 to 50mm Touch OK to return to the previous screen Starting No Setting Screen Available from SET NUMBERING or WATER MARK NUMBE...

Страница 257: ...PAGE NUMBERING When copied blank insertion mode of Sheet Cover Insertion has been already selected this screen allows you to specify whether to print the page number on insertions or skip them from th...

Страница 258: ...RING Specification for WATERMARK and WATERMARK NUMBERING Incompatible Conditions Reverse Image Repeat except 2 4 8 Repeat Overlay Overlay Memory 1 Touch APPLI on the Basic Screen Reminder When startin...

Страница 259: ...tment Setting Screen See p 9 56 for details When selecting WATERMARK NUMBERING Specify the desired watermark numbering type density character size and starting No Touch to highlight the desired waterm...

Страница 260: ...n Selection Screen The Basic Screen will be restored 8 Enter the desired print quantity from the control panel keypad HINT See p 3 7 for details on setting print quantity 9 Position original s FACE UP...

Страница 261: ...ERMARK WATERMARK NUMBERING 1 Touch APPLI on the Basic Screen Reminder When starting a new copying job be sure to close the RADF securely then press AUTO RESET 2 Touch Stamp Overlay on the Application...

Страница 262: ...re automatically released and 1 00 100 is selected as a magnification ratio 7 Enter the desired print quantity from the control panel keypad HINT See p 3 7 for details on setting print quantity 8 Posi...

Страница 263: ...t tray capacity is exceeded due to the print quantity selected remove the copied sets as they exit otherwise mishandled paper will occur 9 Applications Reverse Image Non Image Area Erase Program Job B...

Страница 264: ...inal Tab Paper Sheet Cover Insertion Chapter Combination Booklet Transparency Interleave Image Insert Book Copy Program Job Non Image Area Erase Reverse Image Repeat AUTO Layout Image Shift Stamp Over...

Страница 265: ...e Selection Screen will be displayed Proceed to step 9 when recalling only the stored image 4 Touch IMAGE STORE to display the Image Name Entry Screen 9 Applications Reverse Image Non Image Area Erase...

Страница 266: ...then enter the correct name 6 If the image name is correct touch OK The Basic Screen to store the overlaying image will be displayed Select the desired copy conditions HINT The popup menu may be disp...

Страница 267: ...ELETE 10 Touch OK to return to the Application Selection Screen 11 Touch OK to return to the Basic Screen The Store mode is automatically selected and APS and AMS are released Set the desired conditio...

Страница 268: ...pup Menu for Name Duplication If the popup menu with YES and NO keys is displayed instead of the Basic Screen the entered name is duplicated Touch YES to enter a new name or NO to create a duplicate n...

Страница 269: ...19 To Display Current Machine Status Job Status 10 20 Operating Image Data Stored in HDD HDD Job Information 10 22 Setting E Mail Transmission Function Environment Setup 10 27 Setting E C M Function E...

Страница 270: ...e data can be recalled to DIMM and output as needed This function also allows you to store the image data for normal copying procedures The Server function provides the following three modes 1 Image S...

Страница 271: ...HDD after copying is completed 3 Image Recall mode Recall the image data stored in HDD to built in DIMM for printing 10 Network Function Environment Setup HDD Job Information Job Status Machine Infor...

Страница 272: ...HDD Incompatible Scanning Conditions 1a2 2a2 AMS Selecting output mode Selecting paper size APS is automatically selected Setting print quantity Rotation WHOLE AREA in Non STD Size Sheet Cover Inserti...

Страница 273: ...he desired image data password in up to 8 characters from the touch screen keypad To correct an entry touch 1 CHARACTER DELETE repeatedly to delete each character then enter the correct password 10 Ne...

Страница 274: ...dly to delete each character then enter the correct job name 6 If the job name is correct touch OK The Scanner Setting Screen will be displayed DETAILS If an entered job name has already been used the...

Страница 275: ...job is almost completed the Basic Screen will be restored automatically DETAILS Key Operator can set the machine to restore the Job Name Entry Screen when the storing job is completed so that the data...

Страница 276: ...the data in HDD is required The image data is to be specified by the given job name 1 Press MODE to light up the SCAN SERVER LED The Scan Server Setting Menu Screen will be displayed 2 Touch IMAGE ST...

Страница 277: ...ect an entry touch 1 CHARACTER DELETE repeatedly to delete each character then enter the correct job name 4 Touch OK The Job Name Entry Screen will be displayed 10 Network Function Environment Setup H...

Страница 278: ...popup menu will appear to confirm that you want to delete the selected data Touch YES to delete the selected data or touch NO to cancel The popup menu will disappear 6 Touch OK to restore the Scan Se...

Страница 279: ...copying condition other than Program Job 1 Touch OUTPUT MENU on the Basic Screen to display the Output Mode popup menu 2 Touch HDD STORE The Image Data Password Entry Screen will be displayed HDD DIM...

Страница 280: ...Enter the desired job name in up to 8 characters from the touch screen keypad To correct an entry touch 1 CHARACTER DELETE repeatedly to delete each character then enter the correct job name 6 If the...

Страница 281: ...data or EXIT after storing data to HDD to store the data in HDD without printing After scanning all the originals the machine automatically starts to print and store the data in HDD DETAILS If the Me...

Страница 282: ...stored in the HDD enter the password specified at the time data was stored then designate it by the job name 1 Press MODE to light up the SCAN SERVER LED The Scan Server Setting Menu Screen will be d...

Страница 283: ...hat job DETAILS More than one job at a time can be moved to the recall list to be output in succession provided that those jobs have been stored with the same copying conditions To cancel the job move...

Страница 284: ...sired print quantity then press START to print Selecting AUTO OUTPUT 1 Touch OK The popup menu to enter the print quantity will be displayed 2 Enter the desired print quantity then touch OK When the d...

Страница 285: ...rk environment and E C M function Browser Internet Explorer 5 5 SP2 Netscape 4 7 or later Follow the procedure below to access the Web Utilities of the machine using the web browser 1 Turn on the powe...

Страница 286: ...status of the machine and the maintenance item if required Service call JAM Paper supply Toner supply Staple cartridge supply Dispose of Trimmer trash basket Dispose ot Punch trash basket PM call DETA...

Страница 287: ...8530 image The window now provides the paper tray configuration engine configuration and option information DETAILS The same information will be provided also in the Job Status window See p 10 20 DETA...

Страница 288: ...to 16 previous jobs 1 Open the Web Utilities window HINT See p 10 17 for detailed procedure to access the Web Utilities 2 Click on Job Status The current job status number of jobs in waiting and remai...

Страница 289: ...played in the first Job List area 4 Display the previous job information Click on the desired Job ID No under the Job Status The information on the specified previous job will appear in the second Job...

Страница 290: ...17 for detailed procedure to access the Web Utilities 2 Click on HDD Job Information 3 Enter the Image Recall Password then click on Apply HINT The Image Recall Password is the image data password ent...

Страница 291: ...The result will be displayed as a list DETAILS The search will be performed over the jobs having the same image data password collected in step 3 You cannot make a search of all the jobs for the give...

Страница 292: ...ompleted successfully and the message displayed in the Result of job print dialogue box will inform you that the wrong password was entered HINT See p 13 15 for details of the ECM setting Selecting Au...

Страница 293: ...he machine control panel Choosing Back will resume the Job list dialogue box DETAILS When selecting Auto output or Proof output only the web browser setting allows the print quantity to be specified W...

Страница 294: ...he job name of the image data The Change Job name dialogue box will be displayed Enter the new job name using alphabets and numbers then click on Apply Choosing Back will resume the Job list dialogue...

Страница 295: ...for detailed procedure to access the Web Utilities 2 Click on Environment Setup 3 Display the E Mail Transmission Setting window Enter the 4 digit Key Operator password then click on Apply Click on E...

Страница 296: ...to be informed of the machine status Click on the check box of the desired transmission item Click on Apply to complete the setting and return to the Web Utilities window Clicking on Reset will void t...

Страница 297: ...ming Auto reset timer Complete job Wrong E C M password from printer Accept Reject DETAILS The above settings can also be performed on the machine except for the Wrong E C M password from printer sett...

Страница 298: ...ion setting The Enter Network Password dialog box will be displayed Enter ekc in the User Name text box and an 8 digit master key code in the Password text box then click on OK The E C M Function Sett...

Страница 299: ...s capital letters only numbers and four symbols and Any other symbols will be rejected with an error message displayed in the window Max 1 000 E C M data can be registered An error message will be dis...

Страница 300: ...ion Setting window The E C M Data List window will be displayed HINT The Another user count in the list indicates the count accumulated for the jobs performed by non registered users This data cannot...

Страница 301: ...click on Back DETAILS Error Message See Details on p 10 31 if an error message is displayed after clicking on Apply The edited content will be displayed in the window The edited data will be transmit...

Страница 302: ...y The Count Reset Confirmation window will be displayed DETAILS Click on Back to cancel this procedure and return to the E C M Data List window 3 Click on Apply to immediately reset the counters to ze...

Страница 303: ...cel this procedure and return to the E C M Data List window 3 Click on Apply to immediately delete the data DETAILS Error Message If an error message is displayed after clicking on Apply the data has...

Страница 304: ...ppears in it Click on Apply The change made in the settings will be transmitted immediately for the user operations DETAILS To restore the previous setting click on Reset To cancel the E C M function...

Страница 305: ...System 2 Printer Controller is installed in the machine 1 Open the Web Utilities window HINT See p 10 17 for detailed procedure to access the Web Utilities 2 Click on Environment Setup 3 Display the S...

Страница 306: ...Register the E Mail HDD and FTP as required HINT For details of this setting refer to the instruction manual of the printer controller DETAILS The symbols that cannot be displayed in the entry box wi...

Страница 307: ...play the Entry List of the desired item as described in step 5 Click on the radio button a white circle in the Change column of the item to be changed so that a black mark appears in it then click on...

Страница 308: ...List of the desired item as described in step 5 Click on the check box in the Delete column of the item to be deleted then click on Delete The window for deleting the selected item will be displayed D...

Страница 309: ...file type for batch processing can be edited efficiently and returned to the machine The file transmitted to a PC normally contains the four data types men tioned above however each data type can be...

Страница 310: ...work Password dialog box will be displayed Enter ekc in the User Name text box and an 8 digit master key code in the Password text box then click on OK The Setting File Import Export window will be di...

Страница 311: ...d ekc_tab txt E C M data ip_email txt E mail data of Scan Transmission Setting data ip_hdd txt HDD data of Scan Transmission Setting data ip_ftp txt FTP data of Scan Transmission Setting data DETAILS...

Страница 312: ...The result message will be displayed when the registration is completed DETAILS Error Message If the registration cannot be completed successfully an error messages will be displayed as follows Can t...

Страница 313: ...gits numbers 0 9 only to specify LIMIT 0 999 999 E mail data setting file Begin the file with IP_EMAIL Max 96 files can be edited A line should include ENTRY NAME and E MAIL ADDRESS being sep arated b...

Страница 314: ..._FTP Max 12 files can be edited A line should include PROFILE NAME HOST ADDRESS FILE PASS LOGIN and PASSWORD being separated by a tab PROFILE NAME should be 18 byte or less HOST ADDRESS should be 63 b...

Страница 315: ...11 11 Paper Original Info Original Information Paper Information Paper and Original Information Paper Information 11 2 Original Information 11 8...

Страница 316: ...ty for each Paper Weight Paper Trays Weight Tray 1 2 and 3 Main body tray LCT LT 402 LT 412 16 24 lb 25 45 lb for the tray specified as Thick1 46 110 lb 200 g m2 for the tray specified as Thick2 13 15...

Страница 317: ...ay 200 sheets Primary main tray 500 sheets A5 A5R B6R 3 000 sheets A4 A4R B5R 8 5 x11 8 5 x11 R 1 500 sheets A3 F4 B4 See the table for Staple sort Z Folding mode on p 11 4 Finisher DF 635 Booklet tra...

Страница 318: ...4W A4R A4WR B5 B5W Paper size No of copies Paper Capacity for Staple sort mode of DF 630 635 Finisher 51 100 copies can be stapled by DF 630 Finisher only 1 sheet 2 3 4 5 6 or more 1 40 sheets 0 30 0...

Страница 319: ...Portrait orientation only STD special Detects A4R or F4 instead of 8 5 x11 R 5 5 x8 5 R instead of 5 5 x8 5 Non STD size Max 12 36 x 18 07 314mm x 459mm Min 8 27 x 5 51 210mm x 140mm Wide size 11 x17...

Страница 320: ...uipments Available Sizes ADU STD size STD special 11 x17 to 5 5 x8 5 Portrait orientation only Non STD size Unavailable Wide size 11 x17 W to 5 5 x8 5 W Portrait orientation only Finisher DF 630 DF 63...

Страница 321: ...e other than the above mentioned select User as the paper type in Paper type size setting for the Multi sheet bypass tray To Store Copy Paper Store paper in a cool dry area Using damp copy paper may c...

Страница 322: ...l size 11 x17 280mm x 432mm sheet or book Max book weight thickness 15 lb 6 8 kg 1 2 30mm Original placement Face down on right depth side of glass HINT Detectable paper size can be changed from only...

Страница 323: ...432mm 140mm x 216mm Original weight 13 34 lb no special stock Max feeder capacity 100 sheets 20 lb paper Curling tolerance 10mm or less Original placement Face up Mixed Original mode Use Mixed Origin...

Страница 324: ...stock Max feeder capacity 100 sheets 20 lb paper Curling tolerance 10mm or less Original placement Face up orientation same as copy paper SDF mode Use SDF mode to copy thick originals to be fed one sh...

Страница 325: ...isher 12 6 Empty Trash Basket of PU 108 PZ 108 Punching Z Folding Unit 12 11 Empty Trash Basket of TU 108 Trimmer Unit 12 13 Cleaning Image Scanning Section 12 15 Checking Copy Count 12 17 12 Maintena...

Страница 326: ...minder Use the same number toner cartridge as described on the label on the front of the toner box Otherwise machine trouble may occur Add toner according to the procedure as follows 1 Open the copier...

Страница 327: ...the new toner cartridge several times to loosen toner then remove the toner cartridge cap 5 Set the new toner cartridge into the toner box 12 Maintenance Supplies Checking Copy Count Cleaning Scanning...

Страница 328: ...d mark on the toner box DETAILS Be sure to set the hollow part of the toner cartridge upward otherwise the machine trouble may occur 7 Push the toner cartridge lock lever backward until it stops 8 Ret...

Страница 329: ...with eyes by accident flush with water and seek medical advice CAUTION Do not throw the empty toner cartridge into a fire If it is thrown into a fire the toner may ignite and cause a dangerous situa t...

Страница 330: ...message in the message area Follow the procedure below according to your finisher type to replace the staple cartridge Reminder Use only the staples supplied by Kyoceramita To purchase please contact...

Страница 331: ...en remove the empty cartridge Open the bottom of the cartridge housing while pressing two locks on both sides Reminder Do not remove the staples remaining inside the housing otherwise the first sheet...

Страница 332: ...s remaining inside the housing otherwise the first sheet output after the replenishment will not be stapled 5 Insert the new cartridge into the housing Firmly insert the cartridge into the housing whi...

Страница 333: ...ert the cartridge housing while sliding it along the stapler rail then push down and in to secure it in place 8 Return the stacker unit to its original position DF 635 2 1 DF 630 DF 635 DF 630 12 Main...

Страница 334: ...Inserting a New Staple Cartridge into DF 630 635 Finisher continued 12 10 9 Close the Finisher door...

Страница 335: ...age will be displayed on the touch screen and the finished set will be output without being punched even if Punch mode is selected Follow the procedure below to empty the trash basket 1 Open the Finis...

Страница 336: ...Empty Trash Basket of PU 108 PZ 108 Punching Z Folding 12 12 3 Empty the trash basket 4 Return the trash basket to its original position then close the Finisher door securely...

Страница 337: ...layed on the touch screen and the finished set will be output without being trimmed even if Trimming mode is selected Follow the procedure below to empty the trash basket 1 Open the trimmer front door...

Страница 338: ...Empty Trash Basket of TU 108 Trimmer Unit continued 12 14 3 Empty the trash basket 4 Return the trash basket to its original position then close the trimmer front door securely...

Страница 339: ...y with water if it is difficult to clean Reminder Never use paint solvents such as benzene or thinners to clean the platen glass Cleaning the Left Partition Glass Keep the glass clean otherwise soil m...

Страница 340: ...uide cover should be kept clean otherwise soil marks may be copied or the original size cannot be detected correctly Raise the document cover and clean the RADF platen guide cover with a clean soft cl...

Страница 341: ...er List Screen if desired To Display the Counter List Screen 1 Press P COUNTER on the control panel The Counter List Screen will be displayed DETAILS The Counter List Screen can be displayed even when...

Страница 342: ...el The Counter List Screen will be displayed 2 Touch COUNTER MENU The Basic Screen will be displayed 3 Touch the desired tray key to select the copy size 4 Press START The Counter list will be printed...

Страница 343: ...etting 13 39 14 Machine Management List Print 13 45 15 Side 2 Lens Adjustment 13 46 16 Finisher Adjustment 13 47 17 HDD Management Setting 13 49 18 Scan Transmission Setting 13 51 19 Non Image Area Er...

Страница 344: ...perator password will not be required A service set 8 digit ECM master key code must be entered by the Key Operator to access the Electronic Copy Monitor functions and a service set 4 digit Weekly Tim...

Страница 345: ...rator Mode Screen will be dimmed and cannot be selected on the copier without the remote diagnostics activated 5 Touch PREVIOUS SCREEN to exit the Key Operator mode The Basic Screen will be restored 1...

Страница 346: ...tem Initial Setting Menu Screen Date Time Setting Screen Difference in Time Setting Screen Procedure 1 Touch 1 System initial setting on the Key Operator Mode Screen to display the System Initial Sett...

Страница 347: ...niversal time 6 Touch OK to update the Present time by the Setting time and return to the System Initial Setting Menu Screen 7 Touch PREVIOUS SCREEN to restore the Key Operator Mode Screen 8 If no fur...

Страница 348: ...ator Mode Screen to display the System Initial Setting Menu Screen 2 Touch 2 Language select setting to display the Language Selection Screen 3 Select the desired language mode 4 Touch OK to complete...

Страница 349: ...screen keypad Touch SET to fix the number or touch RESET to clear 4 When customizing the line speed touch Line speed setting to display the Line Speed Setting Screen Touch the desired key then touch O...

Страница 350: ...machine manager E Mail condition inform E Mail transmission item System Initial Setting Menu Screen E Mail Transmission Setting Screen 1 Touch 1 System initial setting to display the System Initial Se...

Страница 351: ...Touch PREVIOUS SCREEN to complete the setting and return to the System Initial Setting Menu Screen 7 Touch PREVIOUS SCREEN to restore the Key Operator Mode Screen 8 Touch PREVIOUS SCREEN to return to...

Страница 352: ...itial settings display when the copier is powered on when Auto Reset timer is reached or when AUTO RESET key is pressed The following initial settings can be changed by the Key Operator Copy mode RADF...

Страница 353: ...egistered 3 Touch OK to complete the setting and return to the Key Operator Mode Screen 4 If no further changes are required touch PREVIOUS SCREEN to restore the Basic Screen to perform copying operat...

Страница 354: ...reen 2 Touch 1 User density level 1 setting to display the User Density Level 1 Setting Screen 3 Place the original on the platen glass or in the RADF 4 Touch Darker or Lighter to select the density l...

Страница 355: ...r Set density then press START The density level sample sheet will be output 6 Select the desired exposure from the sample sheet s then enter the density level No by using the touch screen keypad 7 To...

Страница 356: ...USERSET3 0 50 User Setting Mode Menu Screen User Lens Mode Ratio Setting Screen Procedure 1 Touch 3 User setting mode on the Key Operator Mode Screen to display the User Setting Mode Menu Screen 2 Tou...

Страница 357: ...only after a valid ECM password is entered Copy quantity and copy limit for each account can be visually confirmed on the screen If ECM needs to be activated on your machine contact your service repr...

Страница 358: ...r 8 digit ECM master key code then touch OK to display the ECM Setting Menu Screen See note 3 Select the desired ECM function and make settings as required To exit the ECM mode touch PREVIOUS SCREEN o...

Страница 359: ...E C M function setting on the Key Operator Mode Screen Enter an 8 digit ECM master key code then touch OK to display the ECM Setting Menu Screen NOTE If an invalid ECM master key code is entered cont...

Страница 360: ...for another account No When a password is duplicated The Password Duplication Screen will be displayed Touch YES to re enter new password or NO to create duplicate password NOTE If duplicate password...

Страница 361: ...ch COUNT RESET The Reset Confirmation Screen will be displayed 2 Touch YES to clear the copy count of the selected ECM data or NO to cancel Delete Confirmation Screen Reset Confirmation Screen 4 If ot...

Страница 362: ...continue by entering the valid 8 digit code 2 Touch 2 E C M all count reset The ECM All Count Reset Screen will be displayed 3 Touch YES to reset all counters to zero and to return to the ECM Setting...

Страница 363: ...be cleared To continue the job using the same user password change the copy limit of the password or clear the copy count Touch After job to stop the machine after the current job is completed when co...

Страница 364: ...Screen to display the Lock Delete Job Memory Screen 2 To lock unlock a job memory 1 Touch the key on the left side of the desired job number Use arrow keys to scroll to the desired job number if requ...

Страница 365: ...Wide size input Procedure 1 Touch 6 Paper type Special size set on the Key Operator Mode Screen to display the Paper Type Setting Screen 2 To specify paper type 1 Touch the desired paper tray key to...

Страница 366: ...to select the desired size Select Non STD size to display the popup menu to enter the paper size by using arrow keys or touch screen keypad Select Wide size paper to display the popup menu to show ava...

Страница 367: ...the buzzer volume of the touch keys 3 Touch OK to complete the setting and return to the Key Operator Mode Screen 4 If no further changes are required touch PREVIOUS SCREEN to restore the Basic Screen...

Страница 368: ...he Key Operator Data Setting Screen 2 Touch Name to highlight it then enter the Key Operator name up to 8 characters from the touch screen keypad 3 Touch Key Operator Tel No to highlight it then enter...

Страница 369: ...ON and OFF for each day of the week or the entire week 3 Timer action ON OFF Setting Specify the working days of the machine by the Timer for all Mondays through Sundays and or individually for each d...

Страница 370: ...the code requirement 2 If the Weekly Timer Master Key Code Screen is displayed use the keypad on the touch screen to enter your 4 digit Weekly Timer master key code then touch OK to display the Weekl...

Страница 371: ...fault setting is Weekly timer Off The selected key will be highlighted 4 Touch OK to complete the setting and return to the Weekly Timer Setting Menu Screen 5 Touch PREVIOUS SCREEN to restore the Key...

Страница 372: ...4 digit code 2 Touch 2 Timer setting to display the Weekly Timer On Off Time Setting Screen 3 When the screen is displayed the ON time of Monday is always highlighted Enter a 2 digit ON hour ex 8 a m...

Страница 373: ...Setting Menu Screen 7 Touch PREVIOUS SCREEN to restore the Key Operator Mode Screen 8 If no further changes are required touch PREVIOUS SCREEN to restore the Basic Screen to perform copying operations...

Страница 374: ...entered continue by entering the valid 4 digit code 2 Touch 3 Timer action ON OFF setting to display the Timer Action On Off Setting Screen The days of the current month are displayed on the left hal...

Страница 375: ...Screen to perform copying operations 13 KeyOperator Mode Non Image Area Erase Scan Transmission Centering Adjustment Timing Adjustment HDD Management Finisher Adjustment Side 2 Lens Adjustment Machine...

Страница 376: ...kly Timer master key code is entered continue by entering the valid 4 digit code 2 Touch 4 Lunch hour off setting to display the Lunch Hour Off Setting Screen 3 Touch Function Valid to activate the Lu...

Страница 377: ...r a 4 digit password and then touch OK to complete the setting and return to the Weekly Timer Setting Menu Screen NOTE When the password setting is 0000 timer interrupt can be used simply by turning t...

Страница 378: ...e indications it is recommended that you use a sharp point such as a pencil to be much more accurate 3 Check that the X coordinate and Y coordinate displayed in the first line of the message area fall...

Страница 379: ...the right half of the screen Touch to highlight the desired tray key then change its priority by using Up c and Down d arrow keys 4 Touch OK to complete the setting and restore the Key Operator Mode S...

Страница 380: ...for each power save function are located on the Timer Setting Screen below the Auto Low Power and Auto Shut Off indicators Touch the arrow keys c and d in each area to select a specific waiting period...

Страница 381: ...l APS preferential tray Tray 1 Tray 2 Tray 3 Bypass tray No 15 Platen original size detect Only A series Full size AB series Inch series No 16 RADF original size detect Only A series Full size AB seri...

Страница 382: ...Timer which prohibits Print OFF 15 seconds 30 seconds 60 seconds 90 seconds No 40 Bookmark function ON It is cancel every JOB ON It is not cancel every JOB OFF No 41 Delete of overlay image Permissio...

Страница 383: ...hen AUTO RESET is pressed 6 Initial by Key counter insert Set the machine to return to the initial state when Key counter is inserted 7 Erasure outside area of original Set the machine to delete the o...

Страница 384: ...iginal size detect Select the series of the original paper size detected from the platen glass 16 RADF original size detect Select the series of the original paper size detected from the RADF 17 Plate...

Страница 385: ...ion of 1 sheet Select to exit face up or face down when making only 1 sheet of copy 32 An interruption suspended way Select the timing to stop the job in progress when INTERRUPT is pressed 33 E C M pa...

Страница 386: ...etting select to permit or prohibit deleting the selected image data previously stored in HDD and also overwriting the data of the same name when storing new data in HDD 42 Orig direction binding mode...

Страница 387: ...y 3 Press START to start printing the selected list To suspend printing press STOP Press P and C in order to return to the Management List Print Menu Screen 4 Touch PREVIOUS SCREEN to restore the Key...

Страница 388: ...n the Key Operator Mode Screen to display the Side 2 Lens Adjustment Screen 2 Touch to highlight the desired tray key then touch arrow keys to select an adjustment data The selected data will be displ...

Страница 389: ...Position Adjustment Screen Z Folding Position Adjustment Menu Screen 1st Folding Position Adjustment Screen 13 KeyOperator Mode Non Image Area Erase Scan Transmission Centering Adjustment Timing Adjus...

Страница 390: ...o display the adjustment screen for each function 3 Make fine adjustment on the screen To go on or back to another adjustment screen touch NEXT ADJUSTMENT or PREVIOUS ADJUSTMENT Touching PREVIOUS SCRE...

Страница 391: ...ge Key Operator Mode Screen HDD Management Password Entry Screen HDD Management Setting Menu Screen Password List Delete Screen Password List Delete Screen JOB Auto Delete Period Setting Screen State...

Страница 392: ...Screen 2 Touch to highlight the password key to be deleted then touch DELETE The popup menu will appear for confirmation 3 Touch YES to delete the selected password and all the data corresponding to i...

Страница 393: ...een Procedure 1 Touch 19 Scan transmission setting on the Key Operator Mode Screen to display the Scan Transmission Setting Screen 2 Select the desired address type Touch E Mail HDD or FTP to display...

Страница 394: ...he desired name key then touch CHANGE The subsequent screen according to the address type will be displayed See previous page 2 Touch to highlight the registered item key on the left then change the i...

Страница 395: ...t the density level required Five exposure levels are provided NOTE Select AUTO mode if the specified Oblique or Rectangle Erase mode does not function properly due to the type of set original 3 Touch...

Страница 396: ...or Mode Screen Timing Adjustment Menu Screen Printer Restart Timing Adjustment Screen Printer Resist Loop Adjustment Screen Printer Pre resist Adjustment Screen Printer Lead Edge Timing Adjustment Scr...

Страница 397: ...REVIOUS SCREEN to restore the Key Operator Mode Screen 5 If no further changes are required touch PREVIOUS SCREEN to restore the Basic Screen to perform copying operations 13 KeyOperator Mode Non Imag...

Страница 398: ...erator Mode Screen to display the Centering Adjustment Menu Screen 2 Touch the desired menu key to display the adjustment screen for each function 3 Make fine adjustment on the screen To go on or back...

Страница 399: ...Index...

Страница 400: ......

Страница 401: ...9 49 Binding Mode 3 51 Book Copy 9 22 BOOK MARK key 9 2 Booklet 9 13 Booklet mode outlet 2 6 Booklet tray 2 6 Bookmark function 13 44 C C CLEAR QTY key 3 7 Call for Service message 5 2 Call for Servi...

Страница 402: ...ss 13 7 Guide width for mixed originals 11 10 H HDD Job Information 10 22 HDD Management Setting 13 49 HDD STORE key 10 11 HELP key 4 6 Help Menu Screen 4 7 Help Mode 4 6 I Image data password 10 5 Im...

Страница 403: ...nformation 11 8 Output Mode with Finisher 3 45 Output Mode without Finisher 3 42 Overlay 9 61 Overlay Memory 9 64 P P COUNTER key 2 16 5 4 12 17 Page space function 9 48 Panel Contrast Key Sound Adjus...

Страница 404: ...tment 13 46 Single sided copy 3 28 SPECIAL ORIGINAL key 8 2 Special Original popup menu 8 2 Special paper in Multi sheet bypass tray 11 7 Stacker unit 2 7 Stamp 9 52 Staple cartridge 12 7 Staple mode...

Страница 405: ...etting Mode 13 12 USER1 USER2 Density 3 19 13 12 13 13 USERSET Lens Mode 13 14 V Vertical Horizontal Zoom Mode 7 5 W Wake up Screen 2 17 Warm up Screen 2 17 3 8 WARNING 1 4 Trash basket 2 11 13 Waterm...

Страница 406: ......

Страница 407: ......

Страница 408: ...Parkway Irvine California 92618 7006 TEL 949 457 9000 FAX 949 457 9119 Southeastern Region 1500 Oakbrook Drive Norcross Georgia 30093 TEL 770 729 9786 FAX 770 729 9873 Southwestern Region 2825 West S...

Отзывы: