KVM-TEC Ultraline UVX1 Скачать руководство пользователя страница 9

kvm-tec    |    9

1. INTRODuCTION


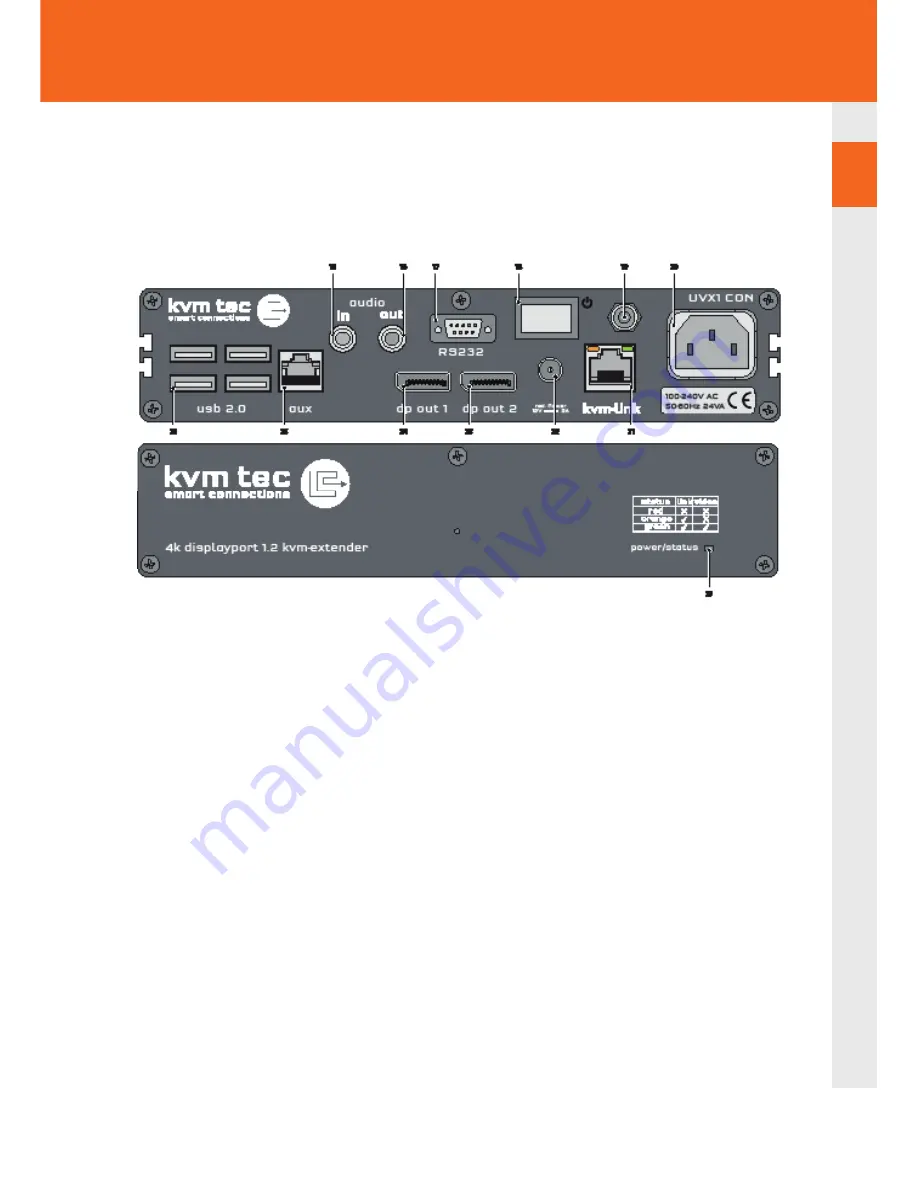
Remote Extender (CON)

Nr. Name 

Function

15 

audio in  

Audio In from microphone etc.

16 

audio out 

Audio Out to speakers etc.

17 

RS232 

RS232

18 

power 

Power Switch ON/OFF

19 

grounding 

grounding screw

20 

Power 

Power Connector AC90-240V

21 

kvm-link 

Connection for CAT 7 cable or fi bre cable

22 

DC   

Connection für 12V power supply

23 

dp out 2  

Displayport Output to Monitor 2

24 

dpout 1  

Displayport Output to Monitor 1

25 

AUX   

Auxilary Gigabit Network Connector 

26 

USB   

USB 2.0 to keyboard /Muse

27 

POWER/ LED  

Displays the status of the extender 


1

Содержание Ultraline UVX1

Страница 1: ...4K uLTRALINE uVX1 uVX1 F KVM EXTENDER INSTRuCTION MANuAL Part No 6901 Ultraline UVX1 Part No 6902 UltralineUVX1 F...

Страница 2: ...0 2 Installation of the extender 11 2 1 Unpacking and checking the contents 11 2 2 Mounting options 12 2 2 1 Mounting pads and rubber feet 12 2 2 2 Mounting kits optional 12 2 3 Installing the extende...

Страница 3: ...22 3 1 5 Upgrade Menu 24 3 1 6 Menu Features 25 3 1 7 Select keyboard layout 26 4 Maintenance and care 27 5 Troubleshooting 28 6 Disposal 28 7 Warranty 29 8 Support 29 9 Declaration of Conformity 30...

Страница 4: ...VX1 UVX1 F KVM Extender will bring you joy for many years to come 1 1 Intended Use This product is intended to be used as a device to increase the distance that a keyboard monitor and mouse can be pla...

Страница 5: ...lant at all times and always take care around this product Do not use electrical equipment if you are lacking in concentration or awareness or are under the influence of drugs alcohol or medication Ev...

Страница 6: ...the adapter with wet hands Use the product within the specified performance limits Keep the product away from flammable materials such as curtains and drapes Protect the mains adapter from use by thir...

Страница 7: ...excluding attached USB devices Operating temperature range 0 C to 45 C 32 F to 113 F Storage temperature range 25 C to 80 C 13 F to 176 F Relative humidity max 80 non condensing Storage humidity max...

Страница 8: ...nding grounding screw 6 power Connection for 220 V power supply 7 kvm link Connection for CAT 7 cable or fibre cable 8 dc Connection f r 12V power supply 9 dpout 2 Displayport Output to Monitor 2 10 d...

Страница 9: ...h ON OFF 19 grounding grounding screw 20 Power Power Connector AC90 240V 21 kvm link Connection for CAT 7 cable or fibre cable 22 DC Connection f r 12V power supply 23 dp out 2 Displayport Output to M...

Страница 10: ...Table 1 Meaning of LED indicators Colour Blinking Physical Link Active Connection Video Extended USB Initialisation UBS Data Received Identify Command Autoupdate Mode Red Yes No No Update Failed Red...

Страница 11: ...unction and its operating safety Make sure that the packaging contains the following content A 1x UVX1 local Extender CPU B 1x UVX1 remote Extender CON C 2x power cable IEC C13 REM D 1 x DP DP cable1...

Страница 12: ...To attach the mounting pads or rubber feet 1 Remove the protection layer from the mounting pads or rubber feet G 2 Attach the mounting pads or rubber feet G to the bottom the units 2 2 2 Mounting kit...

Страница 13: ...y information before installing the product The units can be set up to access one host computer or to access numerous host computers In the case of the latter an additional Network Switch must be inst...

Страница 14: ...14 kvm tec 2 installation of the extender Network Switch Setup...

Страница 15: ...Connect a monitor to the DP out 14 on the UVX1 remote CON unit B 10 Connect a keyboard to a USB port 11 on the UVX1 remote CON unit B 11 Connect a mouse to a USB port 11 on the UVX1 remote CON unit B...

Страница 16: ...m link port 13 on the UVX1 remote unit B For the UVX1 F without Network Switch see chapter Requirements for cable requirements WARNING The UVX1 F is a Class 1 Laser Product Avoid exposure to the beam...

Страница 17: ...ed status LED blinks a few seconds After a few seconds the status LED lights green The monitor will displays your computer s desktop or any open applications 2 5 Replacing the SFP module The UVX1 F is...

Страница 18: ...TION OF ThE EXTENDER 2 6 REMOVING A CAT7 CABLE To remove a CAT7 cable Press the latch down and slowly pull the cable out 2 7 REMOVING A FIBER CABLE To remove a ber cable Press the latch down and slowl...

Страница 19: ...re displayed 3 To access a submenu press the corresponding key or navigate with the arrow keys up and down to the corresponding line and then press Enter key In the main menu you can make the followin...

Страница 20: ...he extender connection The menu displays infroms about the connection video channel resolution and USB status The current FW version is displayed in the upper left corner The link status indicates whe...

Страница 21: ...will be displayed 3 Press 1 to display the DDC information of the monitor connected to the remote CON 4 Extender is connected The DDC information is automatically saved 5 Press 2 for a fixed position...

Страница 22: ...etailed description of the update process For more information please refer to the update manual 1 Go to the main menu 2 Connect the uSB stick to the CON REMOTE unit wait a few seconds until the USB s...

Страница 23: ...steps 1 Wait for the two steps 2 Erasing flash and update is 100 finished The remote CON has now programmed the update LOCAL uPDATE CPu uNIT The update of the local part by pressing L recommended by...

Страница 24: ...prevented Data from a connected USB mass storage device cannot then be accessed SOUND The upgrade is already activated and transmits sound in CD quality analog over 3 5mm sockets in both directions Fu...

Страница 25: ...Glide Switch implemented from 08 2018 Multiple UVX Extenders can be configured to automatically switch the USB operation of each computer and follow the mouse movement Up to 8 Moniotre can be configur...

Страница 26: ...ou can switch between the keyboard layouts with which you can navigate the on screen display menu OSD Press the K button The Keyboard Locale menu opens Press E to select English QWERTY Press D to sele...

Страница 27: ...ure on the monitor Check if the local PC cable is connected well Check if the remote monitor cable is connected well If everything is connected well but no function appears reconnect power supply agai...

Страница 28: ...ot be treated as unsorted municipal waste but must be collected separately Dispose of the product via a collection point for the recycling of waste electrical and electronic equipment within the EU an...

Страница 29: ...ing back the product 7 Warranty If you have any questions about our products please contact kvm tec or your dealer kvm tec electronic gmbh kvm tec Inc Gewerbepark Mitterfeld 1A 67 Camino Del Oro 2523...

Страница 30: ...getestet RoHS II EU Richtlinie 2011 65 EU Bescheinigung nach RoHS II Richtlinie 2011 65 EU Hiermit bescheinigen wir dass alle unsere Produkte im Einklang mit den Richtlinien der RoHS II 2011 65 EU un...

Страница 31: ...IEC 60950 2005 LASER CLASS 1 EN 60825 1 2007 kompatibel mit IEEE 803 3z Unterzeichnet f r und im Auftrag von KVM TEC Electronic GmbH Ort und Datum der Ausstellung Tattendorf 2018 05 09 Name Funktion U...

Страница 32: ...at the very least meet the CAT7 specifications and be suitable for 10 Gigabit transmission The cable should meet one of the following standards Class D ISO IEC 11801 2002 or EN 50173 1 2002 Schema EIA...

Страница 33: ...e should meet the following requirements Maximum length should be 300 m 984ft The MVX1 F includes a fibre Multimode SFP Module which allows a transmission distance of up to 300 m 984 ft Dedicated fibr...

Страница 34: ...34 kvm tec 10 11 NOTES...

Страница 35: ...kvm tec 35 10 11 Notes...

Страница 36: ...36 kvm tec 11 11 Notes...

Страница 37: ...kvm tec 37 www kvm tec com...

Отзывы: