background image

14

15

KIH3300

EN

induction hob

2.2. Product usage

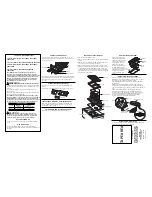
Selection of installation equipment

Cut  out  the  work  surface  according  to  the  sizes  specified  in  the 

drawing below.
There must be a minimum 5-cm space around the hole for installa-

tion and use purposes.
Be sure the thickness of the work surface is at least 30 mm. Please 

select a heat-resistant work surface material to avoid larger deforma-

tion caused by the heat radiation from the hotplate.

L (mm) W (mm) H(mm) D (mm) A (mm) B (mm) X (mm)

590

520

55

51

560

490

50 min.

Always  make  sure  the  Induction  hob  is  well  ventilated  and  the  air 

inlet and outlet are not blocked. ensure the Induction cooker hob is 

in good working order, as indicated below.

Note:

 The safety distance between the hotplate and the cup-

board above the hotplate should be at least 760 mm.

A (mm)

B (mm)

C (mm)

760

50 min.

20 min.

D

E

air intake

air exit 5mm

Before installing the hob, make sure that

•  The work surface is upright and leveled, and no structural parts can 

interfere with the space requirements;

•  The work surface is made of a heat-resistant material;
•  If the hob is installed above an oven, the oven has a built-in cooling 

fan;

•  The installation complies with all applicable requirements, rules and 

regulations;

•  There  is  a  suitable  isolating  switch  providing  full  disconnection 

from the mains power supply incorporated in the permanent wiring, 

mounted and positioned to comply with local safety rules and re-

gulations;

•  The  isolating  switch  must  be  of  an  approved  type  and  provide  a 

3-mm contact gap in all poles (or in all live conductors, if local regu-

lations allow this variation);

•  The isolating switch must be easily accessible to the user after the 

hob is installed;

•  Local building authorities and by-laws should be referred to, if there 

are doubts regarding the installation;

•  Heat-resistant  and  easy-to-clean  finishes  (such  as  ceramic  tiles) 

are used on the wall surfaces surrounding the hob.

After the hob is installed, make sure that

•  The power supply cable is not accessible through cupboard doors 

or drawers;

•  There is an adequate flow of fresh air from outside the cabinetry to 

the base of the hob;

•  If the hob is installed above a drawer or cupboard, a thermal protec-

tion barrier is installed below the base of the hob;

•The isolating switch is easily accessible by the user.

Before fixing the brackets

The unit should be placed on a stable, smooth surface (use the pa-

ckaging). Do not apply force onto the controls protruding from the 

hob.

Adjusting the position of the brackets

fix the hob on the work surface by screwing the 4 brackets on the 

bottom of the hob (see picture) after the installation.

A

B

Screw

Bracket

C

D

Screw hole

Base

Содержание KIH3300

Страница 1: ...instructions manual manual de instrucciones manual de instru es KIH3300 induction hob...

Страница 2: ...ly the instructions and safety measures described in this manual We sincerely hope you will be satisfied when using your new appliance INDEX 1 Safety Instructions 4 1 1 Power Supply 5 1 2 Power Cord a...

Страница 3: ...d not be used for other purposes than the ones intended and sole ly for household use Any damage resulting from using the appliance outside this scope any incorrect use as well as any manual modificat...

Страница 4: ...this product and enjoy its advan ced features Please keep the instructions for future reference Read all instructions before using the pro duct Maintenance and service operations are only to be carri...

Страница 5: ...rs MP3 players near the appliance as they may be affected by its electromagnetic field Never use your appliance for warming or heating the room Always turn off the cooking zones and the induction hob...

Страница 6: ...g process must be supervised A short term cooking process must be supervised continuously WARNING Stabilizing means must be ins talled to prevent the appliance from tipping Do not stand on your induct...

Страница 7: ...cau se accidents This appliance includes an earth connec tion for functional purposes only 2 Operating Instructions 2 1 Product Description Top View 1 2000 W cooking zone boost to 2 600W 2 1500 W cook...

Страница 8: ...re is a suitable isolating switch providing full disconnection from the mains power supply incorporated in the permanent wiring mounted and positioned to comply with local safety rules and re gulation...

Страница 9: ...only The power supply should be connected in compliance with the rele vant standards or with a single pole circuit breaker in accordance with the connection method illustrated below If the cable is d...

Страница 10: ...Cookware Use induction compatible cookware only Look for the in duction symbol on the packaging or on the bottom of the pan You can check whether your cookware is suitable by carrying out a magnet te...

Страница 11: ...ill disappear when the surface has cooled down to a safe temperature It can also be used as an energy saving function so if you want to heat more pans use the hotplate that is still hot Using the Boos...

Страница 12: ...fault working times for the various power levels are specified in the following table Power level 1 2 3 4 5 6 7 8 9 Default working timer hours 8 8 8 4 4 4 2 2 2 When the pot is removed the cooking zo...

Страница 13: ...time expires the corresponding heating zone will automatically switch off and the symbol H will appear NOTE If you want to change the time after the ti mer is set you must start from step 1 Cooking G...

Страница 14: ...ce What How Important Everyday soiling on the glass fingerprints marks stains left by food or non sugary spillovers on the glass 1 Switch off the cooktop power 2 Apply a induction hob cleaner while th...

Страница 15: ...nd Care Some pans make crackling or clicking noises This may be caused by the construction of your cookware layers of different metals vibrating differently This is normal for cookware and does not in...

Страница 16: ...approximate Due to our efforts to improve our products specifications and de signs may undergo alterations without prior notice 4 Post Sale Service KUNFT has designed this appliance in order to guara...

Страница 17: ...Mantenimiento 58 2 4 Resoluci n de problemas 59 3 Especificaciones t cnicas 61 4 Servicio posventa 62 5 Protecci n medioambiental 62 Estimado cliente Gracias por adquirir este producto Este aparato ha...

Страница 18: ...no deber ser utilizado para otros fines que no sean los previstos en el manual y nicamente para uso dom stico Cualquier da o derivado del uso del aparato fuera de este mbito de aplicaci n cualquier u...

Страница 19: ...exterior del producto utilice nicamente un pa o suave y seco 1 5 Precauciones generales Siga las instrucciones de este manual que le ayudar n a instalar y poner correc tamente en funcionamiento este...

Страница 20: ...e los ni os El incumplimiento de este consejo podr a producir quemaduras y escaldaduras Nunca deje el aparato desatendido cuan do est en uso El desborde provoca humo y los derrames de grasa pueden pre...

Страница 21: ...riesgos Este aparato ha sido dise ado para usos dom sticos y similares tales como Zonas de cocina para empleados en tien das oficinas y otros entornos de trabajo Granjas Clientes en hoteles moteles y...

Страница 22: ...e instala ci n ADVERTENCIA Utilice nicamente pro tectores de placa dise ados por el fabri cante del aparato o por l indicados en el manual de uso o los protectores de la placa incorporados en el apara...

Страница 23: ...el ctrica final debe incluirse un interruptor aislante adecuado que permita una desconexi n total de la alimentaci n el ctrica instalado y colocado de forma que cumpla con la legisla ci n en materia...

Страница 24: ...do m stico es adecuado y que no necesita alteraciones Cual quier alteraci n debe ser hecha solamente por un electricis ta cualificado La fuente de alimentaci n debe conectarse de acuerdo con las nor...

Страница 25: ...istre una funci n Aseg rese de que los controles est n siempre limpios secos y que no haya ning n objeto que los cubra por ejemplo un uten silio o un pa o Incluso una fina capa de agua puede dificulta...

Страница 26: ...la selecci n de la zona de calentamiento Control que desea apagar 2 Apague la zona de cocci n presionando el control hasta 0 Aseg rese de que la pantalla muestre 0 3 Apague la placa de inducci nON OFF...

Страница 27: ...de temperatura Cuando se detecta una temperatura excesiva la placa de inducci n dejar de funcionar autom ticamente Detecci n de peque os utensilios Cuando se deja un recipiente inadecuado o no magn t...

Страница 28: ...disminuir o aumentar de a un 1 minuto Mantenga presionado el control o del temporizador para disminuir o aumentar de a 10 minutos 4 Al presionar disminuir el temporizador y aparecer 00 la pantalla 5...

Страница 29: ...mbos lados del bistec con aceite Roc e una peque a cantidad de aceite en la sart n caliente y luego coloque el bistec en la sart n 4 Gire el bistec una sola vez durante la cocci n El tiempo de coc ci...

Страница 30: ...n da ar permanentemente la superficie de la placa Riesgo de cortes la cuchilla del rascador es altamente cortante cuando retira la protecci n Util cela con extremo cuidado y gu rdela siempre fuera del...

Страница 31: ...eradamente se oye un pitido y aparece un c digo de error t picamente altern ndose con uno o dos d gitos en la pantalla del temporizador de cocci n Fallo t cnico Tome nota de las letras y los n meros d...

Страница 32: ...iarizados con estas instruccio nes El hecho de conocer los posibles problemas puede servirle de ayuda para evitar que se produzcan 5 Protecci n medioambiental A fin de proteger el medio ambiente inten...

Страница 33: ...cont m pe as que possam ser reparadas pelo utilizador Contacte o Servi o de Apoio ao Cliente Avisos Importantes Antes de utilizar o aparelho leia atentamen te este manual de instru es e guarde o num...

Страница 34: ...ifique se a tens o da rede el trica compat vel com a indicada no aparelho Caso n o corresponda consulte o Servi o de Apoio ao Cliente 1 2 Cabo de alimenta o e outros cabos N o enrole o cabo nem o puxe...

Страница 35: ...o A fim de evitar perigos este aparelho deve ser instalado de acordo com estas instru es de instala o Este aparelho deve ser corretamente ins talado e ligado terra apenas por um t c nico devidamente q...

Страница 36: ...ossam inte ressar s crian as em arm rios acima do aparelho Se as crian as tentarem trepar para cima da placa de indu o podem fi car gravemente feridas N o deixe as crian as sozinhas ou sem supervis o...

Страница 37: ...s f sicas sensoriais ou mentais reduzidas ou falta de experi ncia e conhecimento se forem supervisionadas ou tiverem sido instru das sobre a utiliza o do aparelho de for ma segura e compreenderem os r...

Страница 38: ...pode cau sar acidentes Este aparelho possui uma liga o terra apenas para fins funcionais 2 Instru es de funcionamento 2 1 Descri o do produto Vista superior 1 Zona de cozedura de 2000 W aumenta para 2...

Страница 39: ...mentos aplic veis Existe um seccionador de isolamento adequado que permite um desligamento total da fonte de alimenta o el trica incorporado na cablagem permanente montado e posicionado de acordo com...

Страница 40: ...eitas apenas por um eletricista qualificado A fonte de alimenta o deve ser ligada em conformidade com as normas relevantes ou com um disjuntor unipolar de acordo com o m todo de liga o indicado abaixo...

Страница 41: ...que os contro los est o sempre limpos secos e que n o h nenhum objeto por exemplo um utens lio ou um pano a cobri los Mesmo uma pequena quantidade de gua pode tornar os controlos dif ceis de operar E...

Страница 42: ...minar de cozinhar 1 Pressione o bot o de sele o da zona de aqueci mento que deseja desligar 2 Desligue a zona de cozedura pressionando o con trolo at chegar a 0 Verifique se o visor mostra 0 3 Desligu...

Страница 43: ...nsor de temperatura para supervisionar a temperatura dentro da placa de indu o Quando uma temperatura excessiva detetada a placa de indu o deixa de funcionar automaticamente Dete o de pequenos objetos...

Страница 44: ...Sugest o Pressione o controlo ou do tem porizador uma vez para diminuir ou aumentar o tempo em 1 minuto Mantenha pressionado o controlo ou do temporizador para diminuir ou aumentar o tempo em 10 minut...

Страница 45: ...one uma pequena quantidade de leo na frigideira quente e em seguida coloque a carne devagar na frigideira quente 4 Vire o bife apenas uma vez durante a cozedura O tempo de co zedura exato depender da...

Страница 46: ...temente a superf cie do vidro Perigo de corte a l mina do raspador afiada quando a tampa de seguran a se encontra retra da Utilize com extremo cuidado e guarde sempre em seguran a e fora do alcance da...

Страница 47: ...quados para a cozedura por indu o Consulte a sec o Escolher os utens lios de cozinha certos Centre a panela e certifique se de que a sua base corresponde ao tamanho da zona de cozedura Problema Poss v...

Страница 48: ...de Apoio ao Cliente de qualquer loja Worten Modelo ou Continente para obter assist ncia A Worten Equipamentos para o Lar fornece uma garantia contra defeitos de fabrico por um per odo de 2 anos a part...

Страница 49: ...ced and distributed by Importado producido y distribuido por Importado produzido e distribu do por Worten equipamentos para o lar S A Rua Jo o Mendon a n 505 4464 503 Senhora da Hora Portugal KIH3300...

Отзывы: