background image

7

Issue 01 MAR.19

SILICONE ALONG SHIM ONLY


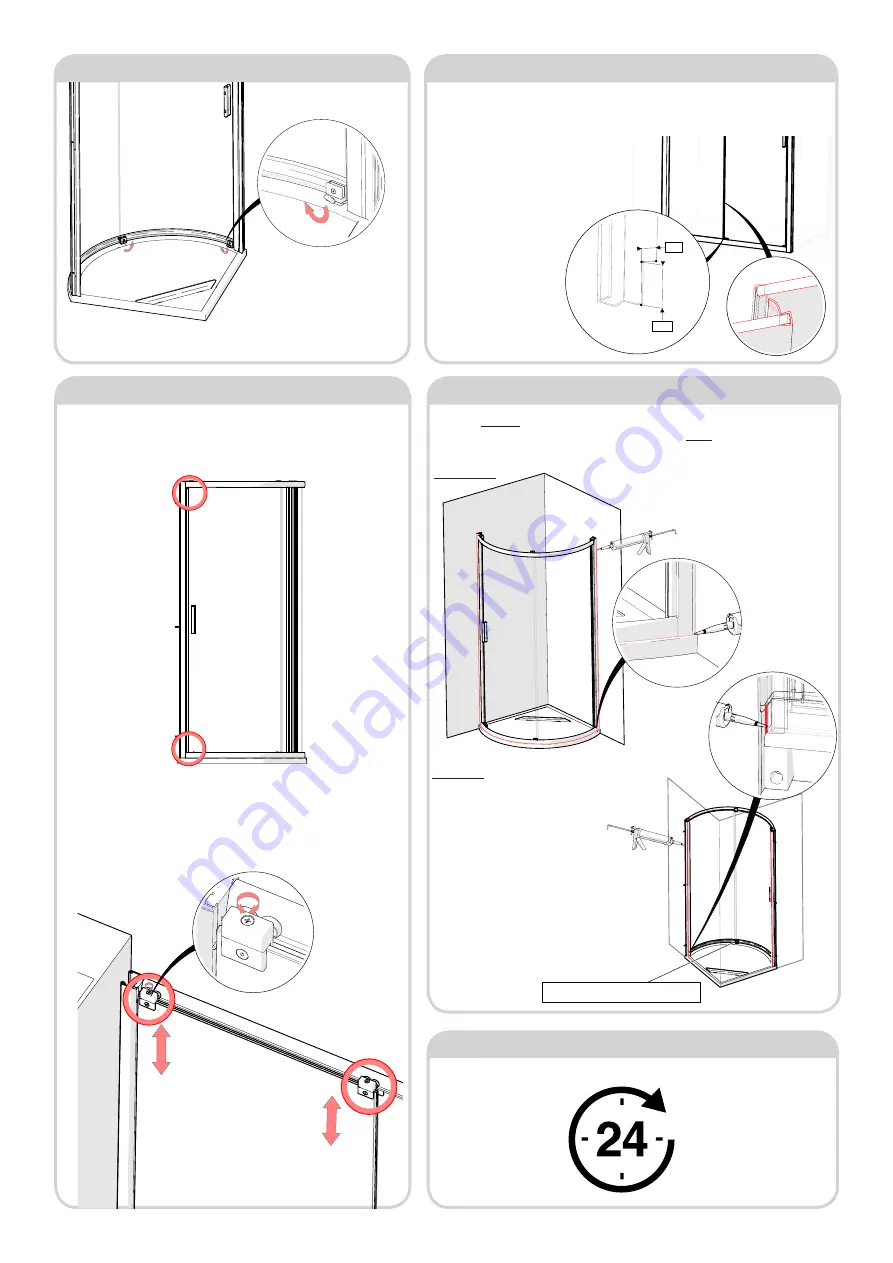
1.Looking from the outside of the enclosure, slide the door into the 
closed  position, with the glass pushed up against the wall post. Check 
the door  glass is level with the wall post down the entirety of its edge. 

2.If there is an uneven gap, the glass in the door can be adjusted either 
up or down at each corner with the rollers. Using ozi-head Screwdriver, 
loosen or tighten the bolt located on the top of each roller set. Each 

roller has around 6mm of adjustment, clockwise will lower the glass, 

anti-clockwise raises the glass.

Step 22 - Adjust Glass

1. On the 

outside, silicone around all three junctions with the wall and tray, and also 

on the frame where the sill meets the uprights. On the 

inside, only silicone along the 

two vertical junctions with the wall, and around the shim.

Step 24 - Silicone

Outside Only

Inside Only

Step 25 - Wait 24hr

1. Allow 24 hours before using the shower.

Do not silicone seal on the inside of 

unit (except where shown). Sealing 

the wall posts & sills to the tray on the 
inside can result in leakage problems- 
please note that, in use, water can 

penetrate into the frame extrusions- 

this has no detrimental effect to the 
product- however, this water must be 

allowed to drain out of the extrusions 
to the inside. Silicone down the wall 

posts wall junction, around the shim 

and at the bottom between the fixed 
glass seal and wall post.  

2. Turn the two release levers, until 

the slots in the rear arms of the 
release levers sits onto the bottom 
rail edge protrusion, holding the 

bottom of the door in-place.  

Step 21 - Fit Glass Door (continued)

Step 23 - Fit Overlap Seals

16mm

5mm

Bottom Notch

Cut

1. Take the ‘1873 Overlap Seal’ (PlexRF023), and fit to the edge of the fixed panel, 
with the soft ‘skirt’ facing the inside, in order to contact with the sliding door glass. 

Make sure the seal is fully sat fully down onto the glass clamp at the bottom of the 

fixed panel. 

2. Fit the 1912mm Overlap 
Seal (PlexRF023) to the 

inside edge of the sliding 
door glass panel, with the 

soft fin facing the fixed panel. 

Notch the top and bottom 

(approximately 16mm at 

the bottom, and 25mm at 
the top), to ensure a tight 
contact with the glass clamp 
at the bottom when in the 

closed position.

Содержание Original6

Страница 1: ...of white vinegar and water works well DO NOT use strong detergents abrasive cleaners or abrasive scrubbing equipment for cleaning these can damage the coating DO use a squeegee to remove remaining droplets of water from glass after showering any build up of residue can be removed easily using an appropriate cleaner and agitation from soft cleaning equipment Cleaning General Kudos LifeShield Glass ...

Страница 2: ...mbly 8 x No 6x30 PH S S Screws 2 x M276 01 Patch Guide Caps 1 x M73 02 Top Cap Left 1 x M73 01 Top Cap Right 1873 1912mm PlexRF023 Overlap Seals 1 x Fixed Panel Wall Post 1 x Door Panel Wall Post 2 x DCM 86 ASM Top Roller Assembly 1 x DCM 89 R ASM Bottom Guide Right 1 x DCM 89 L ASM Bottom Guide Left 3 Now take the right and left Bottom Guides and fit to the bottom left and right corners of the gl...

Страница 3: ...screw through the relevant holes in white plastic spacer blocks on the wall posts and into each screw port two screws for each corner of frame ensuring these are fully tightened by hand The side of the curved rails with the screwed in stop should be to the fixed glass panel side opposite to the door opening Also ensure that the curved rails are fitted flush with ends of each wall post Door Opening...

Страница 4: ...ing channel shown actual size Narrow Compensating channel shown actual size 1000 SIDE 1000 SIDE 810 SIDE 810 SIDE Wide Compensating channel shown actual size Wide Compensating channel shown actual size 2 For Step 20 identify left or right hand cover cap as appropriate to the top of Wide compensating channel VIEW FROM TOP LEFT HAND INSTALLATION VIEW FROM TOP RIGHT HAND INSTALLATION ...

Страница 5: ...ferent angled top faces in order to help keep the frame supported use the Shim M97 01 supplied On the inside of the enclosure measure the gap between the bottom of the rail and top of the tray select the height required from the shim strip supplied break off and insert under rail at fixed panel clamp position hole drilled on curved rail This will support rail when glass is fitted The shim will be ...

Страница 6: ...ost ensuring the panel is concentric with the rail and vertical to the wall post Tap the plastic profile firmly into groove of clip in extrusion along full length if this is not done the fixed panel glass may interfere with the door glass when this is installed Handing shown for example only Tip Use your foot to steady the bottom of the glass and prevent it slipping off the curved rail 2 Take the ...

Страница 7: ...osts sills to the tray on the inside can result in leakage problems please note that in use water can penetrate into the frame extrusions this has no detrimental effect to the product however this water must be allowed to drain out of the extrusions to the inside Silicone down the wall posts wall junction around the shim and at the bottom between the fixed glass seal and wall post 2 Turn the two r...

Отзывы: