


INSTALLATION
2
25
OPTISONIC 1400
www.krohne.com
10/2016 - 4005626301 - QS OPTISONIC 1400 R01 en
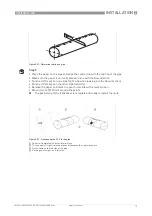
•
7
Position the transducer back to the mark Z (the transducer will be flush with the inner pipe
wall)
•
Check and tighten all
all
all
all the M16 bolts uniformly and in diagonally opposite sequence with a
torque wrench at 14 Nm (12 Nm for the M12 bolts).
i
8
The position of the transducer window is indicated at the end of the stem (close to the
conduit fitting) by a red line (A).
•
Continue with the next unit, following the same steps as previous described.
•
After installing both units (per path) the position of the transducer windows have to be aligned
(facing each other).
See next section, refer to
Alignment of the transducers
on page 26 for the aligning of the
ultrasonic sensors.
Refer to refer to
Electrical connections
on page 29or consult the OPTISONIC 1400 Manual for the
electrical connection of the cables to the connection box and the signal converter.
Figure 2-30: Installing the device; step 7 and 8


