English
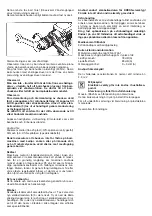
1 ON/OFF switch with full wave electronic control and
adjusting wheel for speed selection
2 Reversing switch
3 Mains cable module
4 Locking device for mains cable module
5 Auxiliary handle
6 Adjusting wheel for torque selection
Technical data
1055 HTC
Input
1050 W
Output
600 W
Full wave electronic control
Rotation right/left
No. of speed ranges
1
No-load speed r.p.m.
80–530
Load speed r.p.m.
530
Max. drill Ø into steel mm
16/6
Max. drill Ø into wood mm
70
Max. screwing Ø into wood mm
12
Max. screwing Ø into sheet metal mm
8
Collar diameter, Ø mm
43
Corner measure mm
34
Chuck dia., mm
13
Spindle thread
1
/
2
" x 20 UNF
Weight kg
2,3
Use
The drill is universally suitable for use as a drill and
screwdriver in wood, metal and plastic. Due to the low
speed it is ideally suited for mixing and stirring thin and
thick liquid materials, for drilling with very large drill ø and
for screwing screws into frames and raw plugs.
Safety instructions and prevention of accidents
Before operating the machine, please read through the
operating instructions completely, follow the Safety In-
structions in this manual as well as the general Safety
Instructions for Power Tools in the accompanying
booklet.
Warning!
This drill generates an extremely high amount of torque.
Always hold the drill firmly with both hands! Use auxili-
ary handles supplied with the tool. Loss of control can
cause personal injury.
Exercise particular caution when stirring thick and hig-
hly viscous materials. Ensure that the container is in
good condition and fixed in such a way that it cannot
be turned itself by the mixer!
Caution!
●
The unit may only be connected to the mains using
the original mains cable module.
●
Pay attention to the jamming moment of the
machine, e. g. if the drill jams or if the drill hits
concrete reinforcing steel and jams!
●
B
efore fitting tools in the chuck or drill spindle
dis-
connect the machine from the power supply, or re-
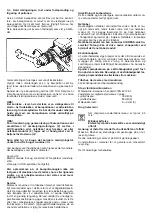
move the mains cable module (3) from the grip
using the locking device button (4)
!
●
Do not work with materials which contain as-
bestos!
●
Outside power sockets must be protected with re-
sidual-current-operated circuit-breakers (r.c.c.b.).
●
Do not drill holes into the housing to label the
machine. The protective insulation will be bridged.
Please use self-adhesive labels.
●
Always lead cables away towards the back of the
machine.
Double Insulation
Our equipment is designed in accordance with European re-
gulations (EN standards) for the utmost safety of the user.
Machines with double insulation always carry the internatio-
nal
symbol. The machines do require earthing. A two-core
cable is sufficient.
The machines are interference-suppressed in accordance
with EN 55014.
Initial operation
Before the first operation check that the mains voltage cor-
responds to that given on the machine nameplate.
Electronic speed control.
This machine has an integrated full wave electronic control
circuit built into the switch (1). The required speed may be se-
lected with the adjusting wheel (e.g. for serial screw drilling).
Position A = lowest speed
Position G = highest speed
As a safety precaution the switch assembly is designed
so that it is impossible to lock it for continuous opera-
tion.
The full wave electronic unit with tacho signal calculation
keeps the torque constant. Low rotational speed and high
torque makes the drilling machine ideal wherever high
power is a requirement, for example:
– when mixing or stirring particularly thick and highly vis-
cous materials,
– when drilling with very large diameters,
– when inserting screws in frames and wall plugs.
Ensure that the drill is not allowed to jam for longer
than 2–3 seconds. Longer jamming can lead to motor
damage.
Important!
Continuous operation under strong load and low speed
can overheat the motor. Allow the motor to cool down
in no-load when set at a high speed!
Electronic torque control (Torque-Control)
Thumbwheel (6) can be used to determine the amount of
torque acting upon the drill spindle.
1 = low torque
10 = maximum torque
When the preselected torque is reached during drilling, the
unit switches off and remains oft.
Changing direction of rotation
(main rotation – clockwise)
The direction of rotation of the spindle is altered by the re-
versing switch (2).
R = Clockwise (Right)
L = Anticlockwise (Left)
Important! Press the rotational direction switch (2) in
each case to the stop on the housing, i. e. until it can
be felt to engage.
The reversing switch can be easily operated using the
thumb and index or middle finger from both sides.
Attention!
Change direction of rotation only when the motor has
ceased turning! When in middle LOCK position, the
reversing switch prevents the accidental activation of
the full wave electronic switch (1), for example when
changing tools or assembling/disassembling the drill
chuck.
Quick-change chuck
This chuck has been specially developed for use on per-
cussion drills. The chuck has a release safety lock which
prevents any unintentional release of drilling tool even at
high impact frequencies. Operation by turning collar as


