Type
RA-2 HV3
Operating Instructions
DOK-208-GB.doc
No. 0920-..,
0921-...
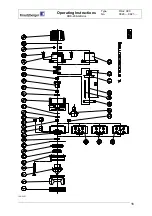
Pull out parts (38 to 42)
Unscrew the seal screw (28)
Remove the gasket (29) on the air side
Remove the gasket (21) on the material side
Insert new gaskets (ensure correct fit!)
Material gasket (material needle)
Unscrew the screws (11)
Pull off the control section (26)
Remove the washer (25), guide ring (24) and gasket (21)
Insert new gasket (21) (ensure correct fit!)
Material and air nozzle
Unscrew the clamping nut (1) or the jam nut (2)
Remove or unscrew the air nozzle (3-6)
Unscrew the material nozzle (7-10)
Assembly is performed in the reverse order. Lightly lubricate the moving parts using a
suitable grease, e.g. article no. 7026-120-0351 from Krautzberger GmbH (supplied in 250 g
cans)
Notes
Always change the material nozzle (7 to 10) and the material needle (39 or 40) together!
Occasionally check the moving parts for free range of motion and lubricate with grease if
onecessary!
8.
Operating breaks, cleaning, maintenance
Wearing parts such as material nozzle (7 to 10), air nozzle (3 to 6), material needle (39 or
40), material needle gaskets (21 and 29), guide ring (24) and other gaskets as well as
fastening components should be checked at appropriate intervals and replaced if necessary
(e.g. if the material needle does not close sufficiently or if there is uncontrolled discharge of
coating substance or air, or displacement of the automatic spray gun on the fastening
device).
Caution
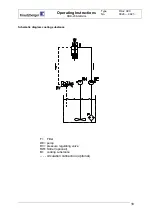
Close the supply of control, circular jet and flat jet air as well as the material feed during
maintenance and repair work.
Notes
The automatic spray gun type RA-2 HV3 is never to be dismantled into its individual parts
except when this is necessary for repair or maintenance purposes. When cleaning and
during material change, the gun should be rinsed through using a detergent recommended
by the supplier of the coating substance until it is discharged clear.
The automatic spray gun RA-2 HV3 should never be completely immersed in detergent!
This could destroy the gaskets and rinse out the lubricant.
9


